
Pumpkin Sourdough Bread
, Updated Oct 30, 2025
This post may contain affiliate links. Please read our disclosure policy.

This Pumpkin Sourdough Bread is fragrant with spices, subtly sweet and shaped like a pumpkin! A fun and easy (I promise!) sourdough bread recipe that’s perfect for fall.
New to Sourdough? Try my Overnight Sourdough recipe.

Meet your new fall ritual: Pumpkin Sourdough Bread! Real pumpkin purée gives the dough a gorgeous golden hue and subtle sweetness, while a whisper of warm spice makes the whole kitchen smell like October.
And to go the extra mile, we will be shaping our sourdough like a real pumpkin. It is adorable and perfect for Halloween or Thanksgiving celebrations!
I used a variation of my super-easy Overnight Sourdough recipe. I added canned pumpkin, honey and plenty of warming spices to create a bread that’s slightly sweet, aromatic and perfect for breakfast. The pumpkin flavor is quite subtle and not overpowering.

Pumpkin Sourdough Ingredients
- Mature sourdough starter –if you haven’t got your own you can buy sourdough starter online or from a local bakery. If you happen to live close by just knock on my door!
- Canned Pumpkin Purée (100% pumpkin) not “Pumpkin Pie Filling”!
- Honey, maple syrup or sugar to add a hint of sweetness. This is very subtle, it is NOT a sweet bread.
- Pumpkin Spice and a little ground turmeric (to add color) or you can use ground cinnamon, ginger and cloves
- Flour – high protein flour I have used white bread flour
- Salt – ideally fine sea salt
- Water – filtered, bottled or boiled tap water left to cool
Essential tools
- Digital scales are needed for accurate measuring. I have given measurements in cups as well, but weighing your ingredients will yield better results!
- Bowl or a banneton basket for proving the dough
- A lame, razor or sharp knife for scoring the bread.
- Cast iron pot – I have used my trusty Greenpan Dutch Oven which is lighter and easier to use
- Dough whisk is very useful!
- String (food safe cotton string) to create the pumpkin shape

How to Make Sourdough Pumpkin Bread
Prepare the dough
- Mix the sourdough starter and water together in a large mixing bowl – I use my dough whisk for this. Add the honey or maple syrup, pumpkin purée, pumpkin spice and salt. Mix well.

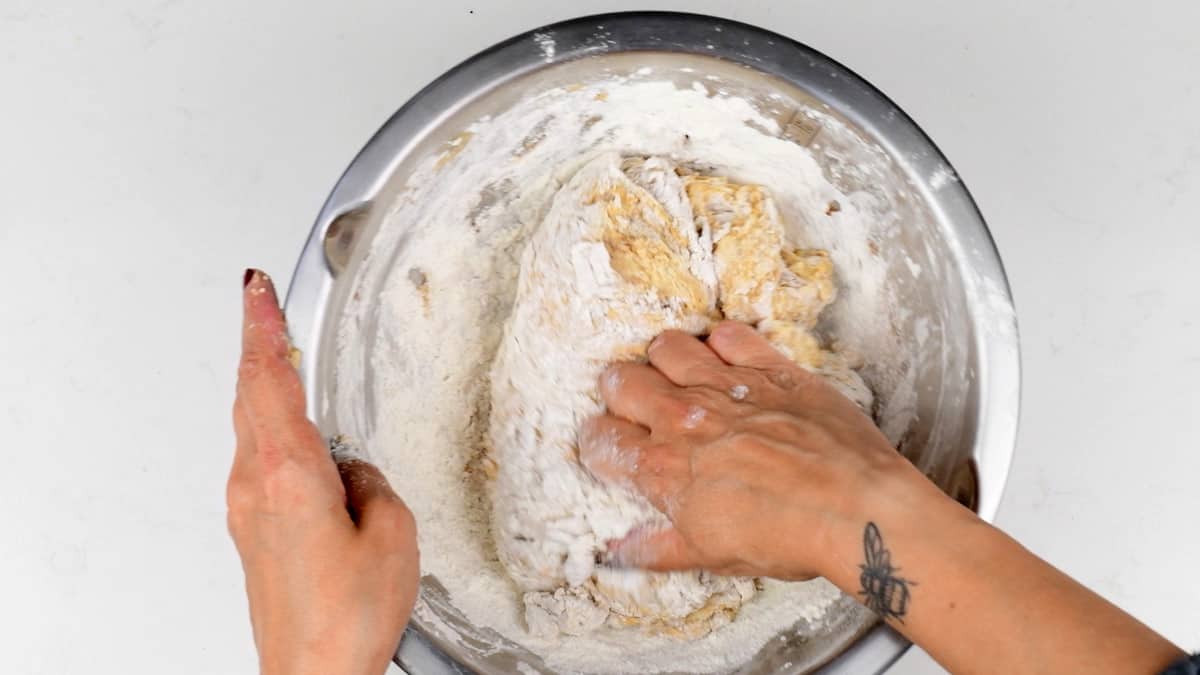
- Add the flour and mix well with the dough whisk or your hands until you have a shaggy, slightly sticky dough. If the dough is really sticky add a little flour, a tablespoon at a time and work it into the dough. Cover the bowl and leave for 30 minutes.
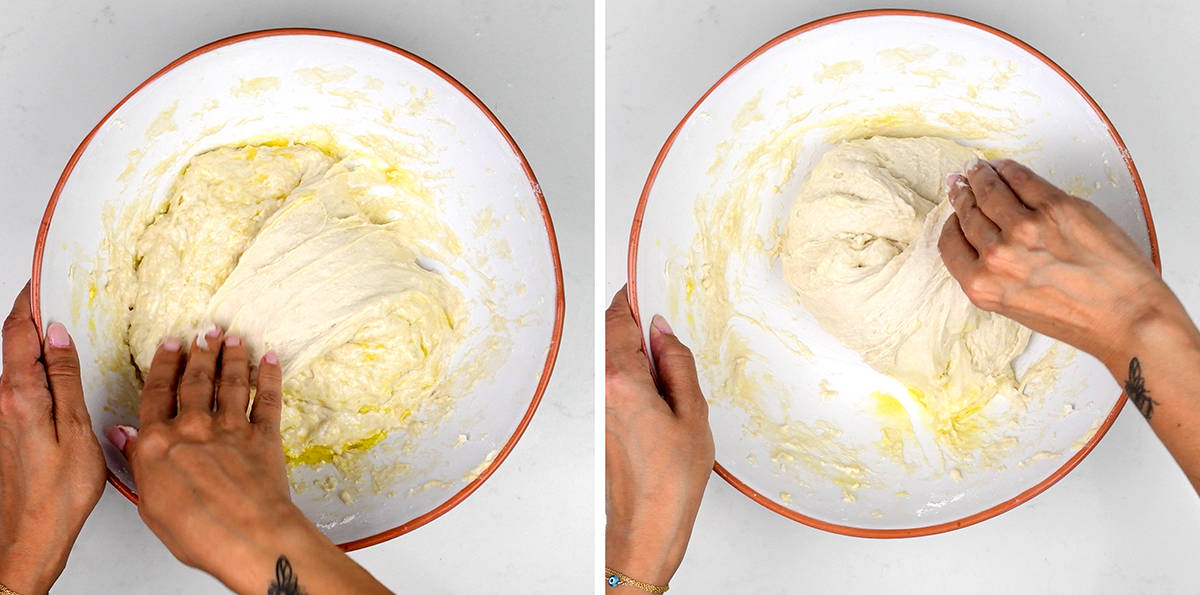
- STETCH AND FOLD Pull a section of the dough from the underside and stretch it upwards. Fold this over the rest of the dough. Rotate the bowl as you do this so that you stretch the entire dough. Repeat every 30 minutes for two hours or just the once. I am quite lazy when it comes to sourdough baking (eek!).
Bulk fermentation (first rise)
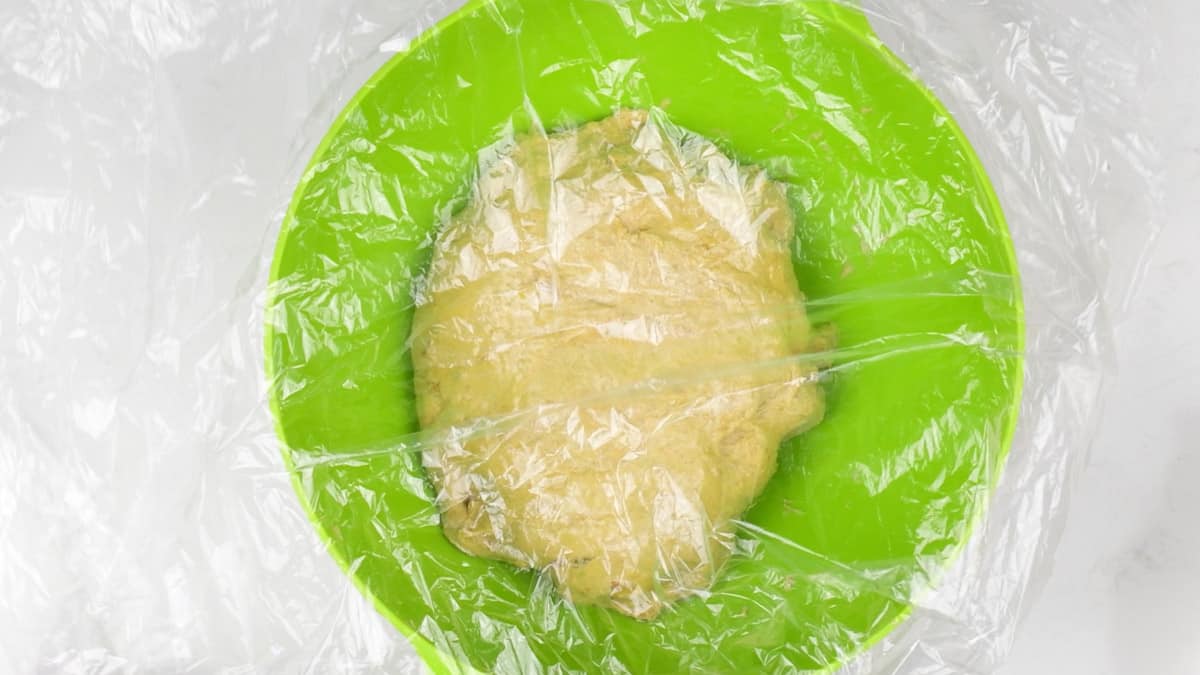
- Cover the bowl and leave the dough to rise at room temperature overnight (8-10 hours) or in the fridge (10-14 hours). The temperature in your kitchen will greatly affect the proving time. Slower fermentation is thought to result in better flavor!
Second rise
- Take a look at your dough – it should have risen in the bowl to almost doubled. Mist your worktop with water and scrape the dough onto it – do not punch the dough down.
- Gently stretch the dough to form a rectangle then fold it into thirds (letter fold).
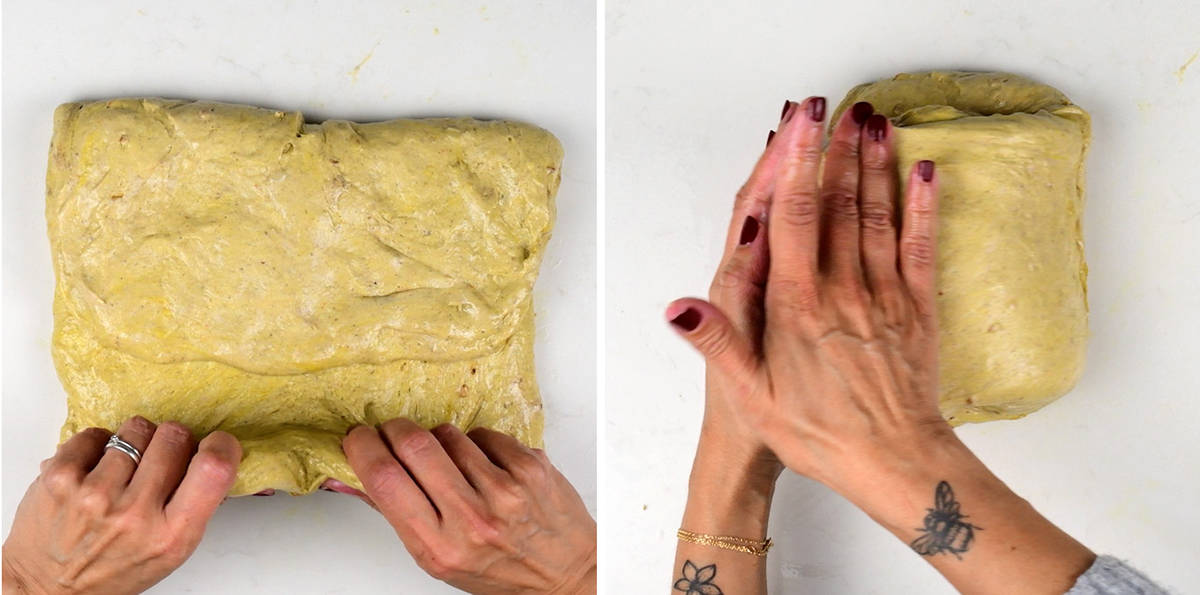
- Roll the dough into a tight ball and shape into a round loaf using your hands and a bench scraper to aid you. Dust with gluten-free flour and smooth it over the loaf.
- Transfer into a banneton basket or a round bowl and let rise for 30-120 minutes. Check your loaf is ready to bake by gently prodding with a finger. If the indent springs back slowly leaving a small dent then you are ready to bake. If it springs back really quickly you need to allow it to rise for a little longer.


TIP: If you are using a banneton for the first time, you muse to prep it before first use.
How to Make a Pumpkin-shaped Sourdough Loaf
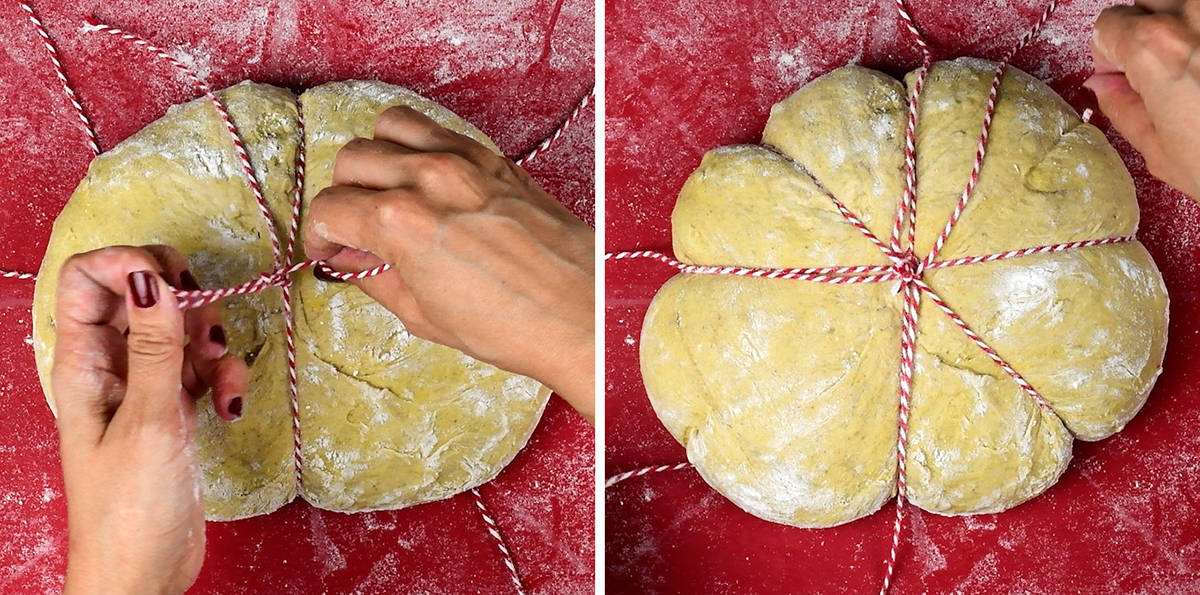
You can use any type of sourdough loaf and shape it in this way. You will need some food safe cotton string, parchment paper and a cast iron pot (Dutch Oven) to bake the bread in. I tied my sourdough with baker’s twine but a plain cotton string is much better!
- Cut four pieces of string, about 24 inches long. Dip the string in vegetable oil and run between your fingers to get rid of excess oil.

- Position the strings on top of a round piece of parchment paper or a silicone bread sling. Place the loaf in the centre and tie the strings (not too tightly, to allow for the bread to expand as it bakes) over the loaf so that it is divided into eight equal sections.
- Cut any excess string. Use a razor to slice the loaf in whatever pattern you like. I found the relatively shallow cuts are better for this tied up loaf.
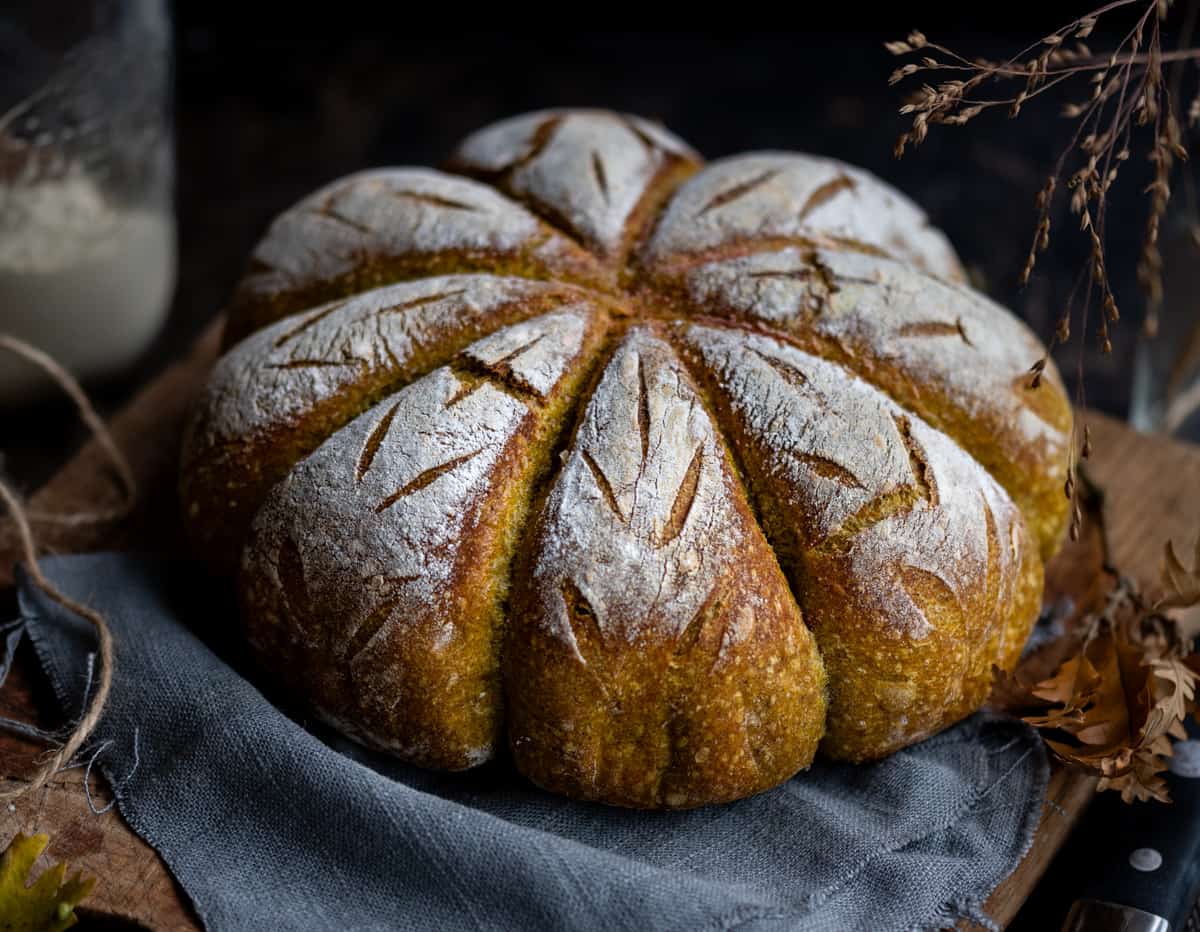
- Bake in a preheated oven for 45 minutes, or until the internal temperature is just above 205°F / 95°C. Let the bread cool down, uncovered, for at least an hour or until it no longer feels warm to the touch. Snip the strings and gently remove (best to cut them into sections rather than pull them whole).
Storing Sourdough Bread
This pumpkin sourdough has a lovely crisp crust and is best toasted and slathered with salted butter and maybe some apple butter! Cover the cooled loaf in a clean tea towel and store at room temperature – the bread will keep for 2-3 days but it is much better eaten fresh!I prefer to slice the entire loaf and then freeze it – that way you can toast slices directly from frozen whenever the fancy takes you.
An active sourdough starter should double in size and be bubbly within a few hours of being fed. To check whether it is ready, add a spoonful of active starter to a glass of tepid water – if it floats you are good to go! If it sinks it’s not quite there yet – this is called the float test.
Make sure to use 100% pumpkin purée and not pumpkin pie filling – the cans look quite similar so it’s an easy mistake to make!
Yes you can but bear in mind it needs to be quite concentrated otherwise the hydration ratio will be affected. You can strain the purée to reduce excess water or cook it for a little longer to make sure has a similar density to canned pumpkin. If in doubt, hold back some of the water and add as needed to make the dough easier to handle.
A preheated Dutch oven creates the high-heat trapped steam baking environment of a commercial oven. The steam keeps the crust soft during the first 20 minutes of baking so your sourdough can rise tall. If you don’t have a Dutch oven, you can bake your sourdough on a preheated pizza stone covered with an inverted oven-safe pan for the first 20 minutes.

👉 If you bake my Pumpkin Sourdough Bread recipe, please leave a rating and comment – it helps more people find the recipe. Don’t forget to also tag me on @Instagram or TikTok so I can see (and share!) your amazing bakes.

Pumpkin Sourdough Bread
Video
Equipment
Ingredients
For your starter
- 50 g (scant ¼ cup) mature starter room temperature
- 50 g (scant ¼ cup) flour
- 50 g (scant ¼ cup) tepid water (filtered, bottled or boiled and cooled tap water)
For the sourdough loaf
- 100 g ( 3 ½ oz) active starter (most of the starter you prepared earlier)
- 300 g (1 ¼ cups) water (filtered, bottled or boiled and cooled tap water)
- 100 g ( 3 ½ oz) canned pumpkin purée
- 3 tbsp honey or maple syrup
- 1 tbsp pumpkin spice
- 2 tsp ground turmeric (this adds color)
- 12 g (2 scant teaspoons) sea salt
- 500 g (4 cups) white bread flour , more as needed
- 3 tbsp olive oil for the bowl
- 3 tbsp olive or vegetable oil for the kitchen string
- rice flour or gluten free flour for the bowl or banetton, as needed
Instructions
Feed Your Sourdough Starter
- Feed your mature starter. Leave for 4-6 hours, or until doubled in size, bubbly and floating in water (float test).50 g (scant ¼ cup) mature starter, 50 g (scant ¼ cup) flour, 50 g (scant ¼ cup) tepid water
Prepare The Dough
- Mix the starter and water together in a large bowl. Add the pumpkin purée, spices, salt and honey and mx well.100 g ( 3 ½ oz) active starter, 300 g (1 ¼ cups) water, 100 g ( 3 ½ oz) canned pumpkin purée, 3 tbsp honey or maple syrup, 1 tbsp pumpkin spice, 2 tsp ground turmeric, 12 g (2 scant teaspoons) sea salt
- Add the bread flour and mix well with the dough whisk or your hands. It’s easier to have a feel for the dough if you use your hands. You will have a shaggy, slightly sticky dough. Cover the bowl and leave to rest for half an hour.500 g (4 cups) white bread flour
Stretch and Fold
- Pull a section of the dough from the underside and stretch it upwards. Fold this over the rest of the dough. Rotate the bowl as you do this so you stretch the entire dough. You can do this a few times – every 30 minutes for two hours or just the once.3 tbsp olive oil
- Transfer the dough into an oiled bowl, cover and leave to rise at room temperature for 6-10 hours. If it is a hot night then place the dough in the fridge where it will need 10-12 hours.
Shape The Sourdough
- The following day take a look at your dough – it should have almost doubled. Mist your worktop with water and scrape the dough onto it – do not punch the dough down. Gently stretch the dough to form a rectangle.
- Fold into three sections, like a letter. Roll the dough into a tight ball.
- Flip over, seam side down, and shape into a round loaf (known as a “boule”). Use your hands and a bench scraper to roll the loaf in your hands, slightly tucking the edges under as you go (please check the video for a demo).
Second Rise
- Line a bowl or basket with baking paper and lightly dust the paper and your loaf with gluten free flour or rice flour to prevent the bread from sticking to the paper. Cup the loaf in your hands and place into the prepared bowl seam side down.rice flour or gluten free flour
- Leave the dough to rise again for 30-120 minutes. Check your dough is ready to bake by gently prodding with a finger. If the indent springs back slowly leaving a small dent then you are ready to bake. If it springs back really quickly you need to allow it to rise for a little longer.
Shape your loaf
- Cut four pieces of cotton string, about 24 inches long. Dip the string in vegetable oil and run between your fingers to get rid of excess oil. Position the strings on top of a round piece of parchment paper (cut so that it fits your Dutch Oven).3 tbsp olive or vegetable oil
- Place the loaf in the centre and tie the strings (not too tightly, to allow for the bread to expand as it bakes) over the loaf so that it is divided into eight equal sections.
- Cut any excess string. Use a razor to slice the loaf in whatever pattern you like. I found the relatively shallow cuts are better for this tied up loaf.
Bake your Sourdough
- Preheat your oven to 450F (230C) half an hour before the end of proving. Place a lidded pot (Dutch Oven) in the oven to preheat.
- Remove the pot from the oven using pot holders (please be very careful). Place the loaf into the pot, lifting it by the baking paper.
- Cover and bake for 20 minutes. Reduce the temperature to 425F (220C). Take the lid off the pot and cook for another 20-25 minutes. You can lift the bread out of the pot and cook directly on the oven shelf for the final 5 minutes.
- Leave the bread to cool, uncovered, for at least an hour or until it no longer feels warm to the touch. Remove the strings and boast about your pumpkin shaped sourdough!
Notes
Cover the cooled loaf in a clean tea towel and store at room temperature – the bread will keep for 2-3 days. I prefer to slice the entire loaf and then freeze it – that way you can toast slices directly from frozen whenever the fancy takes you.
Nutrition
Nutritional information is always approximate, and will depend on quality of ingredients and serving sizes.


I love this recipe! I’ve made it a few times now, I only used a scant half teaspoon of turmeric though, and that was plenty for me, to provide both color and flavor. The flavors of this bread are very warm and autumnal, and go perfectly with a bowl of soup!
I made this already but when I followed your proofing I got no rise. I’m going to make it the same way but instead I will follow how I proof all my other sourdough. I do one slap n fold rest then repeat coil folds. with a 30 min rest each time. do that 3 more times. then I proof in my proofing box for about 5 hours at 79°f. I usually see my sourdough rise almost by half. then I do the final forming and into my t-shirt line bowl dusted with flour then into the fridge over night. I then bake in the morning.
I want to add that it was delicious 😋 when I first made it. why I want to play with the recipe a bit. I forgot to mention I substitute 150 grams of white flour with rye this time while I try proofing a different way.
This dough was beautiful to work with.. but like many others I found the turmeric overpowering and was wishing I omitted it all together or pulled back to 1/2 teaspoon or less. I rose it overnight, shaped in the morning, and baked by lunch. It rose nice and was so easy to shape like a pumpkin– just wishing there was less or no turmeric.
Thanks!
Hi! What a lovely bread.
Hi, Lucy:
What brand is the dough whisk in the pictures? The provided link is to a different style than the one pictured.
Laura
Hi Laura, it’s this one KitchenCraft Home Made Brodpisker Hand Dough Mixer/Danish Dough Whisk, Stainless Steel, 36 cm https://www.amazon.co.uk/dp/B00N4RKDYE/ref=cm_sw_r_cp_apip_CgZeNZEWWcAYn
Thank you! What is your opinion of the whisk?
I love it I use it all the time!
This was a good pumpkin loaf. I baked mine in a loaf pan so it could be used as breakfast toast. For me there was too much Turmeric added. It gave an odd smell and flavor in the bread. If I make it again I will pull back the turmeric and add in some other spicers.
I agree with the strong tumeric smell. May be too much. I’ll add some raisins and more pumpkin spice.
I added the flour for the initial recipe based on weight and there was still a half a cup to a cup of flour left over. After the overnight rise , Now the dough is still so sticky and wet with no form to it. So I added another cup of flour. Any other recommendations as it seems so wet?
Flour has different absorption rates but having said that your dough should be sticky but not so wet you can’t shape it.
My strings are all inside the bread after baking. How in the wirld do I get them out?
Wait until bread cools then cut the string and pull them out (gently). Don’t pull the entire length of string off, cut into smaller pieces
This was great!! I shaped it into a ball and stuck it in the fridge overnight then just took it out for 20min and baked it and it turned out really nicely. Next time I’ll try the strings. A slice with peanut butter and honey tastes awesome!
So awesome to hear!
Thanks for sharing, this looks a lovely loaf 🙂