
Easy Wholemeal Bread Recipe
, Updated Oct 13, 2022
This post may contain affiliate links. Please read our disclosure policy.
This Wholemeal Bread Recipe is super-easy, no knead and perfect for beginners. Ready to bake in two hours and absolutely foolproof. Nothing beats freshly baked homemade bread!
This recipe is naturally Vegan and Dairy Free.
Post may contain affiliate links. For more information, check my disclosure
If you love homemade bread but are scared of long-winded recipes and baking with yeast then you have come to the right place!
This wholemeal bread recipe is so fuss-free and EASY that a child can make it. All you need is a large bowl, a spoon and five ingredients. Ready to bake? Let’s go!
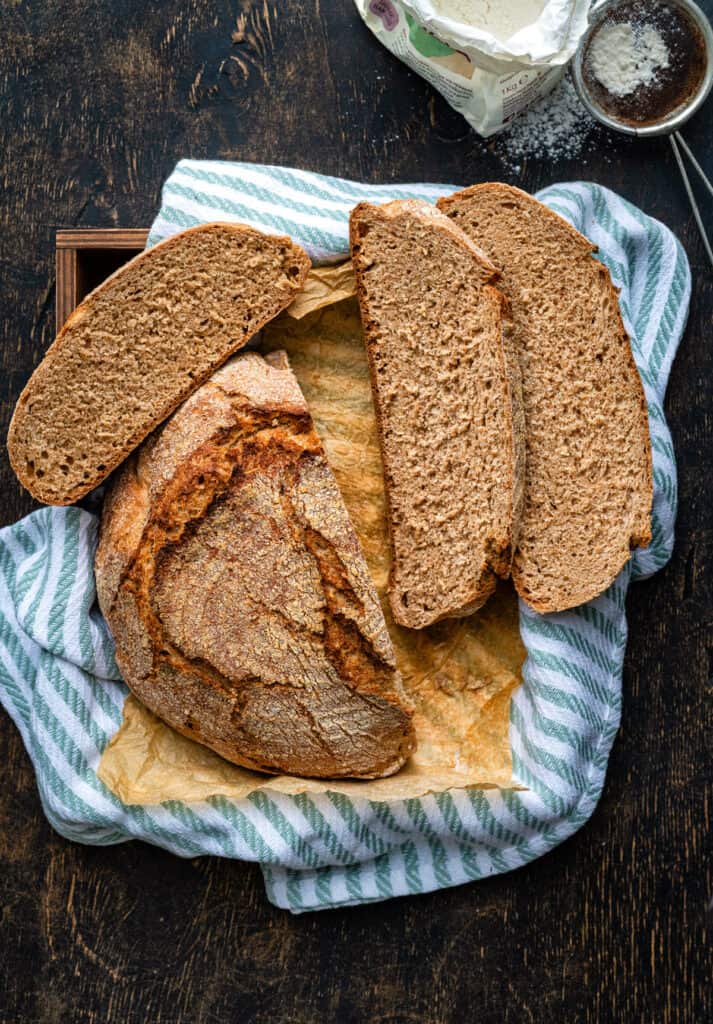
No Knead Wholemeal Bread (Whole Wheat Bread)
This wholemeal bread recipe requires very little hands-on time. You can mix and prove the bread in two hours while you get on with your day.
You don’t need fancy equipment – just a bowl, a spoon, scales and a cast iron pot (Dutch Oven) to bake the bread in.
Wholemeal bread can be made with 100% wholemeal flour or with a mix of whole wheat and white flour.
Any bread made with 100% wholemeal flour will be a bit dense, and have a rougher texture than white bread. If you love the taste of wholemeal then this is a fibre-rich and healthier bread option.
Once you master this basic recipe you can start freestyling and adding herbs, nuts, seeds and different types of flour to create your own unique bread recipe.
Wholemeal Vs Whole Wheat
This one is easy. Wholemeal flour is the same thing as whole wheat flour and whole grain flour – the first term is used commonly in the UK while the latter in North America.
Wholemeal flour is made using the whole of the wheat kernel, including the bran, making it higher in nutrients and fibre.
You can make this recipe using strong bread flour or plain wholemeal flour. Other types of flour can also be used such as whole spelt flour or malted brown flour.
Wholemeal bread is by nature a bit rustic with a crisp crust and soft but dense crumb.
USEFUL EQUIPMENT
- A bread whisk, dough scraper and dough scoring lame kit (totally worth getting if you are planning to do a lot of bread baking)
- A banneton proving basket (not essential you can use a bowl)
- A cast iron Dutch Oven is ideal for in this recipe
HOW TO MAKE WHOLEMEAL BREAD
Full measurements and instructions can be found on the printable recipe card at the bottom of the page. Please take a look at the steps and video before attempting this recipe!
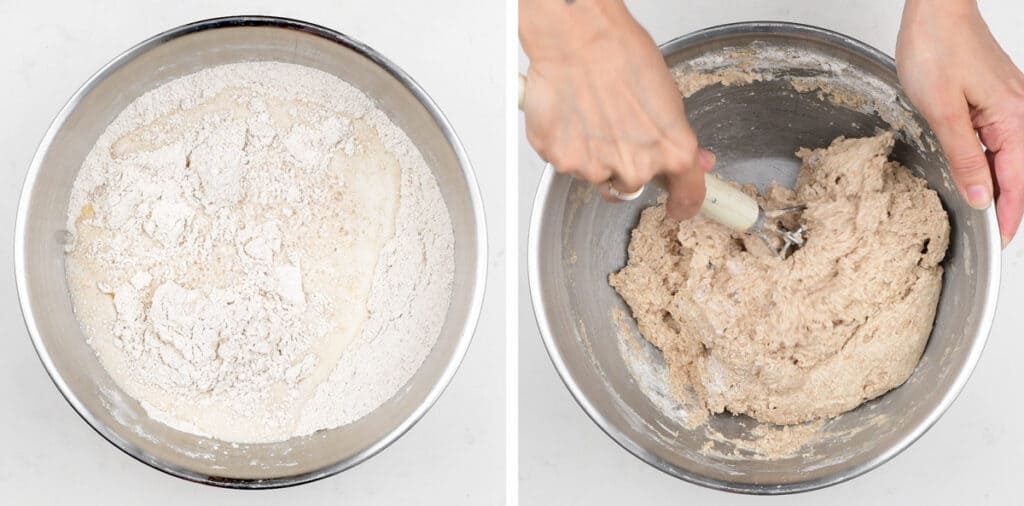
Measure the flour in a large mixing bowl. Add yeast, sugar and salt. Stir to combine the dry ingredients. Pour the water into the bowl and mix it in with a spoon or a dough hook until thoroughly combined. You should have a sticky, shaggy dough.
Cover your mixing bowl with a clean kitchen towel and place in a warm place to prove for 1 hour or until it has doubled in size. On a cold day it can take up to 90 minutes for the dough to rise.
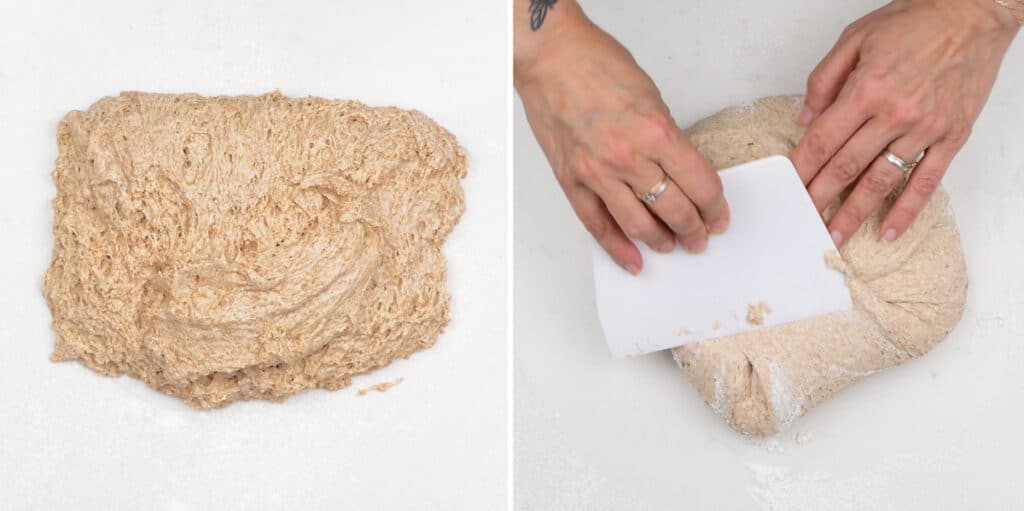
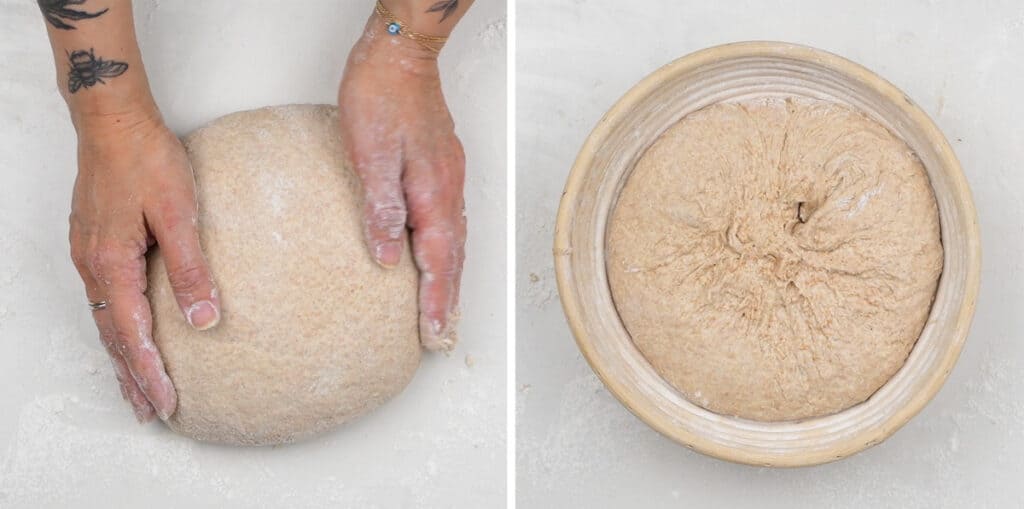
Sprinkle the worktop with plenty of flour (I use gluten-free flour for this purpose). Tip the dough on it and sprinkle with a little flour – it will be sticky. Line a bowl with baking paper and dust with flour. Alternatively use a prepped banneton basket dusted with gluten-free flour.
Use a pastry scraper to fold the edges over towards the centre to create a round loaf.
Liberally sprinkle with flour and carefully cup the loaf in your hands to transfer into the prepared bowl seam side down (If using a banneton basket place seam side up). Loosely cover and allow it to rise again for about an hour.
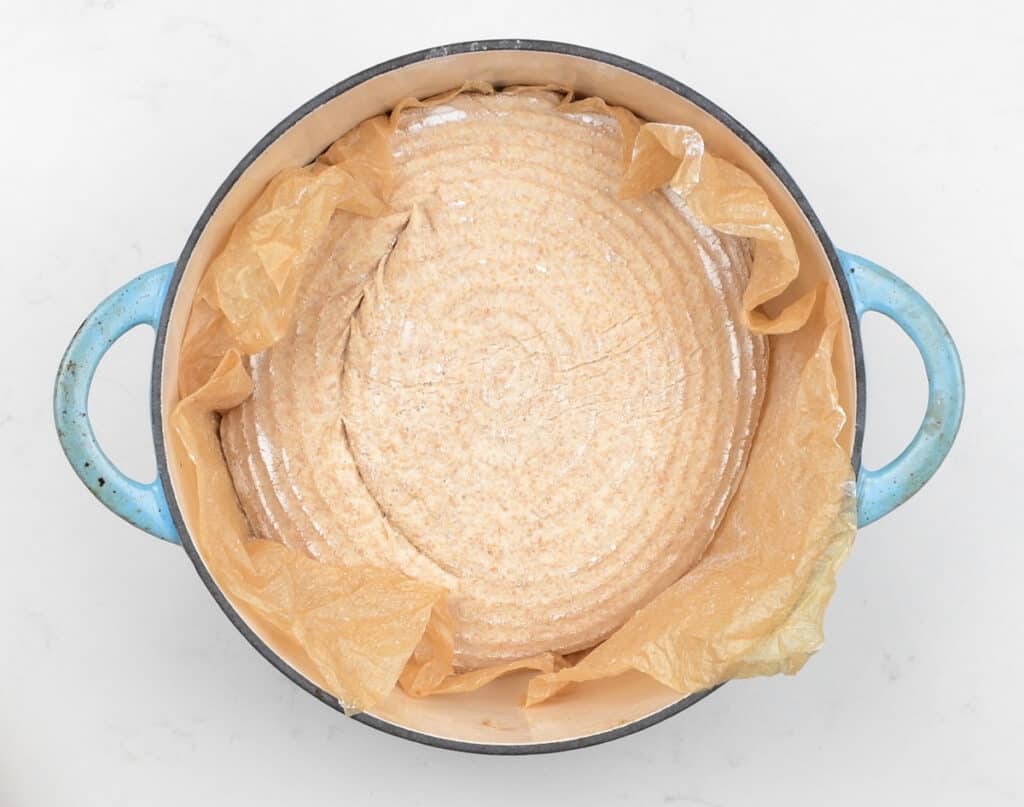
Preheat the oven to 220°C (420°F) and place a cast iron pot on a lower shelf to preheat for at least 30 minutes while the bread is having its second rise.
Slice the bread using a sharp knife or lame. Carefully remove the pot from the oven (it will be very hot so use oven mitts or pot holders). Lift the bread out of the bowl using the baking paper and drop into the pot. Cover and bake for 30 minutes.
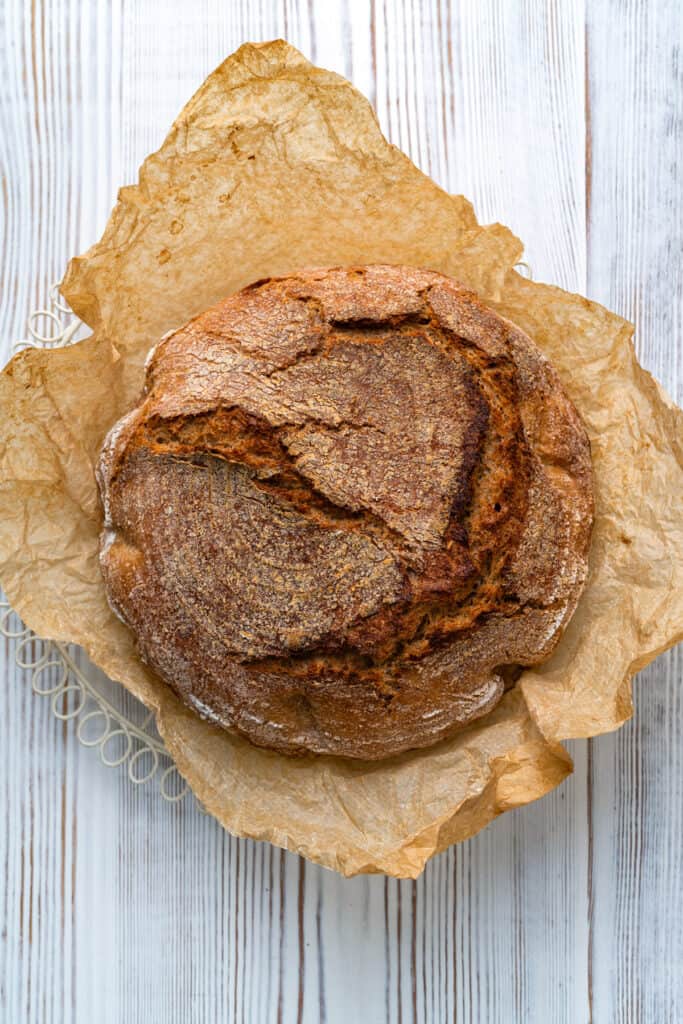
Uncover and bake for 15 more minutes. Carefully remove the bread from the pot – it should sound hollow if tapped on the underside. Cool completely on a wire rack before slicing. Enjoy!
Storing Wholemeal Bread
Homemade bread is always best when freshly baked. It will not last as long as commercially produced bread which is usually full of preservatives.
The best way to store the bread is to slice it and freeze it then simply toast the bread from frozen whenever you fancy a slice.
You can also freeze the whole loaf, as soon as it has cooled down completely, then refresh the bread in the oven. Wrap it well in two layers of foil and freeze for up to three months.
Place the frozen loaf, still wrapped, in a 200°C (400°F) oven for 15–20 minutes, remove the foil and place directly on the oven shelf for about five minutes. Voila – freshly baked bread!
Tips for bread baking success!
- Make sure your yeast is fresh by checking the use-by date. I use rapid rise yeast in all my bread baking. This type of yeast is mixed directly into the flour and doesn’t require activation. An old packet of yeast that has been gathering dust for years will not work!
- Use lukewarm water (or any liquid) in your bread dough as it will help activate the yeast. Hot water will kill the yeast while cold water will delay the proving.
- The temperature in your kitchen will affect how long it takes for the bread to rise. Cover your mixing bowl with a clean towel or a shower cap and put in the oven (without turning it on!) with another bowl of hot water. The steam from the water will create the perfect warm environment for the dough to prove.
- Do not slice the bread while it is still warm. While it is tempting to immediately tuck in to your fresh bread, slicing it while warm will create a gummy texture.
- How to tell if you bread is cooked: tap the underside of the loaf – it should sound hollow.
Serving Suggestions
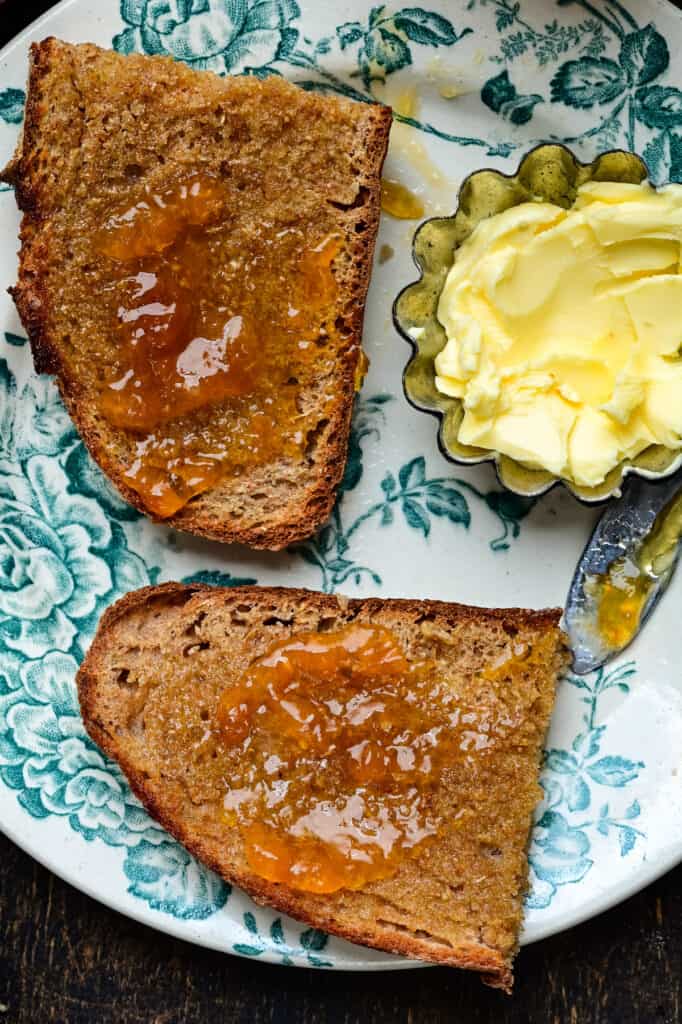
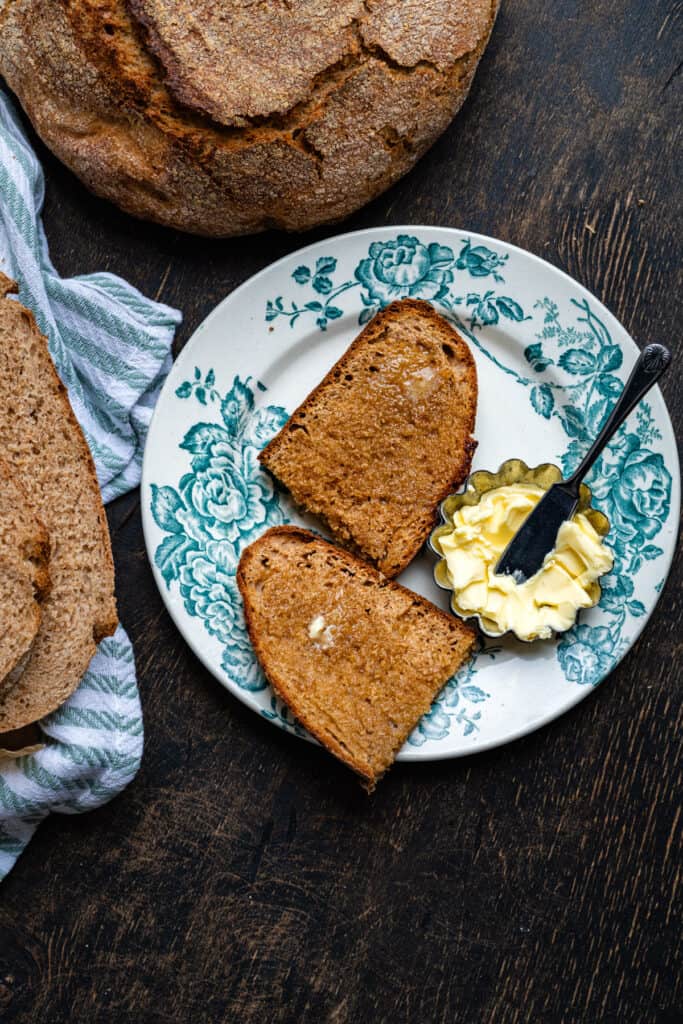
I love a slice of wholemeal Bread toasted and spread simply with butter or homemade jam (try my easy blackberry jam recipe). It is also delicious topped with sandwich fillings, like my salt beef or homemade pastrami.
Serve with homemade soup for a hearty and healthy lunch. Why not try my Hearty Vegetable Soup or the always popular Sweet Potato, Chickpea and Red Lentil Soup?
Have your made my wholemeal bread recipe? Please leave a rating, post a photo on my Facebook page, share it on Instagram, or save it to Pinterest with the tag #supergoldenbakes and make my day!

Wholemeal Bread Recipe
Video
Ingredients
- 4 ½ cups (570g) whole wheat flour plus extra for dusting and worktop
- 2 tsp rapid rise yeast see notes if using dry active yeast
- 2 cups (500ml) lukewarm water or beer
- 2 tbsp sugar , or maple syrup
- ½ tbsp salt
Instructions
- Measure the flour in a large mixing bowl. Add yeast, sugar and salt. Stir to combine dry ingredients.
- Pour the water into the bowl and mix it in with a spoon or a dough hook until thoroughly combined. You should have a sticky, shaggy dough.
- Cover your mixing bowl with a clean kitchen towel and place in a warm place to prove for 1 hour or until it has doubled in size. On a cold day it can take up to 90 minutes for the dough to rise.
- Sprinkle the worktop with plenty of flour. Tip the dough on it and sprinkle with a little flour – it will be sticky (that’s how it should be). Line a bowl or banneton basket with baking paper and dust with flour.
- Use a pastry scraper to fold the edges over towards the centre to create a round loaf.
- Carefully cup the loaf in your hands and transfer into the prepared bowl seam side down or the banneton seam side up. Loosely cover with a plastic bag.
- Preheat the oven to 220°C (420°F) and place a cast iron pot on a lower shelf to preheat for 30 minutes while the bread is having its second rise.
- Slice the bread using a sharp knife or lame. Carefully remove the pot from the oven (it will be very hot so use oven mitts or pot holders).
- Lift the bread out of the bowl using the baking paper and drop into the pot. Cover and bake for 30 minutes.
- Uncover and bake for 15 more minutes. Carefully remove the bread from the pot – it should sound hollow if tapped on the underside. Cool completely on a wire rack before slicing
Notes
Nutrition
Nutritional information is always approximate, and will depend on quality of ingredients and serving sizes.


Can you make this with Soughdough starter or discard?
Yes of course – take a look at this recipe for adapting the ingredients https://www.supergoldenbakes.com/quick-sourdough-yeast/
Simple and nice
The dough isn’t just loose and sticky it’s downright too liquid. The ratio of water to flour is completely incorrect. Maybe 400ml tops. I added mine in small amounts to ensure it was the right consistency at the end. I can’t give this any rating as it’s incorrect.
The absorbance rate of flour can vary depending on type of flour, elevation and humidity. The amount of liquid has worked for me and the people who have made and rated the recipe. I will make a not to say you might need to adjust the liquid amount
My dough was very runny is the water level correct as I measured everything that was asked for. Turned out a complete fail
Hi Derek – yes it is correct. The flour type and even moisture levels and altitude can affect the flour to water ratio. However this is a no knead bread and it is meant to be on the runnier side, not a stiff dough. If your dough is VERY runny then it is ok to add more flour, a tablespoon at a time until it becomes a bit easier to handle. You can also add the water gradually holding some back to add if needed. Take a look this recipe also https://www.supergoldenbakes.com/wordpress/two-hour-no-knead-bread-recipe/
Is this water content correct? My dough is very runny
Hi Kevin, yes the dough should be quite loose and sticky. You can add flour when shaping it. If it is far too runny you can work in some extra flour