
Very vanilla mini cakes

, Updated May 21, 2025
This post may contain affiliate links. Please read our disclosure policy.
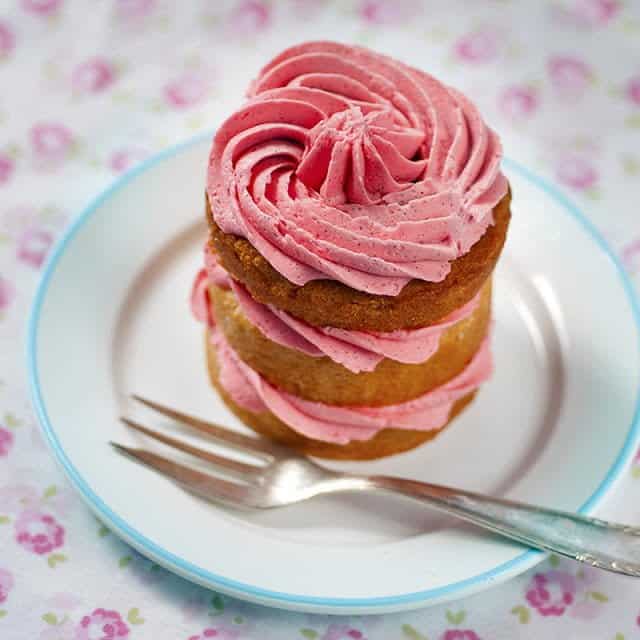
My little Anya Banana (a.k.a Banana Bread, Banana Muffin or Muffin) is turning 7 in less than a month. Birthday party preparations are in progress… This roughly translates as me panicking about venue, theme, invitations etc. and baking furiously as a kind of hysterical displacement activity.
These mini cakes are the result of my procrastination but, in their defence, they would be ideal to serve at a birthday party. You could even have the children go mad decorating them.
I baked these in tin cans in a moment of inspiration (=complete madness). I was not sure whether it would work, but it did and the size and shape is perfect. You could bake the batter in a sheet pan and then cut the circles out with a cutter or simply bake in two 20cm/8inch cake tins and make a lovely layer cake instead.
The whipped cake base recipe comes from the wonderful All Cakes Considered – a book that reads very much like a blog, filled with wonderful creations. It is an odd recipe, in which whipped cream replaces butter. The resulting cakes are light, soft, fluffy – really, the perfect sponge.
For the frosting I wanted something simple to prepare and universally appealing to children. I was sent some fragrant vanilla pods from the lovely folks at Pinner Vanilla and they became the basis and inspiration for the frosting. An entire pod’s worth of seeds went into a small batch of buttercream transforming it from simple to sublime. Seriously, this frosting would probably qualify as a controlled substance – it is that addictive.
For the cakes
240ml whipping cream / 1 cup
2 large eggs
200g caster sugar / 1 cup
1 tsp vanilla paste
230g flour + 10g cornflour | 1½ cups cake flour
¼ tsp salt
2 tsp baking powder
You will need
4 tin cans (400g/14ounce) scrubbed clean
For the butterceam
115g / 1 stick unsalted butter at room temperature
250g icing sugar / 2 cups
2-3 tbsp double cream
Seeds from 1 vanilla pod
1tsp lemon juice
Pink food colouring paste (optional)
Method
- Preheat the oven to 180c/350F. Spray the tin cans with cake release spray then line the bottom and sides with baking paper and spray again.
- Whip the cream until it holds soft peaks. Beat the eggs until frothy in a small bowl (using a hand whisk) then add to the whipped cream and beat together for a few minutes. Slowly add the sugar and finally the vanilla and continue whipping on high speed for 2-3 minutes.
- Meanwhile, sift all the dry ingredients together in a bowl. Sift again over the batter and carefully fold using a large rubber spatula. Make sure you scrape the edges and bottom of the bowl. When all the flour is incorporated, pour the batter carefully into the tin cans – only fill halfway up.
- Bake at the centre of the oven for 35-40m. Test them with a skewer – it should come out clean and the cakes should be firm on top. Because of the unconventional method of baking best check them after 30 minutes – I found they needed at least 35. Leave them to cool completely before turning out on a wire rack. Slice into 3 (or more) layers. You will probably need to slice a bit off the top to make them even.
- To make the buttercream, put your softened butter and icing sugar in the bowl of your stand mixer. Carefully scrape the seeds out of a vanilla pod and add. Mix on high (you may want to cover the bowl) until fluffy then add the double cream 1 tbsp at a time. Mix for several minutes and add the lemon juice and food colouring if using.
- Put the frosting in a piping bag fitted with a large star nozzle and pipe over the mini cake layers. Sandwich 2 layers together, top with a third and pipe some frosting on top. Decorate with sprinkles, fresh strawberries or whatever takes your fancy!



i loved cream cakes and this looks yummy . Perfect with a cup of tea x
It's a great idea and the finished little cakes look so cute!
I love your pictures and recipes, they are mouth watering. Would love for you to share them with us at foodieportal.com. Over at foodieportal.com we are not photography expert snobs, we are just foodies, so pretty much all your pictures will get accepted.
I love the fact these were baked in a can and they look so pretty too! These would be perfect for afternoon tea! I've included them in our Calendar Cakes round up for World Baking Day…thanks for taking part 🙂
These are so gorgeous. Definitely going to try the tin can method. And those photos are perfection. Great post.
I like how these are individually sized. I would not feel so bad eating a whole cake to myself! Was it quite easy for the baked cake to come out of its tin? I would definitely like to try this recipe!
I lined and sprayed the tins with cake release spray so the cakes came out very easily. No problems there at all. What took me by surprise is how long they needed to bake – I thought given their small size it would be 25m but because they have to rise so much they needed a minimum of 35. They looked bit uneven in the tins but once tipped out they were almost perfectly formed. Try to find tins without small ridges on the side (not that it matters too much). We ate all four cakes in a day (one given to the neighbours) which translates as eating an entire layer cake in a day! Delicious though. A great alternative to cupcakes…
Hi Supergolden, I finally tried this recipe and it was brilliant! So thanks for sharing! I was a bit dubious on using the tins at first, but I needn't worry as they worked a treat and the actual texture/taste of the sponges was lovely! I look forward to more!
Love the idea of stacking mini cakes, they look great!
What a fab idea – I have never heard of baking cake in tin cans. They look wonderful!
Excellent! Very well presented.
Genius, baking in tin cans! And beautiful photos too. Annie