
Homemade Cronuts
, Updated May 21, 2025
This post may contain affiliate links. Please read our disclosure policy.
Making homemade cronuts is a labour of love but they are incredibly delicious!

The Cronut is the offspring of an unholy union between a croissant and a doughnut. The brainchild of Dominique Ansel has taken the US (or at least New York) by storm.
Apparently you have to wait in line for one (or maximum two) – I heard rumours of people camping outside the shop at 4am. You can also place on order – 2 weeks in advance. I have to say I was thoroughly intrigued by a pastry that inspires such devotion.
Would I make them again? Probably not. Apart from the fact that they are a LOT of work, I would not really want to make a habit of eating deep fried butter (which these essentially are). They also go stale very quickly which is probably why the Ansel bakery only sells a limited amount every day. Having said that, a stale doughssant tasted very nice dipped in my morning coffee…
 |
||
|
Makes 6 – make the day before150ml warm milk / 2/3 cup
2 tsp instant dried yeast
60g caster sugar/ 4 tbsp
2 large eggs at room temp
450-475g bread flour / about 3 1/2 cups plus extra for dusting
1/2 tsp salt
250g chilled unsalted butter/ 1 cup or 18 tbsp
1 liter /quart sunflower or vegetable oil for frying
Caster sugar (to roll them in)
300ml double cream* ( 1 1/4 cups)
3-8 tbsp icing sugar (or to taste)
seeds from 1 vanilla pod (or use whatever flavouring you like)
* you can use pastry cream but I found this combination too heavy
8 tbsp icing sugar (more if needed)
Juice of half lemon
Freeze-dried raspberry pieces (optional)
Method
- It is best if you make the dough one day ahead as it needs to chill for a minimum of 4 hours – ideally overnight. Put the flour, salt, sugar and yeast in a bowl. Lightly whisk the milk and eggs together and add to the flour. Mix together and knead either by hand or in a stand mixer using the dough hook for about 10 minutes. Put the dough in a greased bowl, cover and chill in fridge for 30 minutes.
- Place your chilled butter between two pieces of baking paper and pound it flat into a rectangle measuring aprox. 10 x 7.5cm/4 x 3in. If it becomes too soft then chill in fridge (or freezer) for 10-15m.
- Lightly dust both your surface and dough with flour and then roll your it out to a rectangle that measures 12.5 x 25cm/5 x 10in.
- Place the butter in the middle of your dough and fold the dough over it. Lightly press the edges with the rolling pin to close them. Roll out the dough carefully into a rectangle that is three times as long as it is wide. Fold one third into the middle and then the other third on top. Wrap in cling film and chill for 30 minutes.
- Repeat the rolling out and folding process two more times chilling the dough for 30 mins between rolling. Leave the covered dough in the fridge overnight. Do not wrap too tightly as it will puff up slightly.
- The following day take your dough out of the fridge and roll it out until 1cm/1/2 inch thick. Stamp our six large rounds using a 9cm/ 3 1/2 inch floured cutter. Cut a hole in the middle using a small cutter (or bottom of piping tip). Place the the rounds on a tray lined with baking paper and leave them to rise for 30 mins.
- Put your oil in a pot and heat until it reaches 170C/350F. You need to make sure the oil temperature is constant before frying – clip a thermometer on and keep an eye on it the whole time.
- When the oil is ready, fry two pastries at a time for a couple of minutes on each side. Flip / take out using chopsticks. The doughssants (name isn’t going to catch on, is it?) will puff up and turn a deep golden brown colour. Drain them on paper towels.
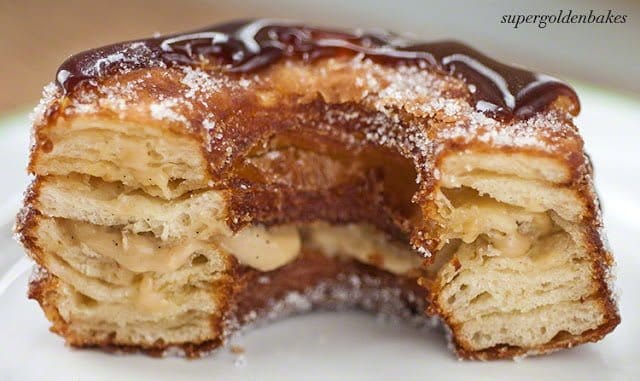
- Roll the sides in caster sugar while still warm. To fill, whip the double cream, vanilla seeds and icing sugar together till you get soft peaks. Poke 4 holes on the bottom of each pastry using a chopstick. Fill with the cream (once they are cool) using a fine tip fitted into a piping bag. Be careful as the cream may come through the layers!
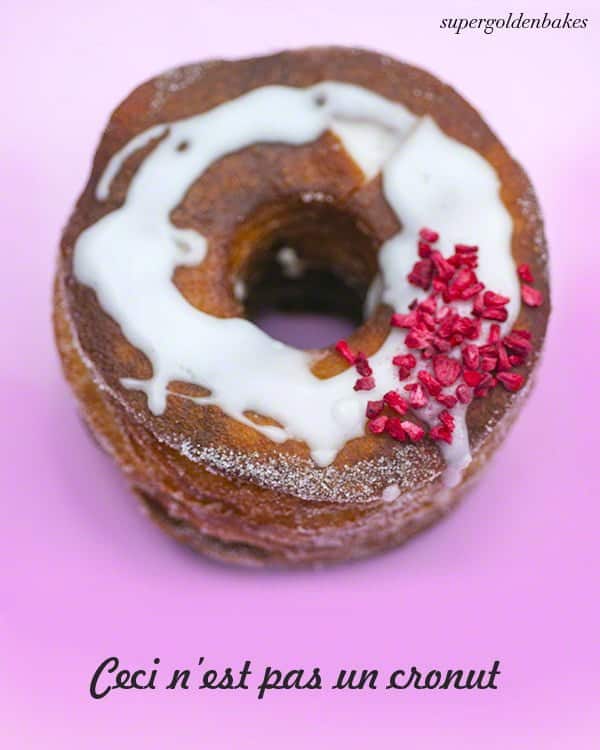
- To prepare the glaze simply mix icing sugar and lemon juice together until you have pipping consistency then drizzle over the cooled pastries. You can make any flavour of glaze you like, but I found I needed the sharp taste of lemon to cut through the sweetness. Decorate with freeze dried raspberries as shown or whatever takes your fancy. Enjoy them while they are still fresh!
 |
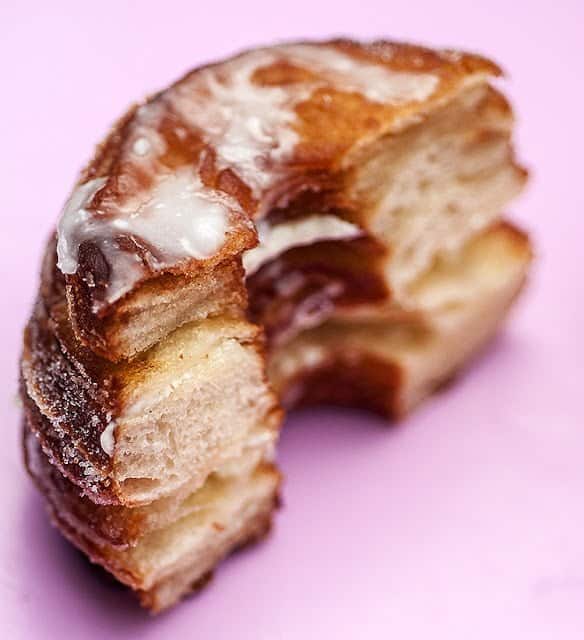
| Admire my layers please… |


Amazing! Differs to the recipe i use but will give yours a go
Ooooh would love to try one 🙂 xxx
Never heard of them but they look fab!
I have never heard of these before. They look great.
wow these sound like heaven
Oooo, they look so naughty!
These look delicious
It's like my two favourites in one.. amazing! So so yumm,y I worry they'd be so difficult to make though!
Wow!, kudos to you for trying these out. It looks like it was a success too, congrats! x
I think I would like to try and make these when I am more experienced.