
How To Make a Gingerbread House (Recipe and Tips)
, Updated Dec 05, 2025
This post may contain affiliate links. Please read our disclosure policy.
Building a Gingerbread House is one of the most joyful (and chaotic!) Christmas traditions. This easy, step-by-step guide walks you through making sturdy gingerbread dough, mixing the perfect royal icing “cement”, cutting your house pieces using a printable template and assembling everything so the house actually stays standing. Perfect for beginners, kids and anyone who loves a little festive magic.

There’s something just so incredibly Christmassy about baking and decorating your very own Gingerbread House every December! It’s the perfect festive holiday activity to get the whole family involved in, with Christmas carols playing and the tree twinkling in the background. Assembling a gingerbread house CAN be a very frustrating experience. Walls WILL collapse. The roof will be too small, or broken, or eaten by a small child (or dog).
The vision of the perfectly perfect gingerbread house you have in your mind may well be very far from reality. Especially if you have never attempted to make one before. I baked and assembled SO MANY gingerbread houses while researching and testing this recipe that our kitchen looked like some sort of mad Santa Grotto.
Learn from all of my mistakes and follow my tips to bake, construct and decorate your very own gingerbread house (or gingerbread village!). I promise to make it easy. But if you have this romantic idea (as I did!) that baking and constructing a gingerbread house from scratch is EASY then I will have to let you down… a bit.
A gingerbread house is made up of three elements: the dough, the icing “mortar” to stick it together and the decorations. Let’s break it down!
1. Gingerbread House Dough
Many recipes use construction gingerbread dough for making gingerbread houses. This can be good for construction, as the name suggests, but not tasty!
My gingerbread dough is great for building and for eating – not that I would necessarily advise you to eat a gingerbread house that has been handled by many little hands. But more on that later.
This dough is sturdy for house construction but delicious to eat – you can make gingerbread cookies with it. What’s more it is SO EASY to make, no mixer required, no chilling needed. Just make it and away you go.

2. Royal Icing (our “cement”)
After experimenting with caramel, I have landed on royal icing as my gingerbread house “glue” or cement. Royal icing is very easily made using only three or four ingredients: icing sugar (powdered sugar), egg whites, lemon juice and vanilla extract.
It will hold the walls of your gingerbread house so well no huffing and puffing will ever blow them down! Plus it can be used to decorate the house and any cookies you have – it’s fabulous stuff.

3. The decorations
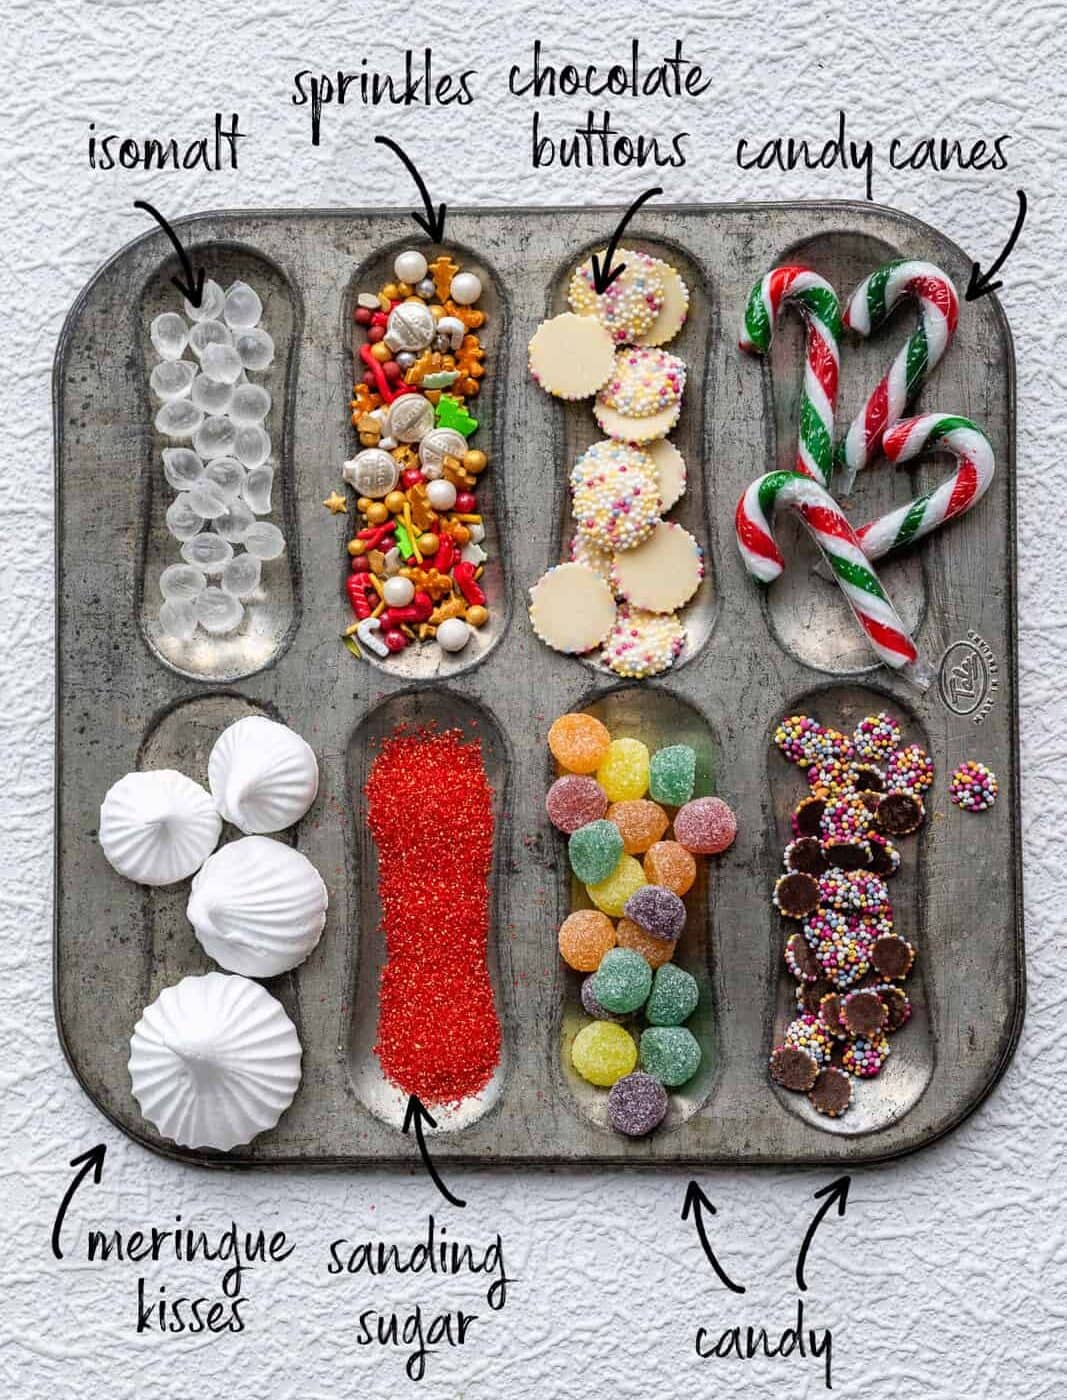
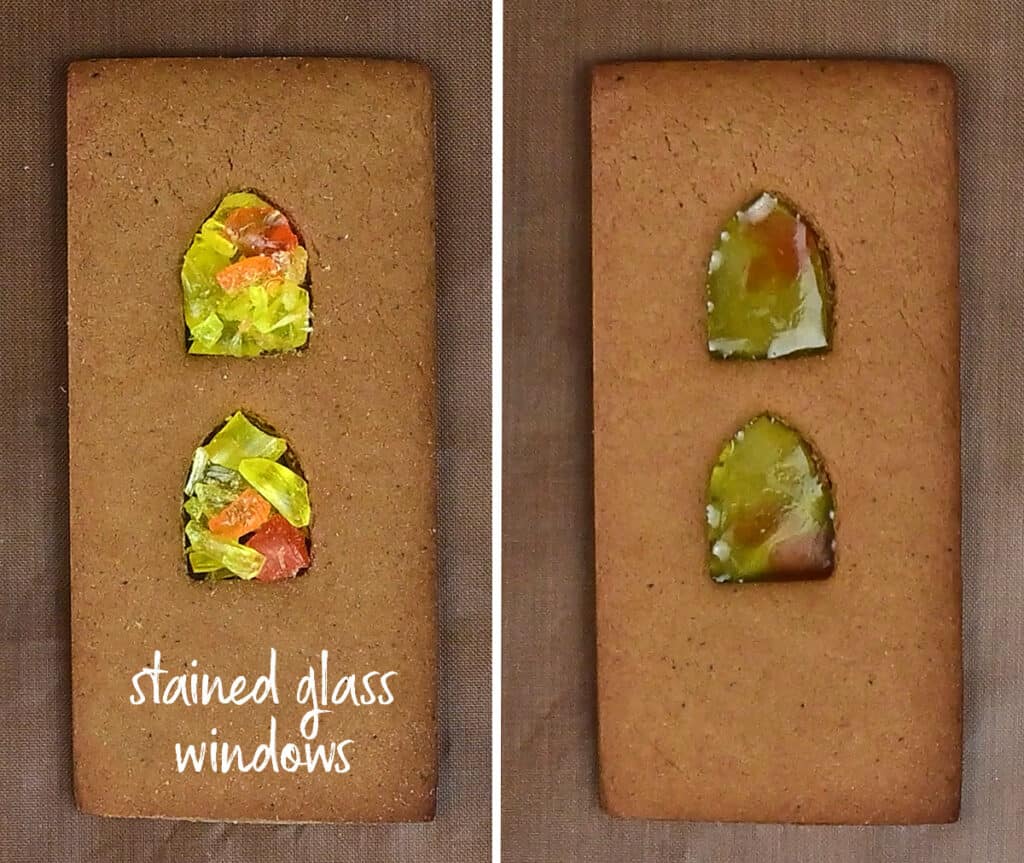
I prefer to keep my gingerbread house on the Scandi style side, simply decorated with icing. I do use candy to make the windows (stained glass cookie style). It’s just my inner control freak wanting to keep things simple I guess.
If my kids were in charge however the house would be a full Hansel and Gretel extravaganza, with just about every candy under the sun used for roofing, doors and bricks. I will leave this part up to you – after you have your house constructed you can be your own designer!
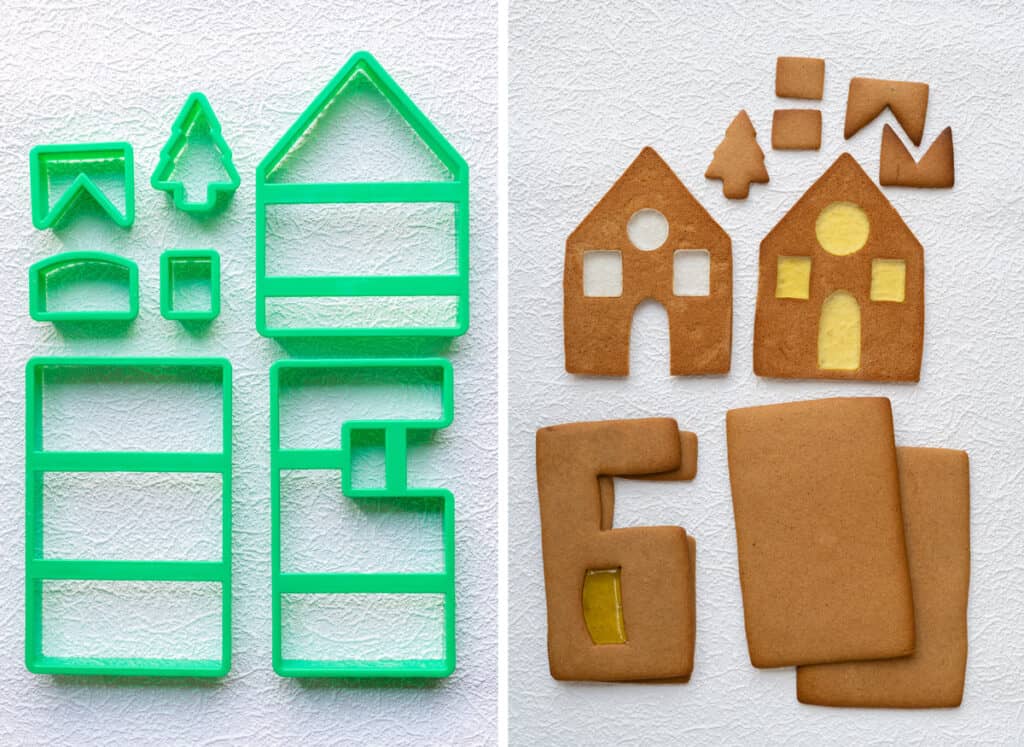
Gingerbread House Template
You can print a template from a plethora available online, but it’s much easier to purchase a gingerbread house kit which contains cutters for the roof, front and sides of the house (or a whole gingerbread village). The beauty of a kit is that you can reuse the cutters every year and don’t have to fuss with print outs and the like.
Once you have mastered the simple gingerbread house you can graduate to multi tiered complicated gingerbread mansions, cottages and palaces. I have a friend who makes an incredible “house” Christmas – last year she baked a Millennium Falcon!
Useful Tools
- Digital scales – I always use these for accurate measuring
- A rolling pin with spacing rings – makes rolling out cookie (and pie) dough evenly so much easier!
- A Gingerbread house kit (selection of cutters) or you can print a template
- Heavy cookie sheets (trays) that will not warp in the oven
- Oxo Good Grips Baker’s Silicone decorating kit is perfect for piping the icing – and for drizzling glaze on drip cakes 😉
- This reusable baking liner is fantastic for rolling out the dough on and for baking the cookies

Your Construction Timeline
Making a gingerbread house is a two or three day process so you need to do a bit of planning before grabbing the rolling pin!
Here’s my schedule:
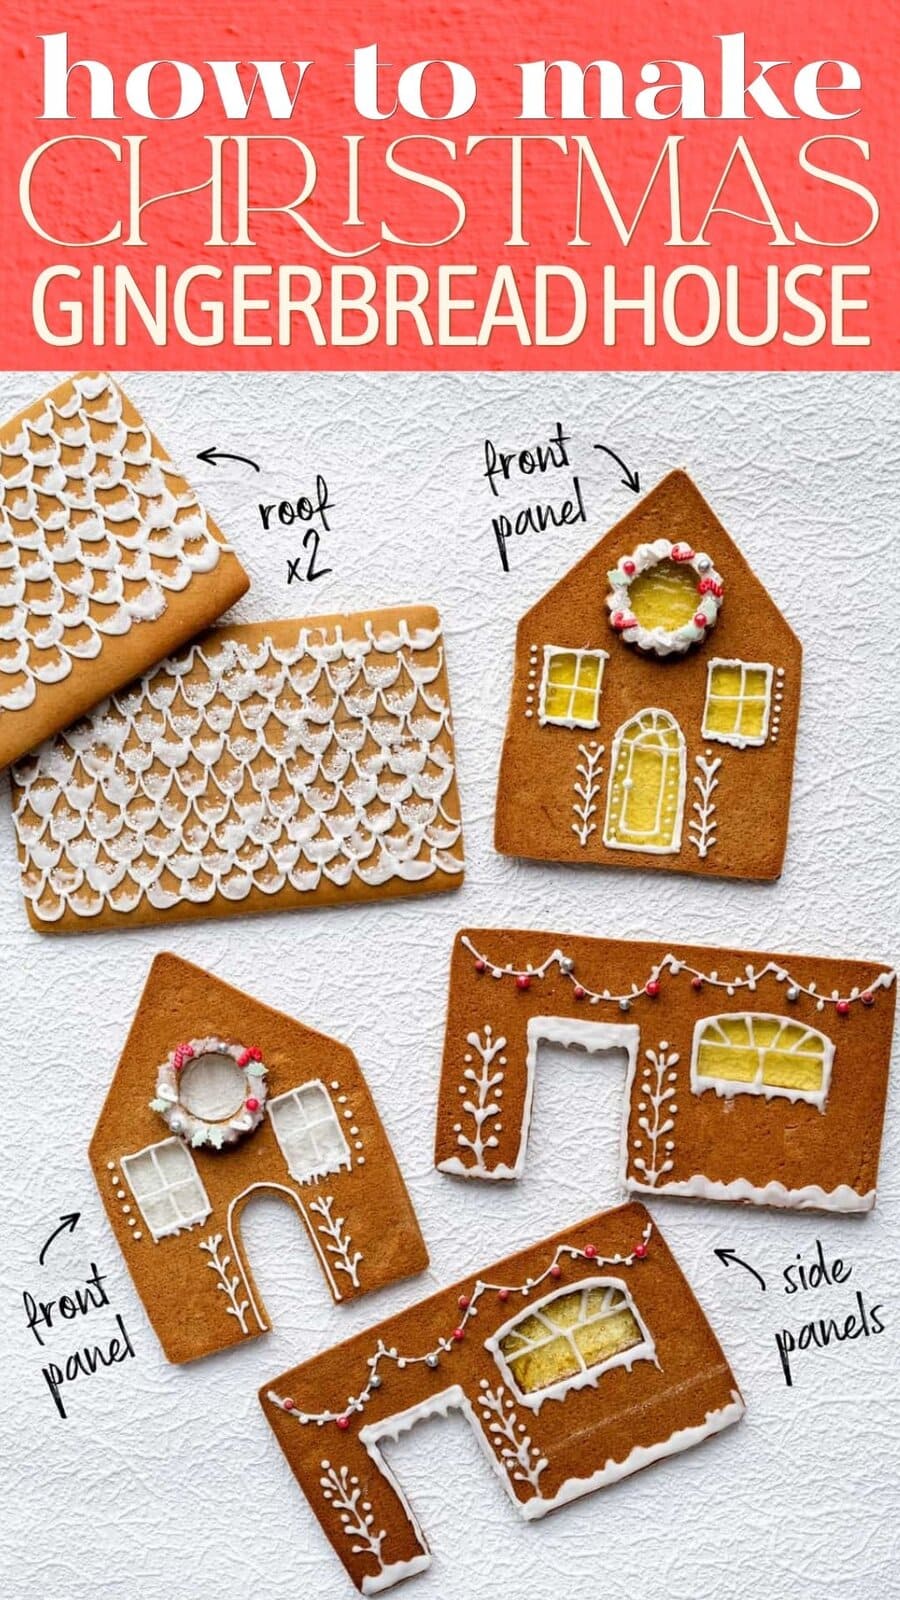
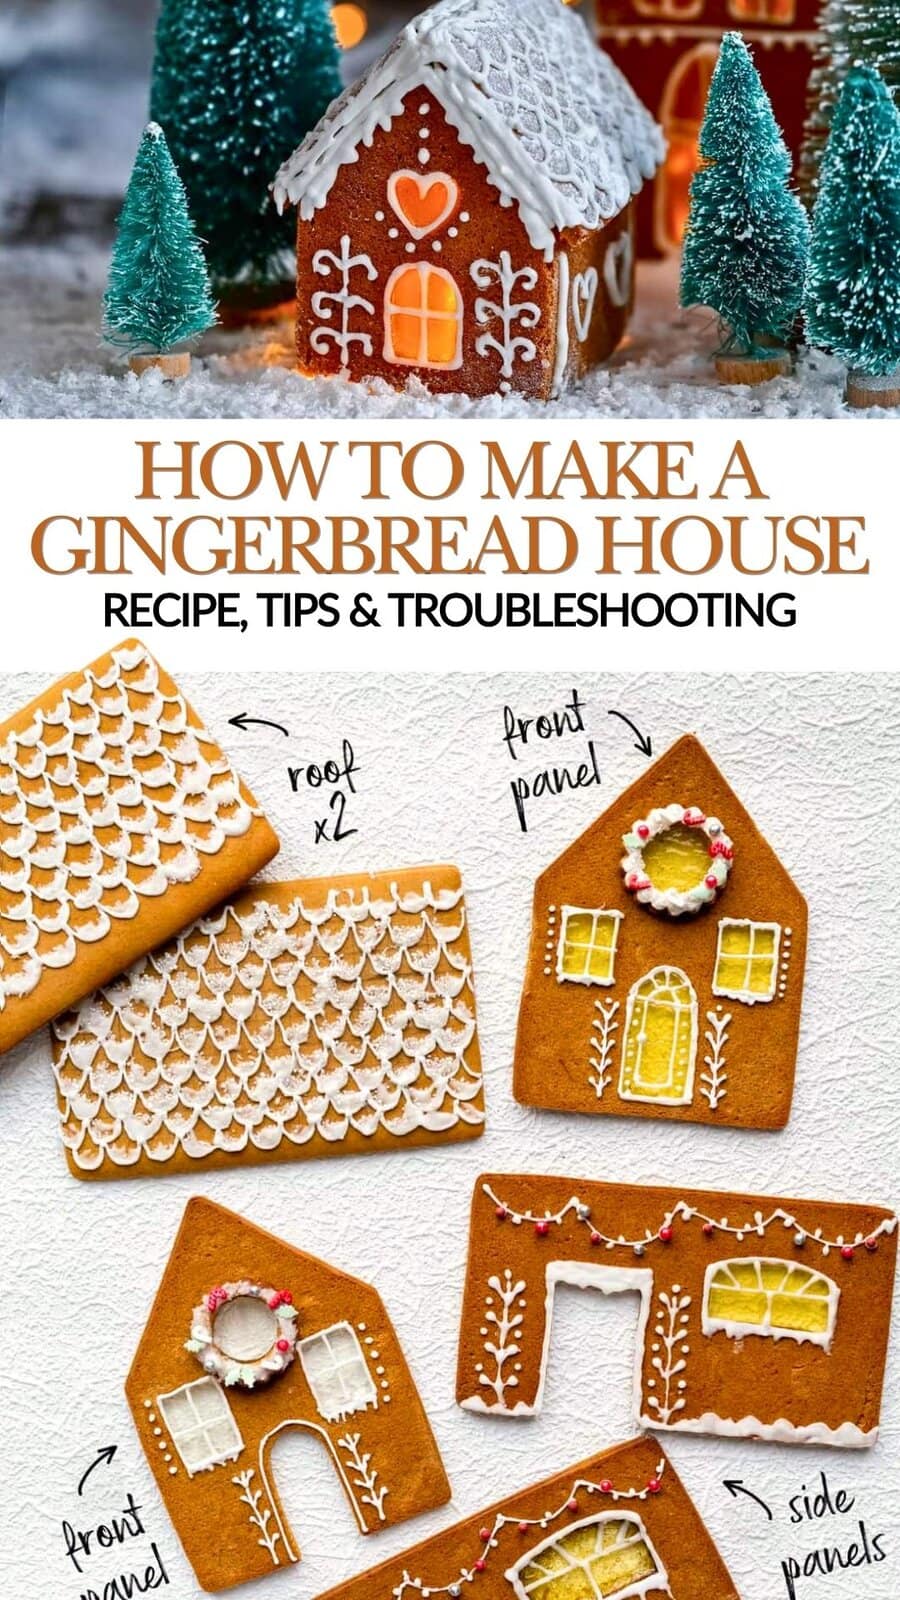
- Day 1: Print any templates or get your cutters ready (this is the set of gingerbread house cutters I used to get the panels in the photo below). Get the ingredients for the dough and shop for candy and decorations.
- Day 2: Make the dough and bake the walls, sides and roof of your house (plus any extras such as chimney, gingerbread folk, trees etc). Make the stained glass windows (using candy). Leave the cookies to dry out overnight.
- Day 3: Make the royal icing and assemble all the tools you will need. Decorate the house if using icing before you construct it (this depends on how steady your hand is – you can also decorate the house after you put it together). Allow the icing to dry then construct your gingerbread house.
- Day 4: You can add a day to decorate the house with candy with small children – perhaps bake more than one so you can keep one to yourself and allow them to go crazy!
How to make a Gingerbread House
Make the dough
- Make the dough. Put the honey, molasses and sugar in a mixing bowl and heat in the microwave in two 30 second bursts. Add the spices, salt and baking soda and stir well to combine.
- Add the butter and stir until it melts. Stir in the egg and then all the flour. Use a dough hook or spoon to fold the flour into the wet ingredients and then use your hands to gather the dough into a ball. You can use the dough straight away.
Roll out dough and cut the house panels
- Divide the dough into three or four chunks, keeping any you are not using covered with plastic wrap to avoid it drying out. Roll the dough out directly onto reusable baking liners or silicone baking mats. Dust with a little gluten free flour, only if necessary.
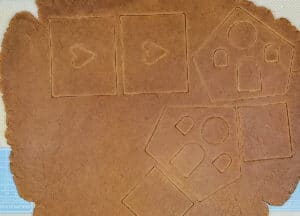
- Cut out the roof, sides and front of the house, making sure two cut two of each. Space out on baking liner and place on a cookie sheet. Bake for 12 minutes (or slightly longer if the pieces are large) until the edges start to colour.
Cool and file straight
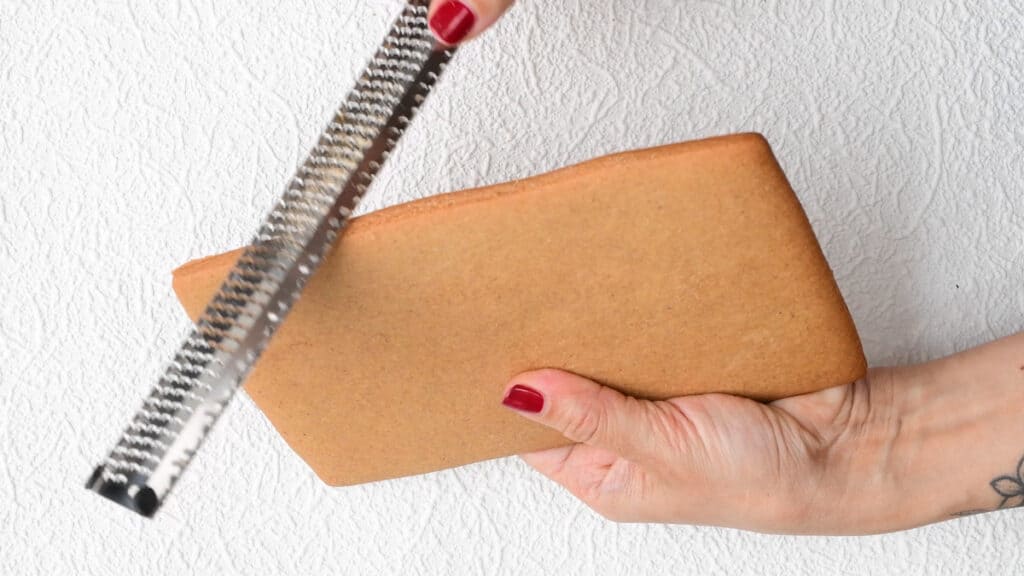
- Transfer to a wire rack and allow the cookies to dry out and firm up.
- Use a microplane zester to file the edges of the panels so that they are not only smooth but straight and evenly sized (optional). Make sure to dust any cookie dust off the panels and keep your worktop clean.
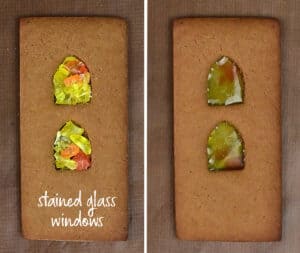
Adding stained glass windows
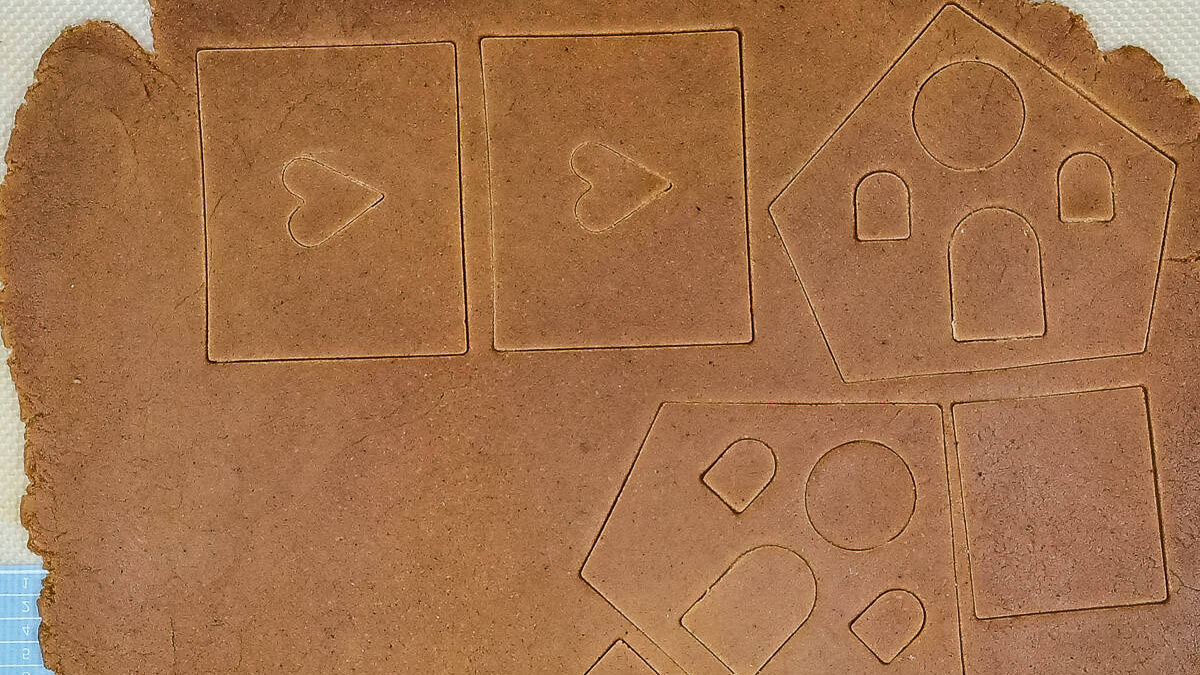
- Cut the shape of the windows (and doors or whatever else) but DO NOT remove them from the house panels.
- Bake the cookies for 9-12 minutes (depending on size) until they JUST start to color at the edges. Take out of the oven and use the cutters (or a knife) to cut and remove the windows while the cookies are still warm.

- Fill the space with crushed candy (such as Jolly Ranchers or Fox’s Fruit Candy). Bake the cookies at 170°C (340°F) for 2-4 minutes or until the candy melts and creates a beautiful stained glass window effect. Keep an eye on the cookies and take them out of the oven as soon as the candy melts.
- Allow to cool completely then carefully lift off the baking liner. Keep in an airtight container unless using immediately – moisture can melt the candy or make it weep.
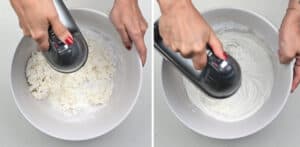
Make the royal icing
- Put the icing sugar, egg whites (from a carton is easiest), lemon juice and vanilla in a mixing bowl and start beating on the lowest setting until ingredients combine.
- Increase the speed to maximum and beat until the icing holds firm, stiff peaks. It is too dry add a little water or lemon juice a few drops at a time.
- Transfer some of the icing into a piping bag (or ziplock bag) and keep the rest covered by placing plastic wrap directly on the icing as it will dry out if left uncovered.
- Add a few drops of water or lemon juice (or water) to make the rest of the icing a bit thinner so that it flows easily. Transfer into silicone decorating bottles or piping bags fitted with small tips and use for fine decorating details or to decorate cookies.
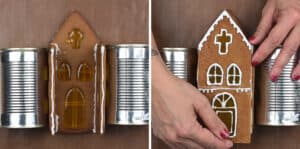
Construct your Gingerbread House!
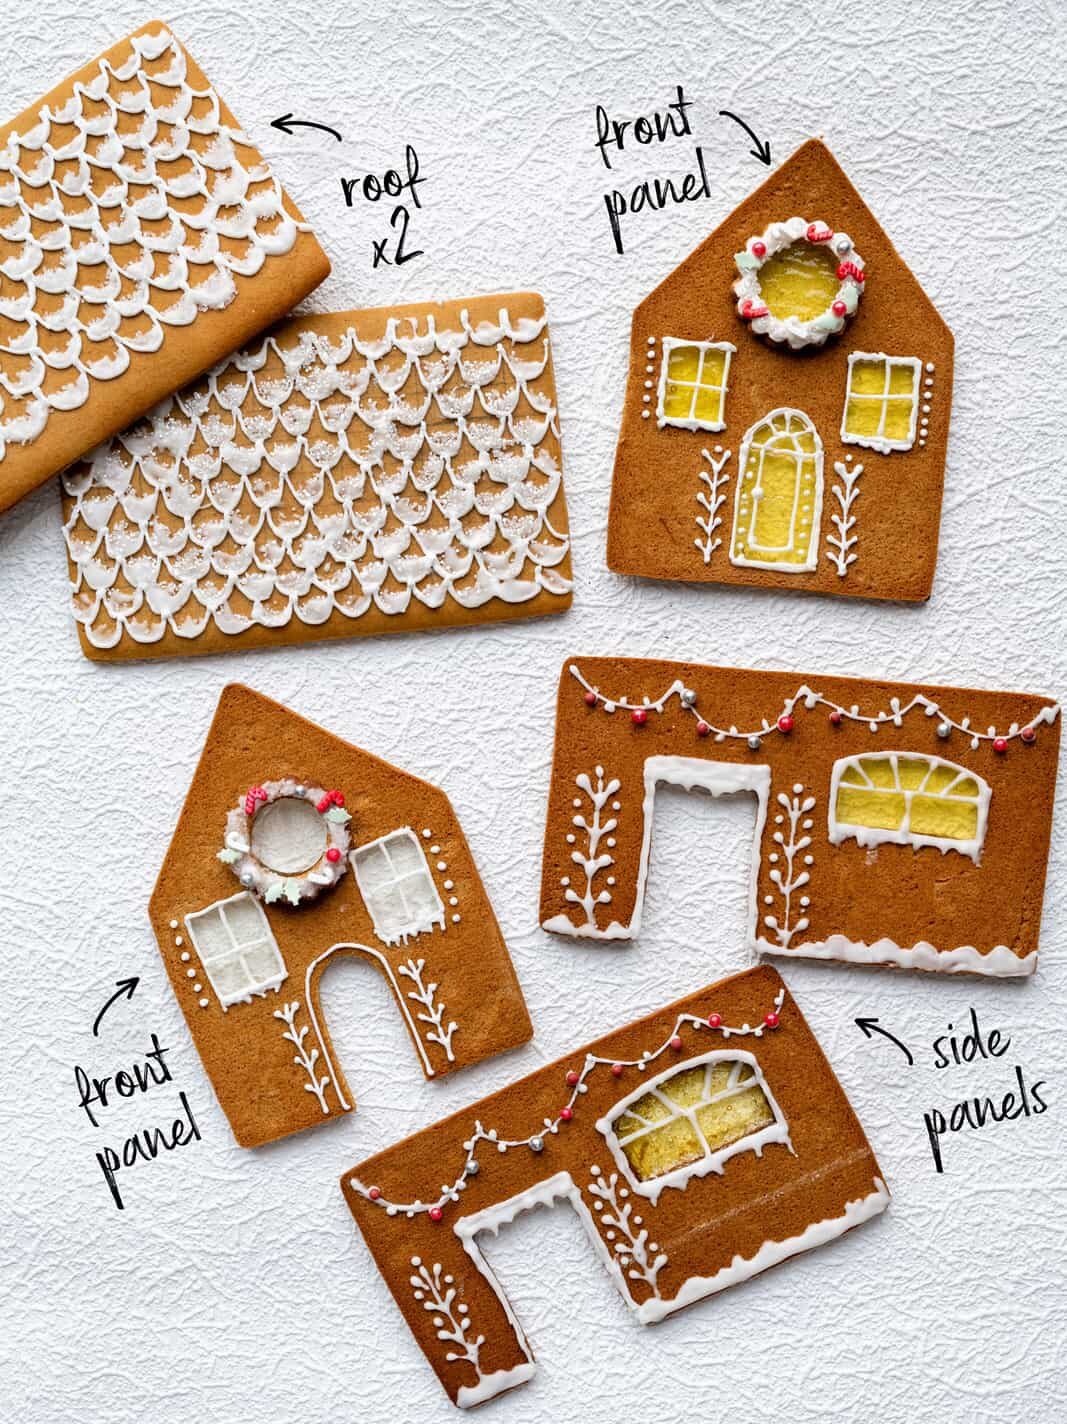
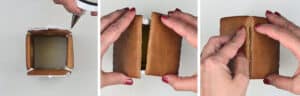
- For a small gingerbread house. Cut a tiny hole in the piping bag and pipe icing along the sides of the front panel of the house. For a large gingerbread house, use a flat cake plate or cake board as the base. Spread a fairly thick layer of icing on the base then stick the front and side panels on before the icing hardens.
- Pipe icing along the sides of the side panel and stick to the front panel, using a tin to keep it in place until it dries. Add the second side panel, again keeping it supported on the other side.
- Add icing along the top edges of the side panel and position the second front panel on top – the tension between sides and front will keep the pieces in place. If the panels collapse don’t get disheartened – just try again.

- Once the bottom of the house is sturdy, which doesn’t take very long, position the roof panels on top, using icing to stick the whole house together.
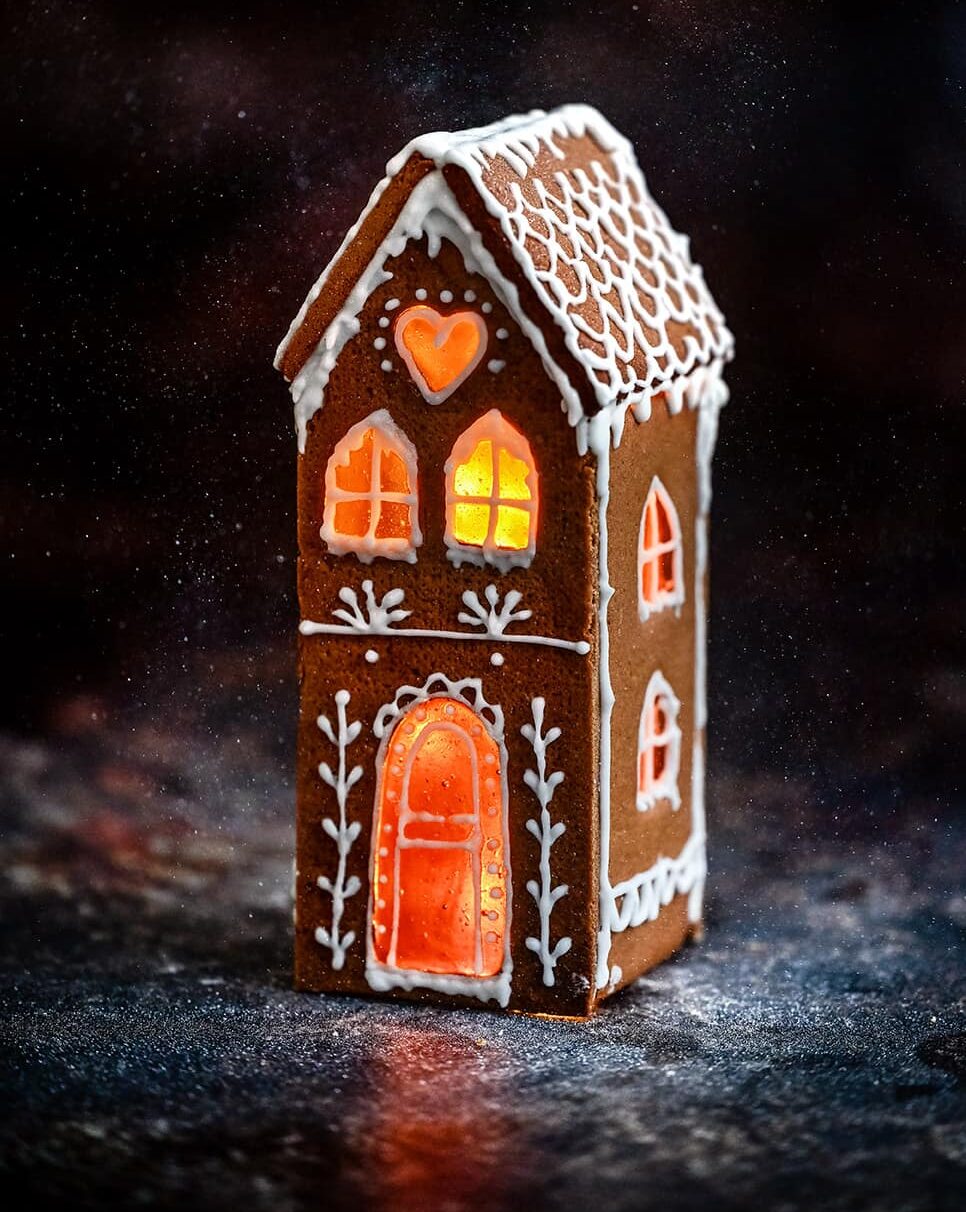
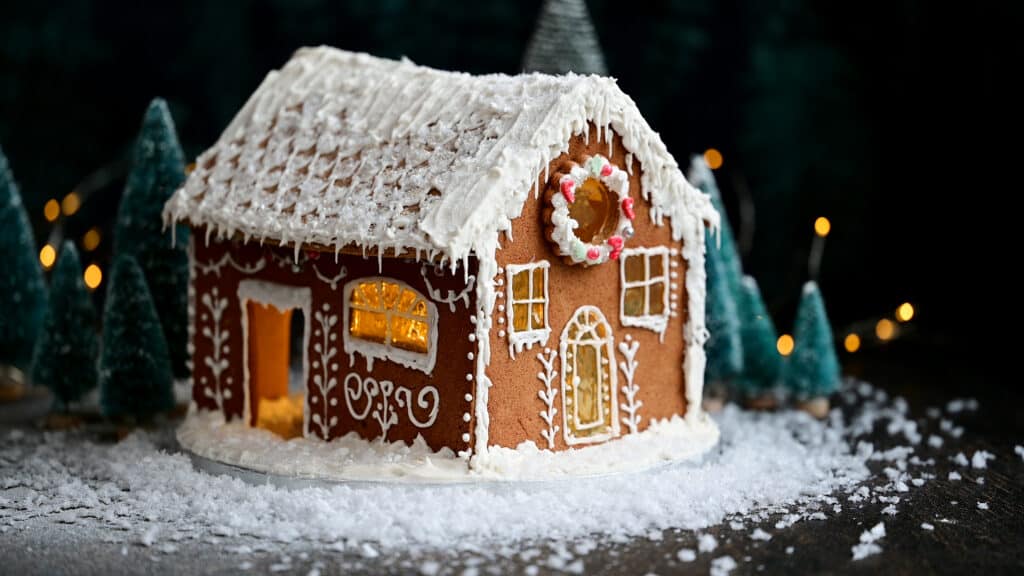
- Add any additional decorative details either by piping or by sticking on candy with icing. Dust the gingerbread house with icing sugar for that snowy effect. Admire your gingerbread masterpiece!
Gingerbread House Decorating Ideas
Your gingerbread house will be ready to decorate as soon as it feels sturdy (no walls collapsing). Pipe icing to create details on the windows and door, plus decorations on the roof panels or add candy as you wish.
Remember that extra icing can be added to cover any gaps or imperfections and dusting the house with a little sugar snow adds a magical touch as well! I find it useful to have a look on Pinterest or Instagram for decorating ideas and in fact creating a board or printing out some ideas helps a lot.
Unless you hand the house over to young children that is… Then ANYTHING goes in terms of decorations and kids tend to have a more is MORE aesthetic when it comes to candy (and who can blame them).

Lucy’s Pro Tip
EASIEST Gingerbread House shape
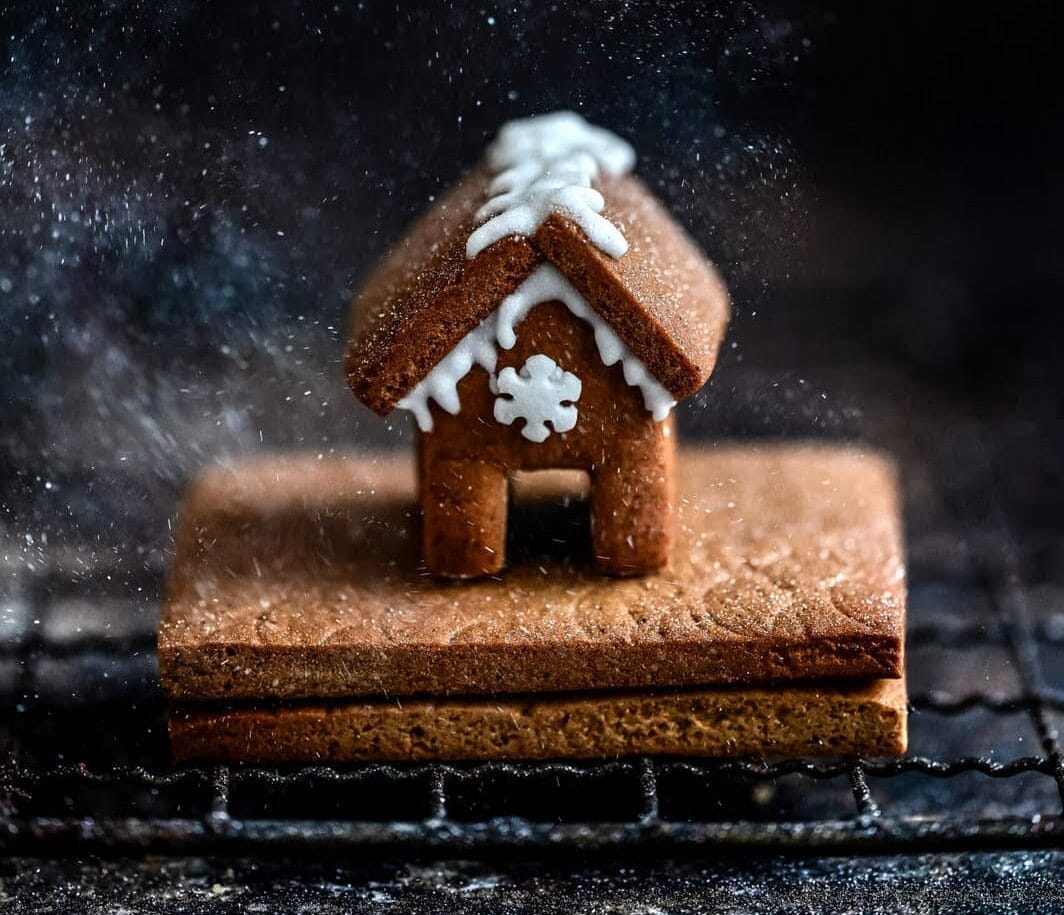
If you are new to this, start by making an A frame gingerbread house which has only four panels: two triangles make up the front and back panels while two square pieces create the roof. An A frame gingerbread house is very cute when made to look like a log cabin 🙂 Use pretzel sticks or chocolate sticks to create a rustic roof.

Recipe Tips and Troubleshooting
If your gingerbread build starts going a bit… wobbly, you are not alone. Here are the most common hiccups and how to rescue them without losing your festive cheer.
- My dough spread in the oven: This dough is very well behaved but the panels will spread a little while baking. If the edges are are not quite straight, you can gently “file” them with a microplane or a new nail file — a very satisfying fix.
- My walls won’t stay upright – Two things help here: patience and stiff royal icing. If the icing is sliding down the sides, it’s too soft — add more powdered sugar until it feels like thick cement. Use tins or mugs as temporary supports and give everything plenty of time to set before touching it again.
- My roof keeps sliding off! Don’t worry, this happens to everyone at least once. Add a generous line of stiff icing along the top seams, hold the panels in place for a moment and then ignore them completely while they set. If needed, pipe a thick line of icing along the ridge to reinforce it — think of it as a cosy snowdrift.
- A piece cracked — is it over? Not at all. Royal icing is basically edible superglue. Pipe a little along the crack, press gently and let it dry. Strategic decorations can hide any battle scars.
- The icing keeps drying out while I’m working – Royal icing crusts quickly, so place a piece of plastic wrap directly on the icing surface.
- My house just looks… wonky – Congratulations, it has character! Gingerbread houses are meant to be whimsical. A generous dusting of powdered sugar snow fixes almost everything.
Frequently Asked Questions
Once the gingerbread house has been assembled it will keep for 2-3 weeks at room temperature. Ideally keep in in a cool, dry place, away from direct sunlight or radiators. For long-term display, you could apple a thin layer of of edible varnish.
Yes, but I would not advise you to eat it if it has been standing around for days. Or if it has been handled by many tiny hands in the decorating process! If you make a candy covered gingerbread house, you can break off bits of the candy and eat them if you wish. Better yet, just make some extra gingerbread cookies with the leftover dough and eat those instead. but after a few days it’s more of a decorative item.
Once you’ve mixed your dough, just pat it into a flat disc, wrap it really well (think two layers of cling film plus a freezer bag) and pop it in the freezer for up to three months. When you’re ready to use it, let it thaw overnight in the fridge and bring to room temperature until soft enough to roll. If it feels sticky after thawing, a quick chill in the fridge or a light dusting of flour sorts it out.
HAVE YOU FOLLOWED MY GINGERBREAD HOUSE RECIPE? Please leave a rating, post a photo on my Facebook page, share it on Instagram, or save it to Pinterest with the tag #supergoldenbakes and make my day!

Gingerbread House Recipe
Video
Equipment
Ingredients
Gingerbread Cookies
- ½ cup (170g) golden syrup sub with honey or light corn syrup
- 3 tbsp (2 tbsp) molasses or treacle
- ⅓ cup (75g) dark brown sugar
- 2 tsp ground ginger
- 2 tsp ground cinnamon
- 1 tsp allspice
- ½ tsp ground cloves
- ¼ tsp salt
- ½ cup (113g) unsalted butter softened
- 1 tsp baking soda (bicarbonate of soda)
- 1 large egg
- 3 ½ cups ( 440g) all-purpose flour (plain flour) plus extra for rolling if needed
Royal Icing
- ¼ cup (60ml) pasteurized egg whites or from two large eggs
- 4 cups (480g) powdered sugar (icing sugar)
- 1 tsp vanilla extract optional
- ½ tbsp lemon juice strained
- water as needed, for thinning icing
Stained Glass Windows
- selection of hard candy Jolly Ranchers / boiled sweets or Isomalt
To decorate
- selection of candy, chocolate buttons, candy canes etc use what you like!
- powdered sugar (icing sugar) for dusting
Instructions
Prepare the dough
- Preheat the oven to 350°F (180°C). Put the golden syrup, molasses and sugar in a mixing bowl and heat in the microwave in two 30 second bursts. Add the spices, salt and baking soda and stir well to combine.½ cup (170g) golden syrup, 3 tbsp (2 tbsp) molasses, ⅓ cup (75g) dark brown sugar, 2 tsp ground ginger, 2 tsp ground cinnamon, 1 tsp allspice, ½ tsp ground cloves, ¼ tsp salt, 1 tsp baking soda
- Add the butter and stir until it melts. Stir in the egg and then all the flour. Use a dough hook or spoon to fold the flour into the wet ingredients and then use your hands to gather the dough into a ball. You can use the dough straight away.½ cup (113g) unsalted butter, 1 large egg, 3 ½ cups ( 440g) all-purpose flour
- Divide the dough into three or four chunks, keeping any you are not using well covered with plastic wrap to avoid it drying out.
Roll out and cut the panels
- Roll the dough out directly onto reusable baking liners or silicone baking mats. Dust with a little flour, only if necessary.

- Cut out the roof, sides and front of the house, making sure two cut two of each. Space out on baking liner and place on a cookie sheet. Bake for 12 minutes (or slightly longer if the pieces are large) until the edges start to color.

- Transfer to a wire rack and allow the cookies to dry out and firm up *unless adding stained glass windows – see below! If baking ahead then place in an airtight container as soon as they have cooled down completely.
- If you want to make candy stained glass windows then cut the shape of the windows (and doors or whatever else) but DO NOT remove it from the front house panel or sides etc.
- Bake the cookies then take out of the oven and immediately use the cutters to press down on the windows/ doors while they are still soft. Use a small knife or scalpel to remove the windows.

File away the edges
- Do this soon as the cookies are totally dry (or the next day). Use a microplane zester to file the edges of the panels so that they are not only smooth but straight and evenly sized.
- Make sure to dust any cookie dust off the panels and keep your worktop clean, clean, clean as you will be adding candy windows next.

Stained Glass windows (and doors)
- Fill the space with crushed boiled candy (such as Jolly Ranchers or Fox’s Fruit Candy). See tips for more options.selection of hard candy
- Bake the cookies at 340°F (170°C) for 2-4 minutes or until the candy melts and creates a beautiful stained glass window effect. Keep an eye on the cookies and take them out of the oven as soon as the candy melts.

- Allow to cool completely then carefully lift off the baking liner. Keep in an airtight container unless using immediately– any moisture will cause the candy to weep and eventually melt.
Make the royal icing
- Put the egg whites, powdered sugar, lemon juice and vanilla in a mixing bowl and start beating on the lowest setting until ingredients combine.¼ cup (60ml) pasteurized egg whites , 4 cups (480g) powdered sugar , 1 tsp vanilla extract, ½ tbsp lemon juice, water

- Increase speed to maximum and beat until the icing holds firm, stiff peaks. Transfer half into a piping bag (or ziplock bag) and keep the rest covered by placing plastic wrap directly on the icing as it dries out if left uncovered.
- Add a few drops of water or lemon juice to make the rest of the icing a bit thinner so that it flows easily. Transfer into silicone decorating bottles or piping bags fitted with small tips and use for fine decorating details or to decorate cookies.
Construct your GIngerbread House!
- For a small gingerbread house. Cut a tiny hole in the piping bag and pipe icing along the sides of the front panel of the house. Pipe icing along the sides of the side panel and stick to the front panel, using a tin to keep it in place until it dries. Add the second side panel, again keeping it supported on the other side.

- Add icing along the top edges of the side panel and position the second front panel on top – the tension between sides and front will keep the pieces in place. If the panels collapse don’t get disheartened – just try again.
- Once the bottom of the house is sturdy, which doesn’t take very long, position the roof panels on top, using icing to stick the whole house together.

- For a large gingerbread house (those are more suitable for the candy treatment) you can use a flat cake plate or cake board as the base. Spread a fairly thick layer of icing on the base then stick the front and side panels on before the icing hardens.selection of candy, chocolate buttons, candy canes etc
Decorate your Gingerbread House
- Add any additional decorative details either by piping or by sticking on candy with icing. Dust the gingerbread house with powdered sugar for that snowy effect. Admire your gingerbread masterpiece!powdered sugar

Notes
- Digital scales – I always use these for accurate measuring
- A rolling pin with spacing rings – makes rolling out cookie (and pie) dough evenly so much easier!
- A Gingerbread house kit (selection of cutters) or you can print a template
- Heavy cookie sheets (trays) that will not warp in the oven
- Oxo Good Grips Baker’s Silicone decorating kit is perfect for piping the icing – and for drizzling glaze on drip cakes 😉
- This reusable baking liner is fantastic for rolling out the dough on and for baking the cookies.
Nutrition
Nutritional information is always approximate, and will depend on quality of ingredients and serving sizes.


My yearly go-to gingerbread house recipe!
Hosting a gingerbread house making party so wanted to know if I can make this dough ahead of time and freeze before baking? X