
Pear Cake with Cream Cheese Frosting – the Perfect Thanksgiving Dessert
, Published Oct 01, 2025
This post may contain affiliate links. Please read our disclosure policy.

Pear Cake with Cream Cheese Frosting – warmly spiced cake layers filled with poached pears and silky cream cheese frosting. A showstopper Thanksgiving dessert centerpiece that sure to impress!
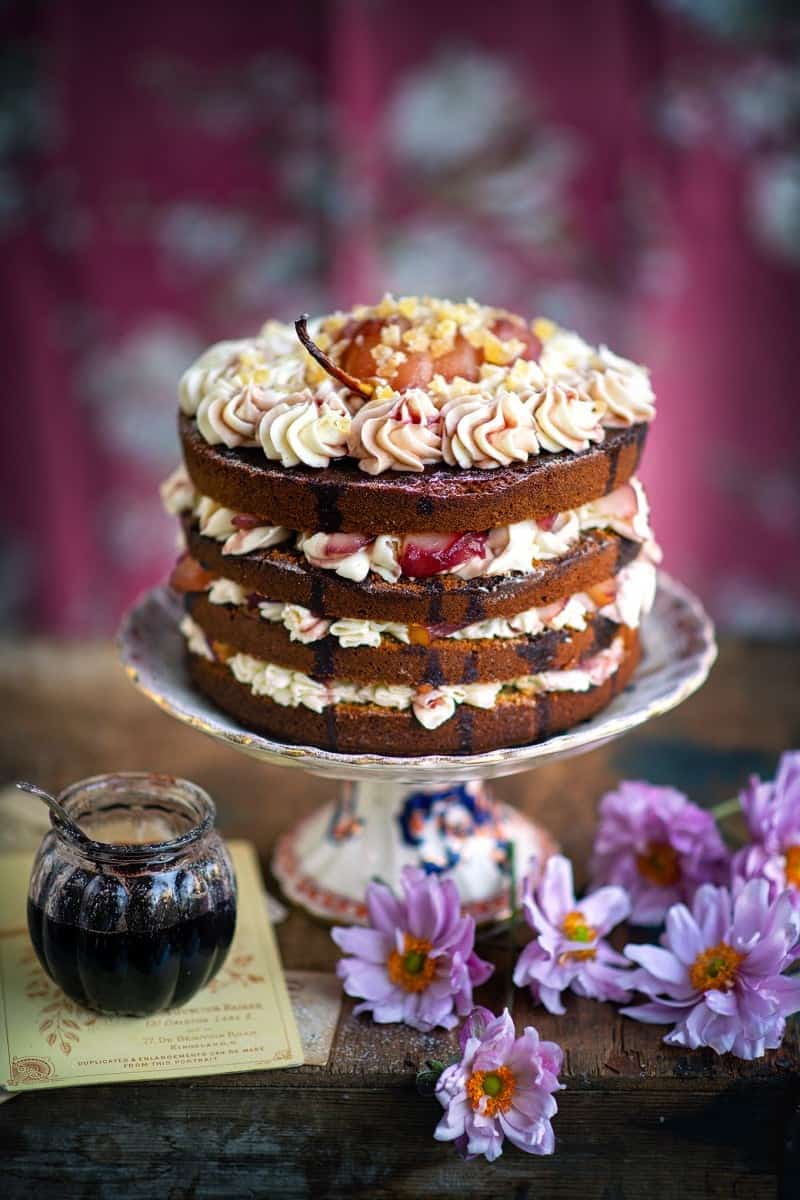
Move over pumpkin pie — this year’s Thanksgiving dessert spotlight belongs to this spectacular Pear Cake. Juicy poached pears nestle between layers of tender spiced cake, tied together with silky cream cheese frosting and a drizzle of wine syrup. It’s a cake that feels elegant enough for the holiday table but still cozy and comforting thanks to those warm fall flavors.
Cakes using pears are often overlooked in favor of pumpkin and apple – let me rectify that! Poaching the pears in wine and spices infuses them with rich flavor and pairing them with warmly spiced sponge layers creates an stunning dessert that has been described “one of the best things I have EVER tasted” by my guests! Whether you’re baking for Thanksgiving, Friendsgiving, or any autumn gathering, this pear cake is sure to impress.

What Is the Reverse Creaming Method?
This pear cake uses the reverse creaming method which turns the traditional way of mixing cake batter on its head. Instead of creaming butter and sugar, you start by mixing the dry ingredients with the butter. This coats the flour with fat, limiting gluten development to create a tender and moist crumb. Easier and faster than the usual creaming method – try it once and I am sure you will be converted!

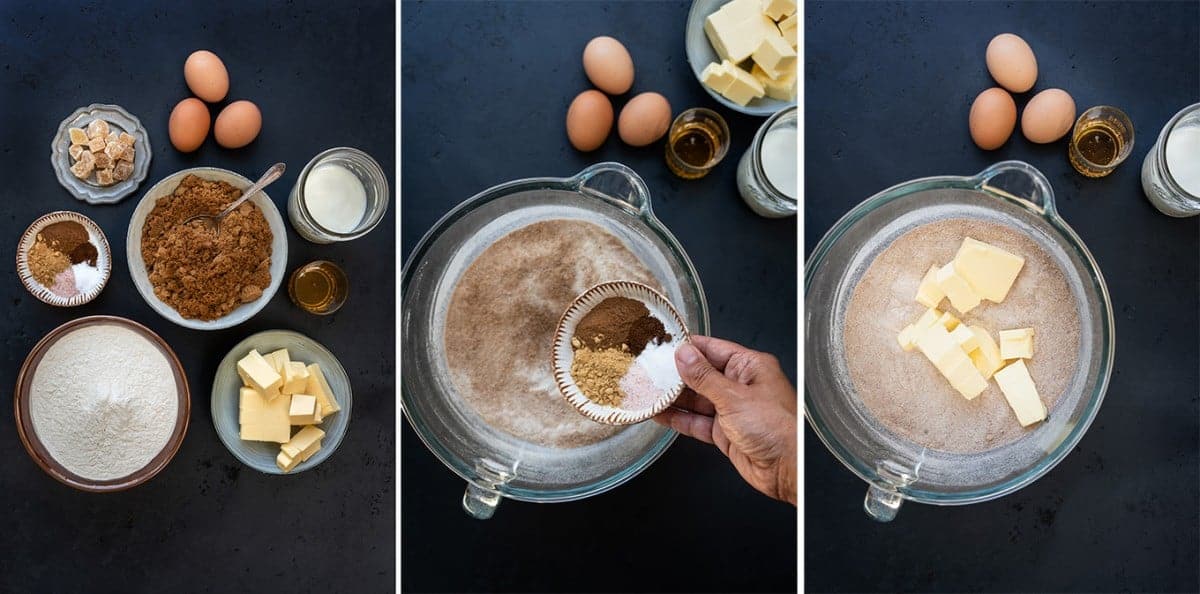
Pear Cake Ingredients
Let’s take a look at the key ingredients for this spiced pear cake. You can prepare the poached pears and cake layers up to two days in advance if you are baking for a celebration. Frost and assemble on the day of serving.
For the Cake Layers
- All-purpose flour: With added baking powder and soda – make sure your ingredients are fresh!
- Brown sugar: Caramel sweetness that matches the pears.
- Warm spices: Ground ginger, cinnamon, cloves.
- Unsalted butter: The butter needs to be firm and cold so that it coats the flour grains without becoming greasy.
- Large eggs: Use room temperature eggs for a smooth batter.
- Whole milk: Ideally a warmed up a little until tepid.
- Crystallized ginger: Or stem ginger in syrup for extra bursts of warmth.
For the Frosting
- Cream cheese: Or mascarpone cheese at room temperature. Always use full-fat dairy ingredients when making frosting.
- Powdered sugar (icing sugar) – ideally sifted.
- Vanilla bean paste: for warmth and aroma or you can use stem ginger syrup.
- Heavy cream – Lightens the frosting and creates firm peaks.
For the Poached Pears
- Pears: Use just ripe, firm Bosc, Anjou, or Conference pears.
- Red wine and sugar – classic poaching liquid for color and sweetness. Use a fruity, medium-bodied red like Merlot, Shiraz, Zinfandel, or Pinot.
- Spices – cinnamon sticks, cardamom, star anise for fragrance.

How to Make My Pear Cake Step-By-Step
- Measure the dry ingredients into your stand mixer bowl fitted with the paddle attachment or place in the bowl of a food processor fitted with a metal blade. Mix (or pulse) on low speed to combine.
- Add the cubed butter and beat or pulse for a couple of minutes until the mixture resembles coarse breadcrumbs.
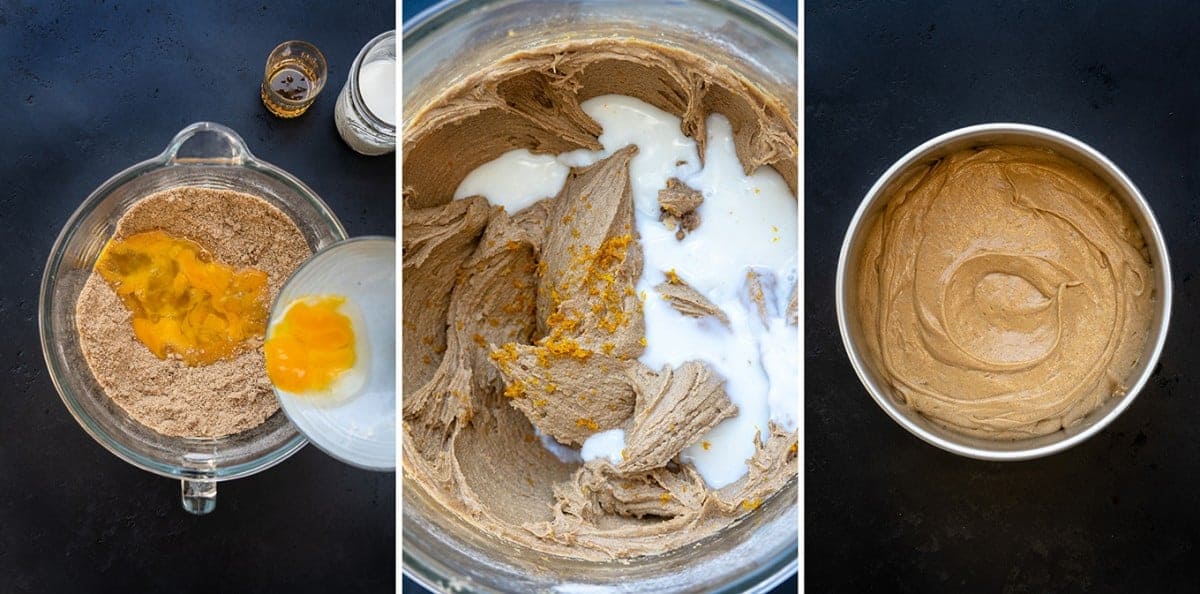
- Gradually add the eggs and honey while mixing on medium speed. Stop the mixer and scrape the bottom and sides of the mixing bowl.
- Add the milk and orange zest and whisk on medium speed, stopping the mixer to scrape the bottom and sides of the mixing bowl as needed. Continue whisking for a couple of minutes at maximum speed until the batter is completely smooth.
- Fold some of the chopped ginger into the batter, reserving a handful for topping, and divide between the cake pans. Bake for 50 minutes or until the cakes are springy to the touch, coming away from the tin edges and a skewer inserted in the centre comes out clean. Cool completely before frosting.
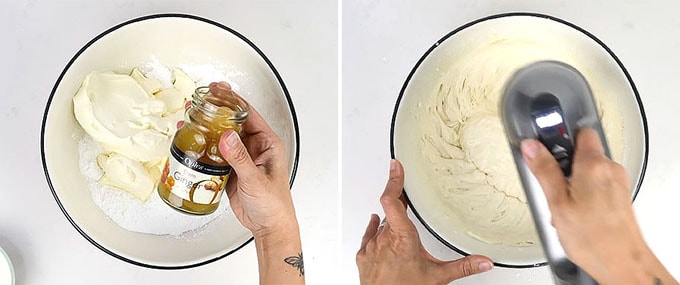
Make the frosting
- Take the cream cheese or mascarpone out of the fridge and bring to room temperature. Place in the bowl of your stand mixer together with the powdered sugar, cream, cinnamon and vanilla paste (or use some of the stem ginger syrup).
- Mix on low speed to combine the ingredients. Increase the speed to maximum and whisk until the frosting holds peaks, scraping the sides and bottom of the bowl with a spatula halfway through.
Assemble the Pear Cake
- Spread the frosting over the cake, adding sliced pears and some of the syrup between the layers. Repeat until you have used all the layers.

- Pipe frosting over the top of the cake and decorate with half a pear, sliced and fanned out. Drizzle with more syrup and top with the remaining chopped ginger. Cut into small slices – it is very rich! – and serve.

Recipe Notes and Tips
- Which wine is best for poaching? Use a medium dry red wine you’d happily drink – it doesn’t need to be super expensive but if it’s unpleasant in the glass, it won’t improve in the pan! Store leftover spiced wine syrup in the fridge for up to two weeks and use it to jazz up your fall cocktails or flavor your Champagne or sparkling wine.
- What type of pears should I use? Choose pears that are just ripe and still firm. Overripe pears will fall apart in the poaching liquid, while underripe ones may not absorb flavor as well. Bosc pears are the best choice for poaching as they are naturally firm and hold their shape beautifully.
- Storing pear cake: Store cake in an airtight container in a dark cool spot at room temperature for up to 3 days.
- Freezing instructions: You can freeze the unfrosted cake layers for up to three months. Cover each in two layers of plastic wrap and aluminum foil, stack and place in a freezer-safe container. Thaw overnight in the refrigerator, bring to room temperature and decorate.

HAVE YOU TRIED MY PEAR CAKE RECIPE? Please leave a comment and rating if you try this recipe, follow me on Pinterest for more easy recipes and don’t forget to tag me on @Instagram or TikTok so I can see your creations.

Pear Cake With Cream Cheese Frosting
Equipment
Ingredients
For the cake
- 2 ¾ cups (350g) flour , all-purpose / plain
- 1 ⅔ cups (330g) dark brown sugar
- 2 tsp ground ginger
- 2 tsp ground cinnamon
- ½ tsp ground cloves
- 1 tbsp baking powder
- 2 tsp baking soda
- ½ tsp salt
- ¾ cup + 1 heaped tbsp (200g) unsalted butter , firm and cubed
- 3 large eggs , lightly beaten
- 2 tbsp honey
- ¾ cup + 2 tbsp (200ml) whole milk
- 2 tsp orange zest
- 4 tbsp crystallized ginger or stem ginger, finely diced
For the poached pears
- 1 bottle (750ml) red wine , I used Merlot
- 2 ¼ cups (450g) sugar , granulated
- 4 cardamom pods
- 2 cinnamon sticks
- 1 star anise
- 1 tsp vanilla bean paste
- Strip of orange peel
- 5 firm pears , peeled, stem left on
For the frosting
- 24 oz (680g) full-fat cream cheese or mascarpone cheese
- 2 cups (240g) powdered sugar , sifted (= icing sugar)
- 1 cup (240ml) cream heavy / double
- 1 tsp ground cinnamon
- 1 tsp vanilla bean paste or stem ginger syrup
Instructions
Bake the Cake Layers
- Preheat the to 350°F (180°C). Mist two 7-inch deep pans with cake release and line with baking paper.
- Mix dry ingredients: Place the flour, sugar, spices, baking powder, soda, and salt into the bowl of a stand mixer fitted with the paddle attachment. Mix on low speed to combine or stir by hand. Make sure to break up any clumps of brown sugar.2 ¾ cups (350g) flour, 1 ⅔ cups (330g) dark brown sugar, 2 tsp ground ginger, 2 tsp ground cinnamon, ½ tsp ground cloves, 1 tbsp baking powder, 2 tsp baking soda, ½ tsp salt
- Add butter: Drop in the cubed butter and mix for 2–3 minutes, until the mixture looks like coarse breadcrumbs.¾ cup + 1 heaped tbsp (200g) unsalted butter
- Add liquids: Gradually mix in the eggs and honey on medium speed. Add the milk and orange zest, then beat for 1 minute. Scrape down the bowl and continue mixing for 2 more minutes at high speed, until the batter is smooth.3 large eggs, 2 tbsp honey, ¾ cup + 2 tbsp (200ml) whole milk, 2 tsp orange zest
- Fold & bake: Stir the chopped ginger into the batter. Divide evenly between the tins and bake for 45–50 minutes, or until a tested inserted in the middle comes out clean.4 tbsp crystallized ginger
- Cool: Leave in tins for 10 minutes, then turn out onto a wire rack to cool completely.
Poach the Pears
- Make poaching liquid: Put the wine, sugar, and spices into a deep saucepan. Heat gently, stirring, until the sugar has dissolved.1 bottle (750ml) red wine, 2 ¼ cups (450g) sugar, 4 cardamom pods, 2 cinnamon sticks, 1 star anise, 1 tsp vanilla bean paste, Strip of orange peel
- Poach pears: Add the peeled pears, weigh them down with a small plate, and simmer for 20 minutes. Carefully remove pears to a plate and let cool. Slice thinly, discarding any seeds.5 firm pears
- Reduce syrup: Continue simmering the poaching liquid until it reduces to a thick syrup. Strain, pour into a jar, and cool.
Make the Frosting
- Put all frosting ingredients into the bowl of a stand mixer fitted with the whisk attachment. Start on low speed until combined, then increase to medium-high and beat until firm peaks form. Transfer to a piping bag fitted with a large star tip.24 oz (680g) full-fat cream cheese, 2 cups (240g) powdered sugar, 1 cup (240ml) cream, 1 tsp ground cinnamon, 1 tsp vanilla bean paste
- Use a wire cake cutter to level the cake tops if needed. Carefully slice each cake into two even layers.
Assemble the cake
- Place one cake layer, smooth-side down, onto a platter or cake stand. Pipe frosting on top, add pear slices, and drizzle with syrup. Repeat with the next two layers.
- Place the final layer smooth-side up. Frost the top of the cake, decorate with half a pear sliced and fanned out, drizzle with syrup, and sprinkle with the remaining chopped ginger.
Notes
- Which wine is best for poaching? Use a medium dry red wine you’d happily drink – it doesn’t need to be super expensive but if it’s unpleasant in the glass, it won’t improve in the pan! Store leftover spiced wine syrup in the fridge for up to two weeks and use it to jazz up your fall cocktails or flavor your Champagne or sparkling wine.
- Which pears are best? Choose pears that are just ripe and still firm. Overripe pears will fall apart in the poaching liquid, while underripe ones may not absorb flavor as well. Bosc pears are the best choice for poaching as they are naturally firm and hold their shape beautifully.
- Storing your pear cake: Store cake in an airtight container in a dark cool spot at room temperature for up to 3 days.
- Freezing Instructions: You can freeze the unfrosted cake layers for up to three months. Cover each in two layers of plastic wrap and aluminum foil, stack and place in a freezer-safe container. Thaw overnight in the refrigerator, bring to room temperature and decorate.
Nutrition
Nutritional information is always approximate, and will depend on quality of ingredients and serving sizes.


Loved this cake thanks ❤️
Can you keep the fully iced cake at room temperature for 3 days? I am just concerned attbe cream cheese and cream in the frosting
Hi Sandra – yes ideally it should be put in the fridge. But I think it would keep in a cold dark spot away from direct heat for 3 days.
I would love to try to make this pear cake because the whole family loves pears. The problem is we detest red wine in any form. Is there any substitute liquid that I could use to poach the pears? I’m fairly new to baking and don’t really know what to use for changing ingredients in general so thanks in advance for any advice you can provide.
Hi Amy – you can replace the wine with apple cider. The pears will still have a wonderful flavor but the syrup will be golden in color. I think cranberry juice may also work but apple cider is a safer option. Hope this helps!
amazing!!!!
We made this cake last night as a trial run for a dinner party next month. We were very pleased! The merlot syrup was indeed very yummy on the cake and in the champagne. The recipe was easy to follow and we learned a few things to improve our next attempt. We used two 8-ounce pkgs of cream cheese which was 3 ounces short of the 19 called for. We adjusted the other frosting ingredients. It just didn’t give us enough frosting. We will likely increase to three 8-ounces pkgs next time and again adjust the other frosting ingredients. I also sliced the pairs too thin, but I’ll know next time. Overall, very pleased with our first attempt at a layered cake this size. Oh, the cake is very filling so keep the slices small!
Glad you liked it Laurie!
I love to bake and your ginger layer cake with poached pears looks amazing. But I’m not seeing the recipe no matter what I click on.
Not sure what you mean Leslie? The recipe is at the end of the post
I cant find the recipe anywhere either Lucy. All I see is the comments.xo
Hi Heather – at the top of the recipe post you will see a button called “jump to recipe” this will take you directly to the recipe card at the bottom of the post
This cake is just SO gorgeous! Would be a perfect show stopper for Thanksgiving and Christmas.
Thanks Eden – it really is perfect for Fall celebrations 🙂