
Salted Caramel Cake
, Updated Oct 13, 2022
This post may contain affiliate links. Please read our disclosure policy.

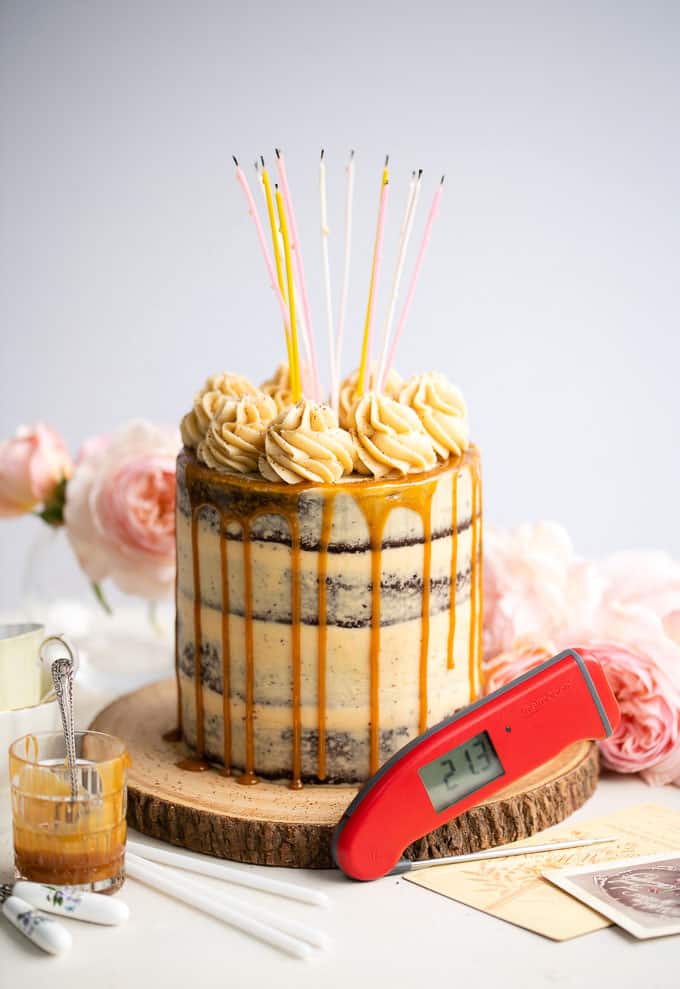
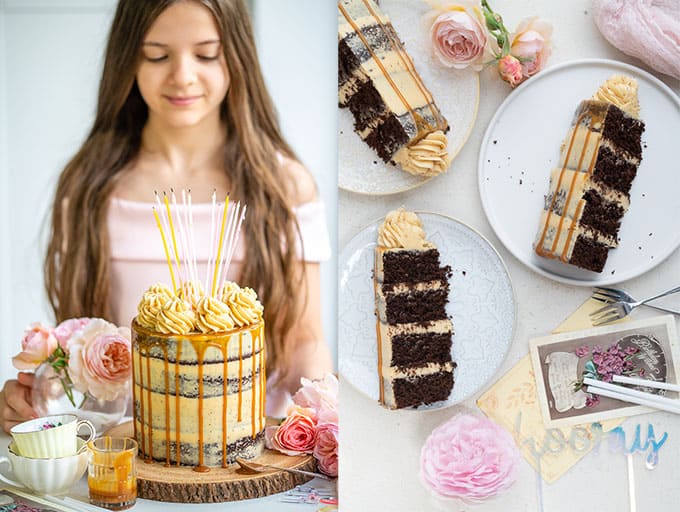
Outrageously delicious Salted Caramel Cake – four layers of rich chocolate cake filled with caramel buttercream. Watch the video tutorial on how to make salted caramel sauce and create this impressive – yet easy! – layer cake. I guarantee that it will become a favourite with friends and family for birthdays and celebrations. In partnership with Thermapen.
You will also love… my Winter Wonderland Cake.
Post may contain affiliate links. For more information, check my disclosure
Salted Caramel may well be my absolutely favourite thing. I think you will agree it is such a magical treat, transforming desserts, cakes and ice cream from delicious to WOW!
I made this Salted Caramel Chocolate Cake for my blog’s first birthday six years ago (!) and am so happy to finally update the recipe with step-by-step instructions and a video.
I decided to simplify the recipe, swapping the Swiss Buttercream with an easier, but equally delicious, version that uses my new favourite way to make buttercream.
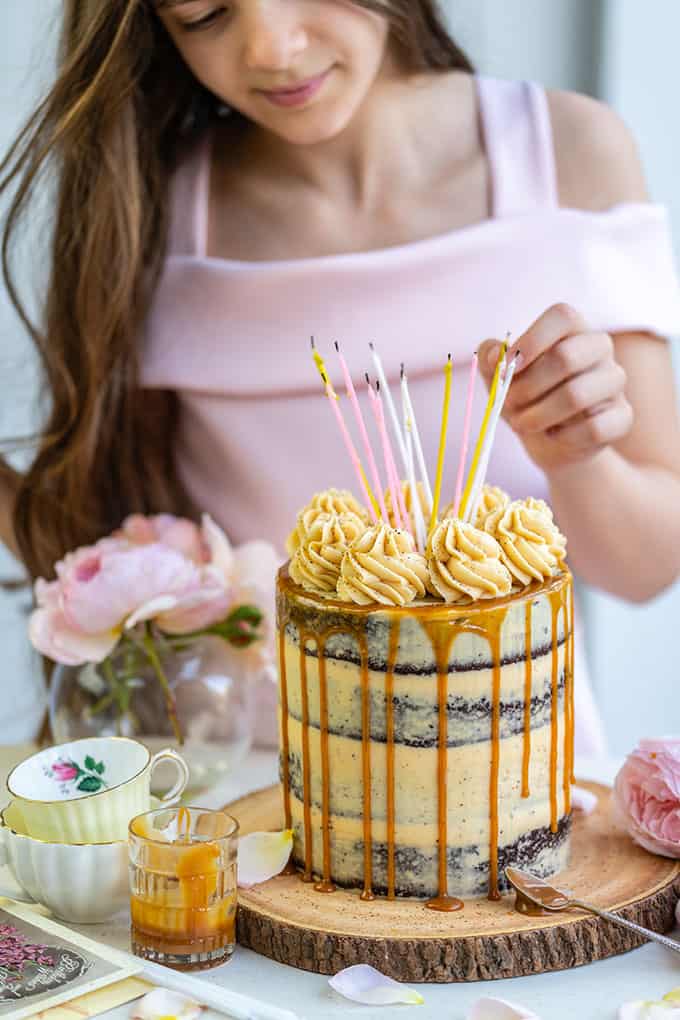
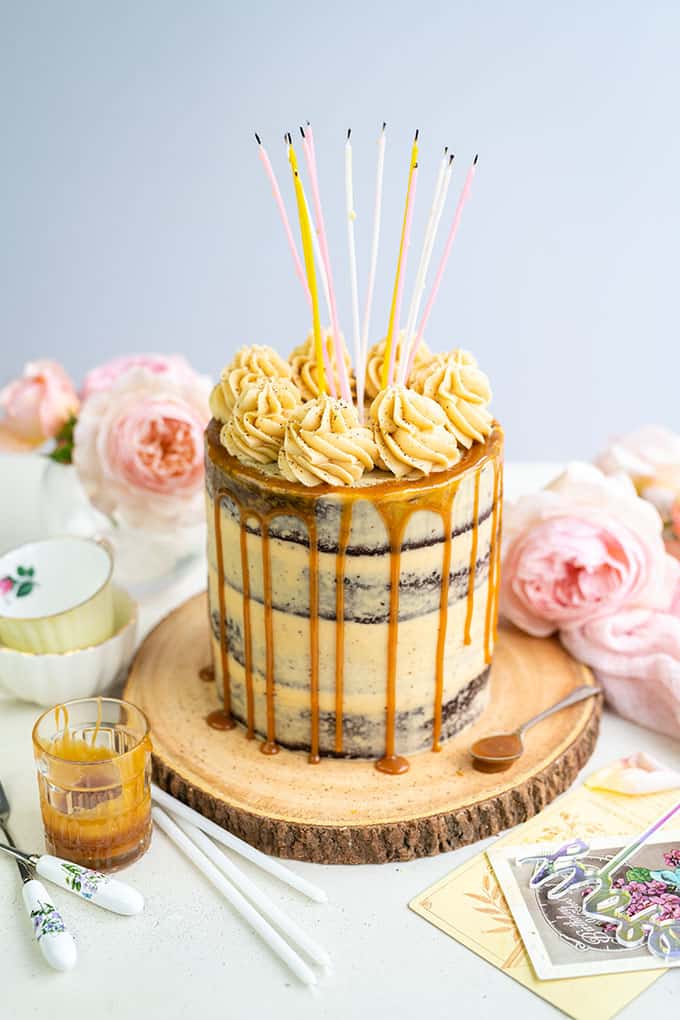
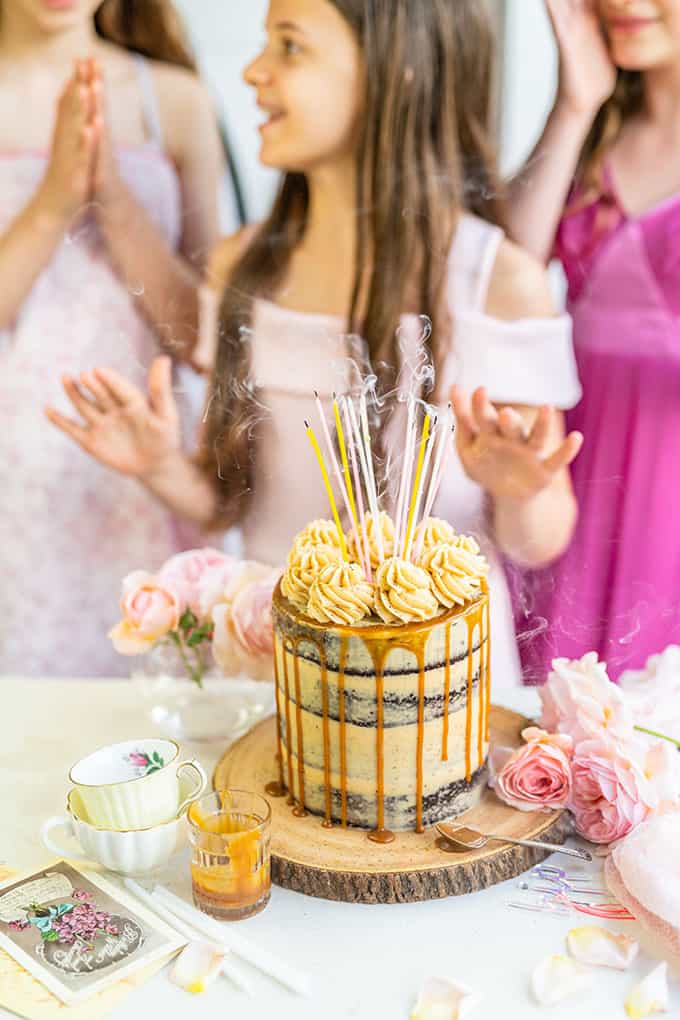
I served this cake for my daughter’s 13th birthday (I am the mother of a teenager!) and it was a big hit with her and her friends as you can see from the photos. If you are curious what her 14th birthday cake was… An Oreo Cake!
Let’s break down this Salted Caramel Cake to its elements…
- Salted Caramel Sauce: this should be made up to a day in advance, or several days in advance. This recipe makes enough for the cake plus leftovers which you can keep for up to two weeks. The caramel will set in the fridge but you can easily reheat it in a saucepan or the microwave.
- Chocolate cake: you can use your favourite chocolate cake recipe here. I am showing you the Ultimate Chocolate Cake which features in my Nutella Chocolate Cake but this One-Bowl Chocolate Cake would work equally well. If you prefer to use a white cake then this Vanilla Cake would be perfect.
- Salted Caramel Frosting: using the quick-method Easy Swiss Meringue Buttercream (SMBC) – which doesn’t actually require making meringue. Foolproof for novice bakers, stable and perfect for frosting, filling and piping.
How to make Salted Caramel
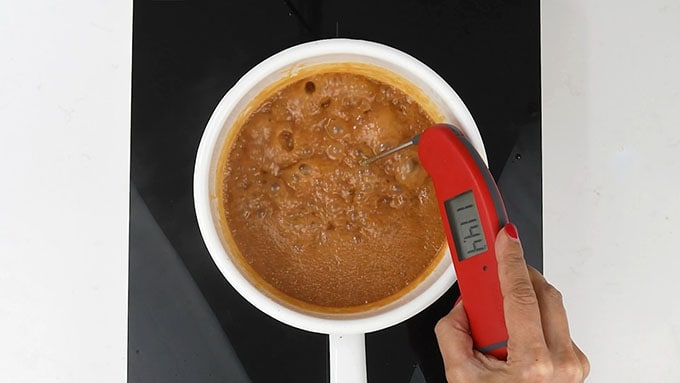
Making caramel is not difficult provided you follow a few basic rules. Sugar is heated until it turns a deep copper colour and then double cream, butter and salt are added. The caramel is then heated further until it reaches 116°C (240°F), thick enough to create the drips on this cake.
I always use my trusty Thermapen Pro when making caramel, I love that it gives an accurate reading within 3 seconds at any angle. I think it’s one of my most used gadgets whether making macarons or fried chicken.
You will also need a heavy-bottomed deep sided saucepan for caramel sauce. Avoid using aluminium pan as they tend to discolour when adding cream.
The final thing you will need is a bit of patience and care. It takes several minutes for the sugar to turn into caramel and you might be tempted to scroll through your instagram feed or go make a cup of coffee. Don’t do that – it takes mere seconds for the caramel to turn from golden to burned and the smell is not a pleasant one!
Salted Caramel step-by-step
Use room temperature cream and butter for best results. Be careful when working with caramel as it is VERY HOT and can give you a nasty burn if you don’t pay attention. Never taste the caramel straight from the pan you WILL burn your mouth!
STEP 1. Combine sugar, water and lemon juice to a deep heavy saucepan. Cook over high heat until the sugar dissolves, brushing the sides of the pan with a wet pastry brush to get rid of any sugar crystals.
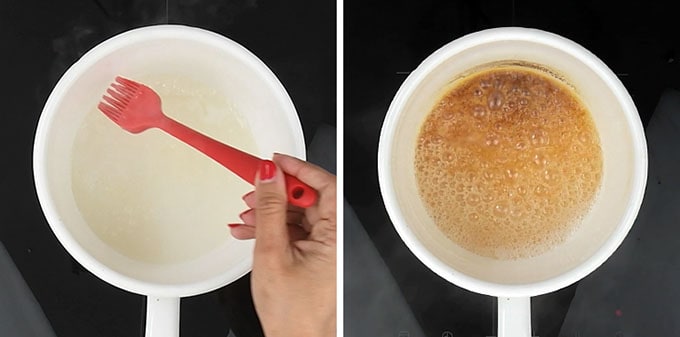
STEP 2. Boil without stirring until the caramel turns a deep copper colour.
STEP 3. Remove from the heat, add the cream and quickly step back. The cream will cause the caramel to bubble volcanically before settling again.

STEP 4. Add the butter and use a small balloon whisk to stir until it melts.
STEP 5. Bring back to the boil, add the sea salt and cook until the thermometer registers 116°C (240°F).
STEP 6. Leave to cool slightly. Taste and adjust the salt if needed. Transfer to a clean jar and cool completely (in the fridge) before adding to buttercream.
Chocolate Cake step-by-step
STEP 1. Preheat the oven to 160C (325F). Line 4x15cm (6 inch) cake pans with greaseproof paper and spray with cake release. You can also use 3x20cm (8 inch) cake tins.
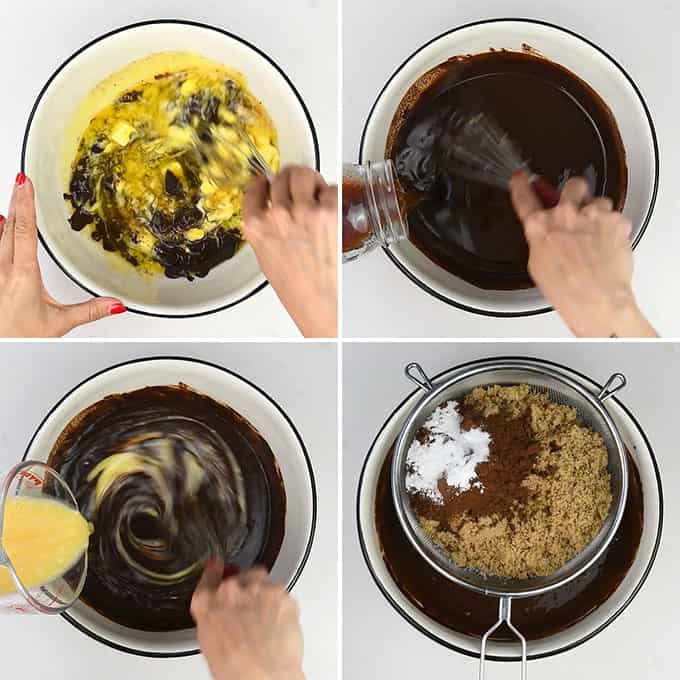
STEP 2. Place the chocolate and butter in a large bowl and microwave in short bursts, stirring, until melted. Stir until smooth.
STEP 3. Add the hot coffee and use a hand whisk to mix it in.
STEP 4. Combine the eggs and buttermilk in a measuring jug and briefly whisk together to combine. Add to the chocolate and whisk it in.
STEP 6. Combine all the dry ingredients and then sift them over the chocolate. Use a hand whisk to mix the batter together until completely smooth.
STEP 7. Divide evenly between your prepared cake tins and bake for 25-30 minutes until the cakes are springy on top and a skewer inserted in the centre comes out clean.
STEP 8. Cool in the tins for 15 minutes and then carefully invert and cool on a wire rack. Be gentle as the cakes can be a little fragile.
SALTED CARAMEL BUTTERCREAM (CHEAT’S SMBC RECIPE)
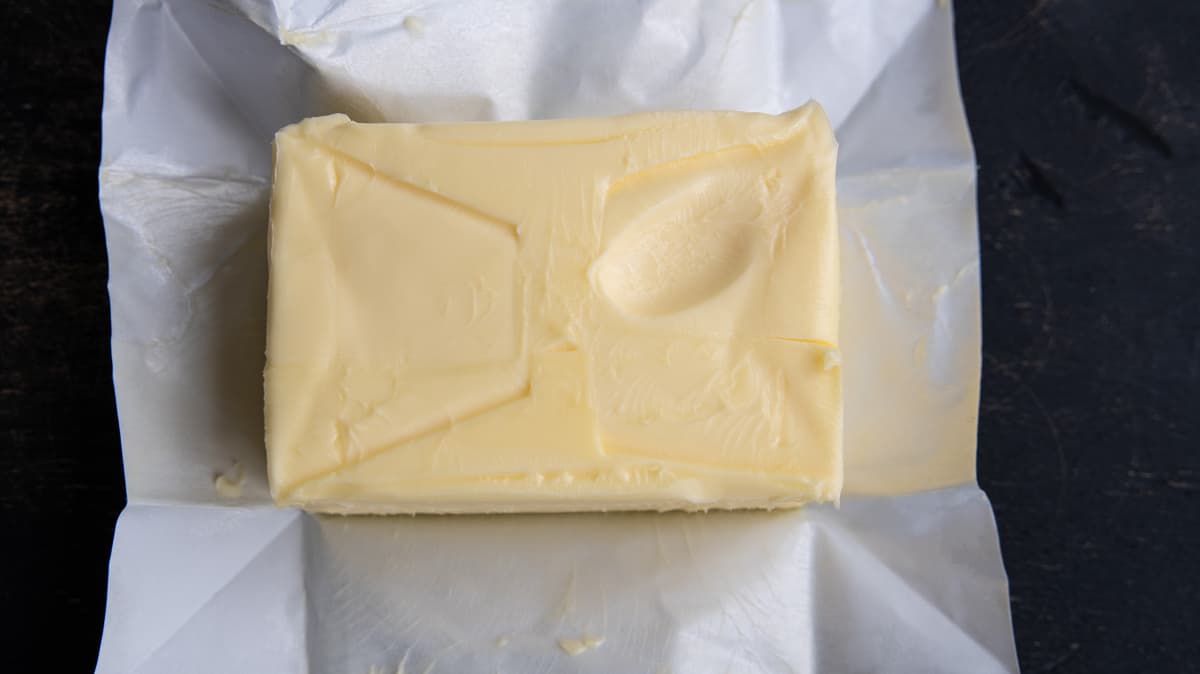
Make sure to use room temperature butter when making the caramel frosting. The butter should be soft enough for your finger to leave a clear imprint if pressed. Use pasteurised egg whites from a carton for ease and safety.
STEP 1. Put the egg whites, icing sugar, vanilla paste and salt in the bowl of your stand mixer. Use the paddle attachment to beat together until thoroughly combined.
STEP 2. Gradually add room temperature unsalted butter, one chunk at a time, beating on medium-low until all the butter is incorporated. Use a spatula to scrape the bottom and sides of the bowl as well as the paddle.
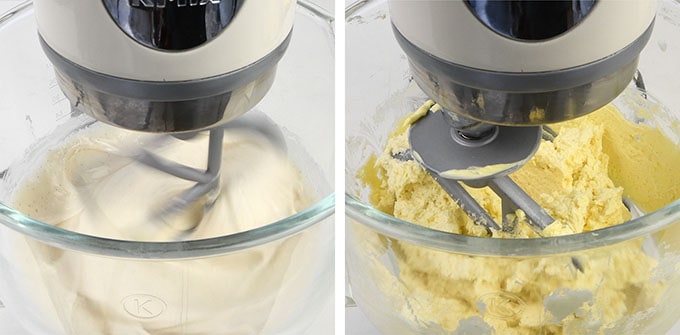
STEP 3. Add 3 heaping tablespoons of the salted caramel (or more, to taste). Increase the speed slightly (not all the way to maximum, around 5 or 6 on dial) and beat for about 5-10 minutes until the buttercream is fluffy, silky and holds peaks.
STEP 4. Transfer the buttercream to a piping bag fitted with a large star tip to assemble the cake.
ASSEMBLE THE SALTED CARAMEL CAKE
STEP 1. Pipe an even layer of butter cream over the bottom cake layer, smooth with an offset spatula and sandwich with the second layer.
STEP 3. Repeat the process with the third layer and top with the fourth. Make sure the stacked cake is flat on top and all the layers are even. You can nudge the layers slightly at this stage to make adjustments.
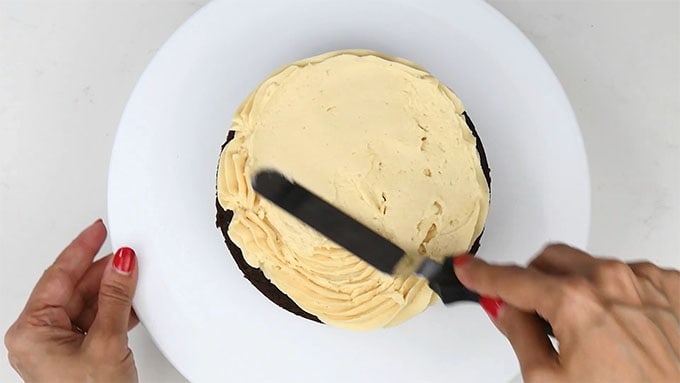
STEP 4. Pipe more frosting over the top layer and use the offset spatula to smooth the buttercream so that it comes over the sides.
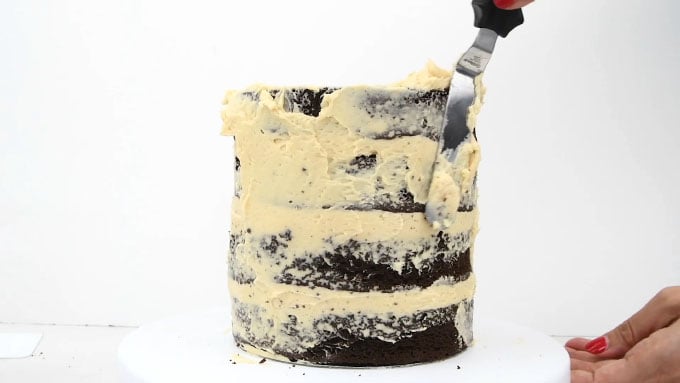
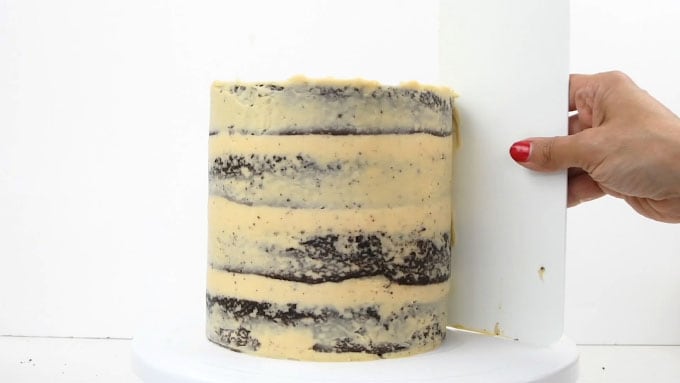
STEP 5. Add more buttercream to the sides of the cake and smooth it to cover the cake completely. Use a pastry scraper (icing smoother) to smooth the frosting. This is your crumb coating and you can stop here for a semi-naked cake effect where a hint of the sponge shows through. If you wish to completely cover the cake, chill for 15 minutes then add another layer of buttercream to completely cover the cake.
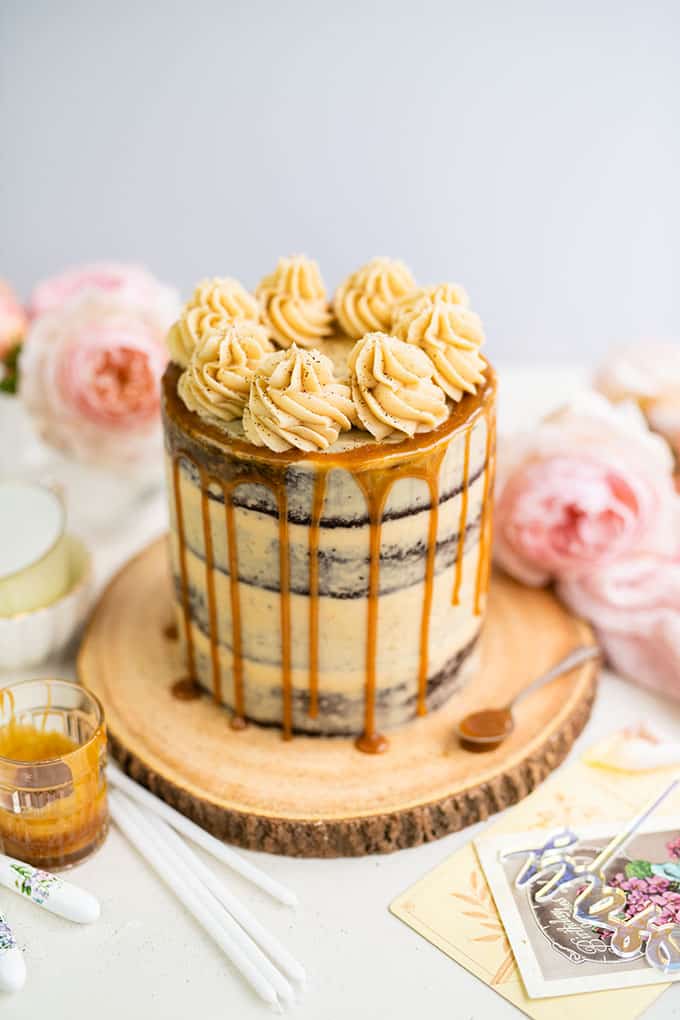
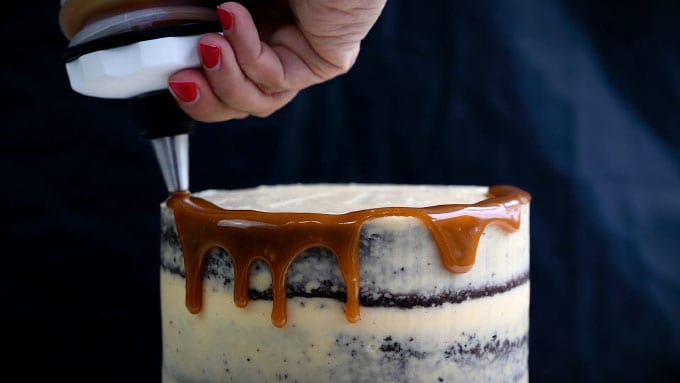
STEP 6. If your caramel has set heat for just a few seconds in a microwave then stir until it slowly drips off a spoon. Drizzle the salted caramel around the perimeter of the cake, letting it drip prettily down the sides. You can use a spoon or a small squeeze bottle for this.
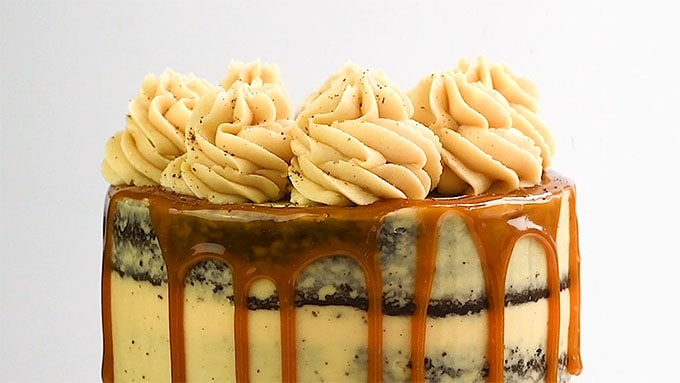
STEP 7. Pipe rosettes of frosting over the top of the cake and sprinkle with a little sea salt or dust with finely grated chocolate.
TIPS FOR MAKING THIS CARAMEL CAKE RECIPE
- The cake layers can be made in 3×8 inch pans or in 4×6 inch pans as I have done. Cakes can be baked a day in advance and stored, wrapped in cling film, at room temperature.
- Use room temperature butter and cream when making the caramel sauce. If the cream is cold you can microwave for a few seconds in a measuring jug and stir before using.
- Always use room temperature butter when making the Cheater’s Swiss Meringue buttercream. Add the butter gradually, allowing for each piece to be incorporated before adding the next.
- To turn this caramel buttercream into chocolate salted caramel frosting add 100g -200g (3.5-7ozoz) of melted and cooled dark chocolate to the frosting together with the caramel. Make sure the chocolate is at room temperature otherwise the buttercream will turn into soup.
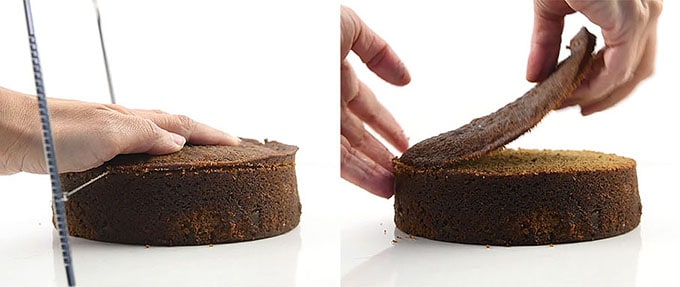
- Level the cake layers if needed to ensure a perfectly straight cake. Use a cake leveller or a serrated knife to trim any domed tops. If you are using a leveller, make sure you keep it straight and cut through the cake slowly using a sawing motion.
- How to store the cake: put in a cake carrier and store at room temperature out of direct sunlight if weather is cool. Store in the fridge for up to 3 days but bring back to room temperature before serving.
- How to store the buttercream: store the buttercream in the fridge for two weeks or freezer for up to 6 weeks. Bring back to room temperature and beat it again so that it is creamy and ready to use.
USEFUL CAKE TOOLS
- Digital scales – I use a scale for all my bakes
- Measuring spoons
- Fine strainer (sieve)
- Bench Scraper (for smoothing frosting)
- Palette knife (offset spatula)
- A Cake turntable is useful but not essential
- Cake boards – useful when covering cakes with frosting
- I always use a Cake lifter to transfer cakes safely
Have you made my Salted Caramel Cake?
Post a photo on my Facebook page, share it on Instagram, or save it to Pinterest with the tag #supergoldenbakes. I can’t wait to see your take on it!

Salted Caramel Cake
Video
Ingredients
Salted Caramel
- 300 g | 1 ½ cups granulated sugar
- 60 ml | ¼ cup water
- 1 tsp lemon juice
- 240 ml | 1 cup double (heavy) cream at room temperature
- 2 tbsp unsalted butter at room temperature
- 1 tsp sea salt or to taste
Chocolate Cake
- 200 g | 7oz dark chocolate chopped or chocolate buttons
- 200 g | 7oz (7/8 cup) unsalted butter cubed
- 125 ml | ½ cup hot coffee or water
- 75 ml | 5 tbsp buttermilk
- 3 large eggs
- 200 g | 7oz soft (1 cup) light brown sugar
- 200 g | 7oz (1 cup) caster sugar
- 200 g | 7oz (1 ½ cups) plain flour
- 25 g | 4 level tablespoons cocoa powder
- 1 tsp bicarbonate of soda
- 1 tsp baking powder
- ½ tsp salt
Salted Caramel Buttercream
- 180 ml (3/4 cup) pasteurised egg whites or from 6 eggs
- 500 g (6 cups) icing sugar
- 500 g (3 cups) unsalted butter at room temperature
- 1 tbsp vanilla extract or paste
- ¼ tsp salt
- 3 tbsp salted caramel sauce (cooled)
Instructions
- SALTED CARAMEL
- Combine sugar, water and lemon juice to a deep heavy saucepan. Cook over high heat until the sugar dissolves, brushing the sides of the pan with a wet pastry brush to get rid of any sugar crystals.
- Boil without stirring until the caramel turns a deep copper colour.
- Remove from the heat, add the cream and quickly step back. The cream will cause the caramel to bubble volcanically before settling again.
- Add the butter and use a small balloon whisk to stir until it melts.
- Bring back to the boil, add the sea salt and cook until the thermometer registers 116°C (240°F),
- Leave to cool slightly. Taste and adjust the salt if needed. Transfer to a clean jar and cool completely (in fridgbefore adding to buttercream.
- CHOCOLATE CAKE
- Preheat the oven to 160C (325F). Line 4x15cm (6 inccake pans with greaseproof paper and spray with cake release. You can also use 3x20cm (8 inccake tins.
- Place the chocolate and butter in a large bowl and microwave in short bursts, stirring, until melted. Stir until smooth.
- Add the coffee and use a hand whisk to mix it in.
- Combine the eggs and buttermilk in a measuring jug and briefly whisk together to combine. Add to the chocolate and whisk it in.
- Combine all the dry ingredients and then sift them over the chocolate. Use a hand whisk to mix the batter together until completely smooth.
- Divide evenly between your prepared cake tins and bake for 25-30 minutes until the cakes are firm on top and a skewer inserted in the centre comes out clean.
- Cool in the tins for 15 minutes and then carefully invert and cool on a wire rack. Be gentle as the cakes can be a little fragile.
- SALTED CARAMEL BUTTERCREAM
- Make sure to use room temperature butter when making the caramel frosting. The butter should be soft enough for your finger to leave a clear imprint if pressed. Use pasteurised egg whites from a carton for ease.
- Put the egg whites, icing sugar, vanilla paste and salt in the bowl of your stand mixer. Use the paddle attachment to beat together until thoroughly combined.
- Gradually add room temperature unsalted butter, one chunk at a time, beating on medium-low until all the butter is incorporated. Use a spatula to scrape the bottom and sides of the bowl as well as the paddle.
- Add 3 heaping tablespoons of the salted caramel (or more, to taste). Increase the speed slightly (not all the way to maximum, around 5 or 6 on diaand beat for about 5-10 minutes until the buttercream is fluffy, silky and holds peaks.
- Transfer the buttercream to a piping bag fitted with a large star tip to assemble the cake.
- ASSEMBLE THE SALTED CARAMEL CAKE
- Pipe an even layer of butter cream over the bottom cake layer, smooth with an offset spatula and sandwich with the second layer.
- Repeat the process with the third layer and top with the fourth. Make sure the stacked cake is flat on top and all the layers are even.
- Pipe more frosting over the top layer and use the offset spatula to smooth the buttercream so that it comes over the sides.
- Add more buttercream to the sides of the cake and smooth it to cover the cake completely. Use a pastry scraper (icing smootheto smooth the frosting. This is your crumb coating and you can stop here for a semi-naked cake effect where a hint of the sponge shows through. If you wish to completely cover the cake, chill for 15 minutes then add another layer of buttercream to completely cover the cake.
- If your caramel has set heat for just a few seconds in a microwave then stir until it slowly drips off a spoon. Drizzle the salted caramel around the perimeter of the cake, letting it drip prettily down the sides.
- Pipe rosettes of frosting over the top of the cake and sprinkle with a little sea salt or dust with finely grated chocolate.
Notes
- TIPS FOR MAKING THIS CARAMEL CAKE RECIPE
The cake layers can be made in 3×8 inch pans or in 3×6 inch pans as I have done. - Use room temperature butter and cream when making caramel sauce. If the cream is cold you can microwave for a few seconds in a measuring jug and stir before using.
- Always use room temperature butter when making Swiss Meringue buttercream. Add the butter gradually, allowing for each piece to be incorporated before adding the next.
- Use room temperature ingredients when making the cake.
- Level the cake layers if needed to ensure a perfectly level layer cake. Use a cake leveller or a serrated knife to trim any domed tops. If you are using a leveller, make sure you keep it straight and cut through the cake slowly using a sawing motion.
- How to store the cake: put in a cake carrier and store at room temperature out of direct sunlight if weather is cool. Store in the fridge for up to 3 days but bring back to room temperature before serving.
- Cake I bake the chocolate cake in advance? the cake layers can be made up to two days in advance and stored, wrapped in plastic, at room temperature.
- How to store the buttercream: store the buttercream in the fridge for two weeks or freezer for up to 6 weeks. Bring back to room temperature and beat it again so that it is creamy and ready to use.
Nutrition
Nutritional information is always approximate, and will depend on quality of ingredients and serving sizes.


Wow, this looks amazing!! Happy blog birthday, and what a gorgeous and delicious way to celebrate 🙂 so glad I found your blog, totally will be trying your recipes when I'm in London, especially since you have all the right measurements! I'm gonna be beyond lost. This is most definitely going on the to-do list.
What a beautiful cake. And happy birthday to your blog!
Congratulations on your blog turning one! This cake is absolutely GORGEOUS.
pinned!
the cake looks amazing!
Happy blogiversary! Love the idea of using an upside down pie tin as the cake stand – very effective!
This is one gorgeous cake that I wish I had on my counter right now!
This looks soo good! Perfect!
thank you both – it was a delicious cake – notice the 'was'. There's none left.
An amazing cake, Happy Blogiversary!
Oh my, oh my – I have been struck dumb. What a spectacular cake. Looks amazing and sounds even better. A great cake to celebrate your blogiversary. Congratulations.