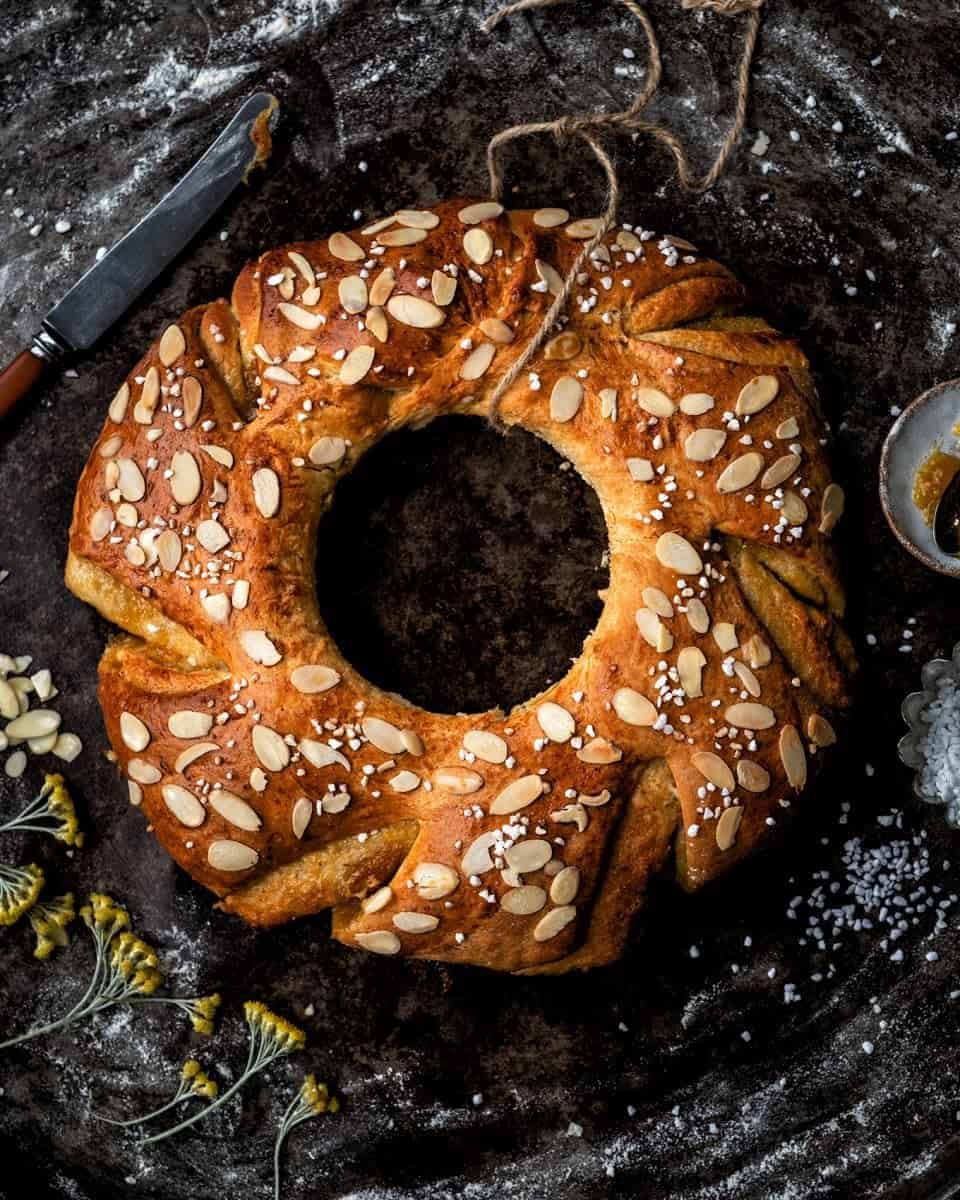
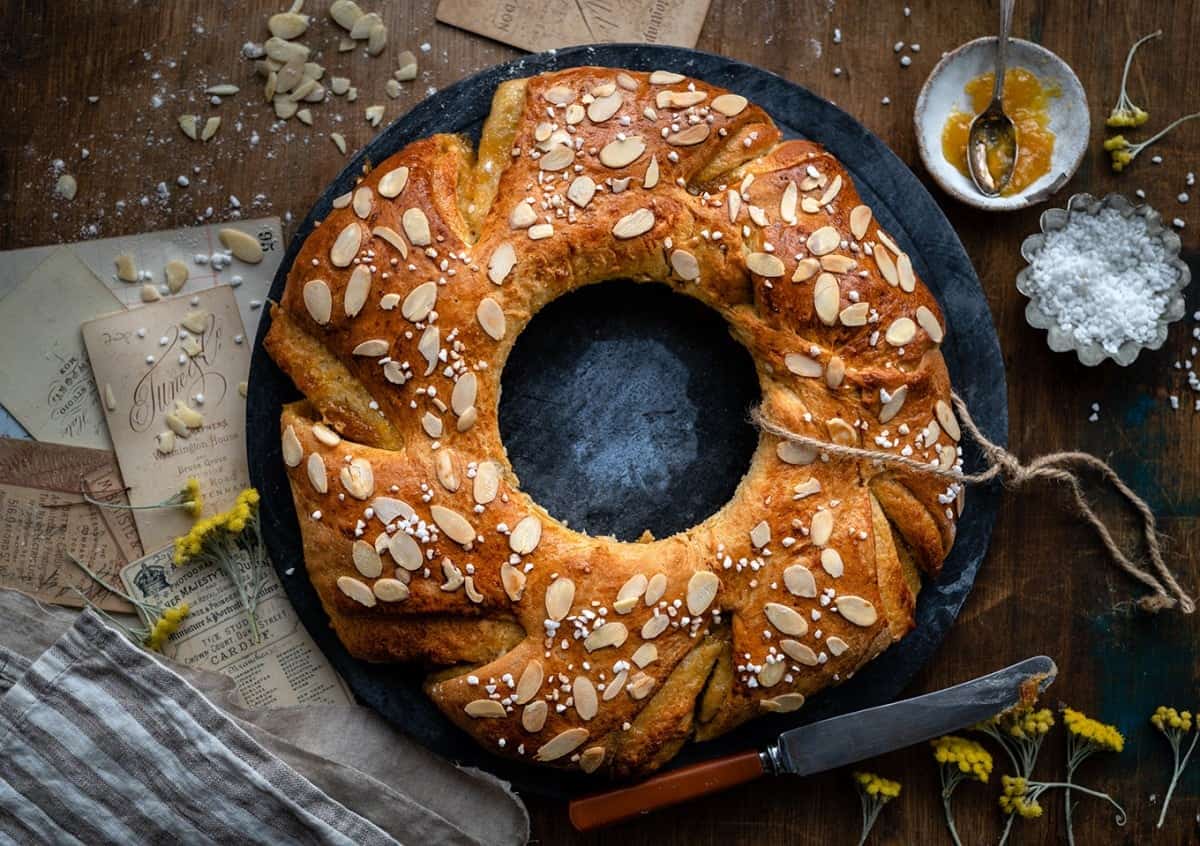
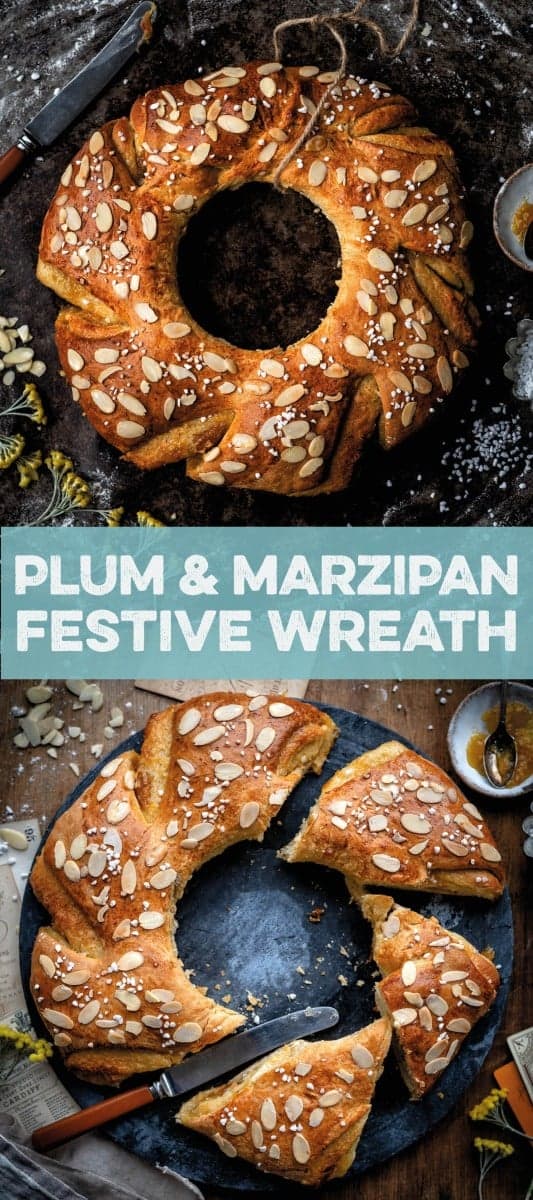
This delicious plum and marzipan wreath would make a beautiful centrepiece on your breakfast table. Easily customisable for holidays such as Christmas and Easter and perfect for sharing!

I know, I know… Another baking recipe when it is a bajillion degrees outside and not even a breeze to help break the intense heat. What can I say, I love baking even in summertime! But I wouldn’t blame you even a little if you bookmarked this recipe for when the weather gets a little cooler 😉
In fact, even though I am sharing this plum and marzipan wreath in July, it is the sort of recipe that would be perfect for Christmas breakfast or presented as a beautiful edible gift. It’s equally suitable for Easter though or for any celebration brunch.
I made this as a treat for my trio of painters who were sprucing up our windows and a couple of rooms last week. It was the least I could do, considering the intense heat they had to endure while painting.
And even though it looks pretty impressive, it is actually a pretty easy bake if you use a stand mixer or bread machine. If yeasted bakes tend to intimidate you though, have a look at my hints and tips below.

Yeasted bakes: troubleshooting tips
When I first started making yeasted bakes I was more or less terrified. I think I considered yeast a very volatile element, hard to tame and even harder to master. While that might have been the case with fresh yeast, which I remember my mother buying from our local bakery when I was little, baking with dried yeast is actually pretty easy.
Which type of yeast
Regular dried (granular) yeast needs to be tested (this is called proofing) before using, mixing with warm water and sometimes a little sugar and flour. After 5-10 minutes the mixture will be frothy, a clear indication the yeast is active. If the yeast doesn’t froth up, your packet is probably past its best-by day and you need to start your recipe again.
Instant yeast is sometimes also called Rapid Rise or Easy Blend and marked as suitable for use in bread machines. This yeast doesn’t require proofing and instead is added directly into the flour. I prefer to use this type of yeast for the most part.
My yeasted bake is not rising!
If you are using dried yeast and it doesn’t froth up during proofing then it’s probably stale. But using water that’s too hot can also kill your yeast and sink your bake. The water should be about 38C (100F) ‘blood warm’ (body temperature) but not hot. It is worth checking the expiry dates on your yeast packets and to replace them frequently unless you bake very often. Store in a dark cool place – not above or near your oven!
Proving your yeasted bake
After you have mixed your dough and shaped your wreath you will need to prove it. Usually this is done by placing the dough in a greased bowl (or your stand mixer bowl) and leaving until doubled in size. On a cold winter day this can take up to 1 1/2 hours but in the summer this will be less! Check your bake has proved by denting with your finger. If the indent doesn’t spring back then prove for a little longer. If it springs back slowly you are good to go.
This wreath is proved twice – first after you mix the dough and then once more after you fill and shape the wreath. If you use a bread machine the first round of proofing will be done in the machine so you only need to do the second proofing.
Filling and shaping your wreath
I used Bonne Maman Mirabelle plum jam as a filling in this bake. In the past I have used apricot jam and marmalade. I like how these flavours combine with marzipan which is used quite sparingly in this recipe but it still adds a lovely touch.
I prefer to grate the marzipan over the jam by freezing until almost solid and then grating. As this wreath is sliced on the diagonal it’s important not to overfill it otherwise the filling will ooze out while baking.
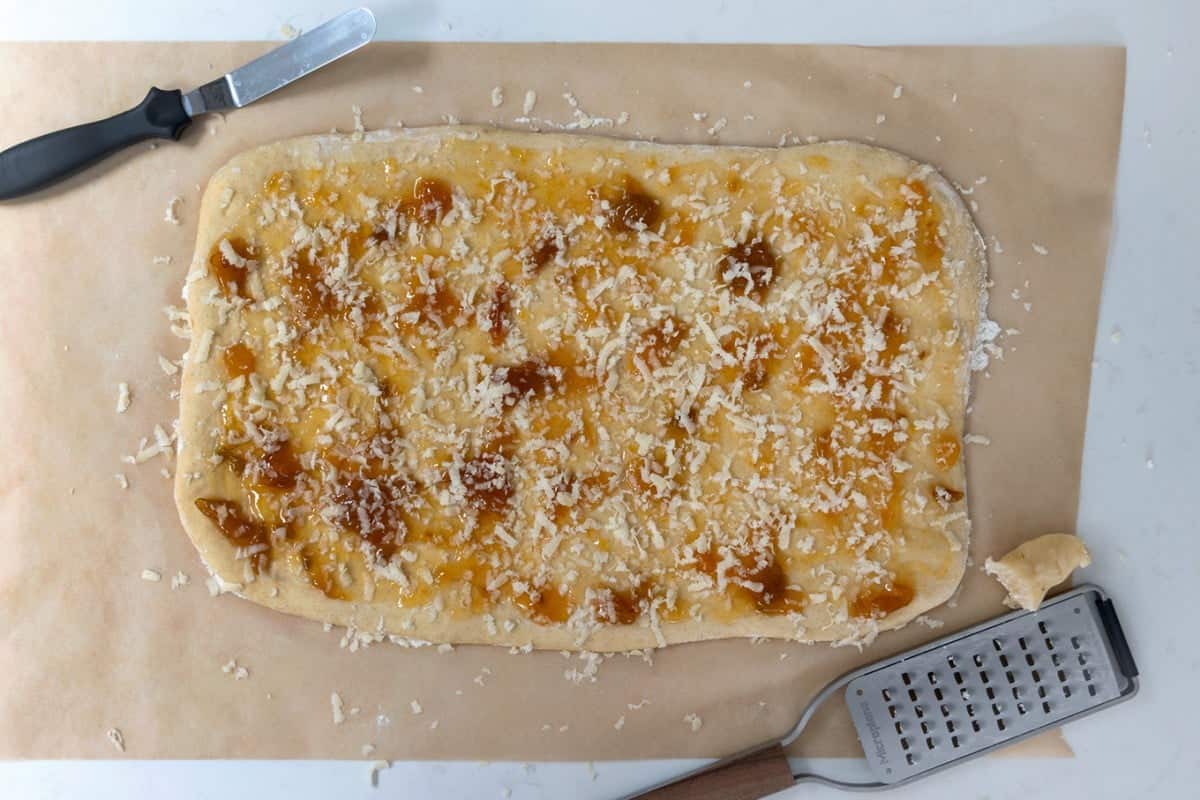
Once your dough has proved, you need to roll it out to rectangle shape on baking baker. Spread the jam over the entire surface, leaving a small border on one side. Grate the marzipan over it and then roll into a log.
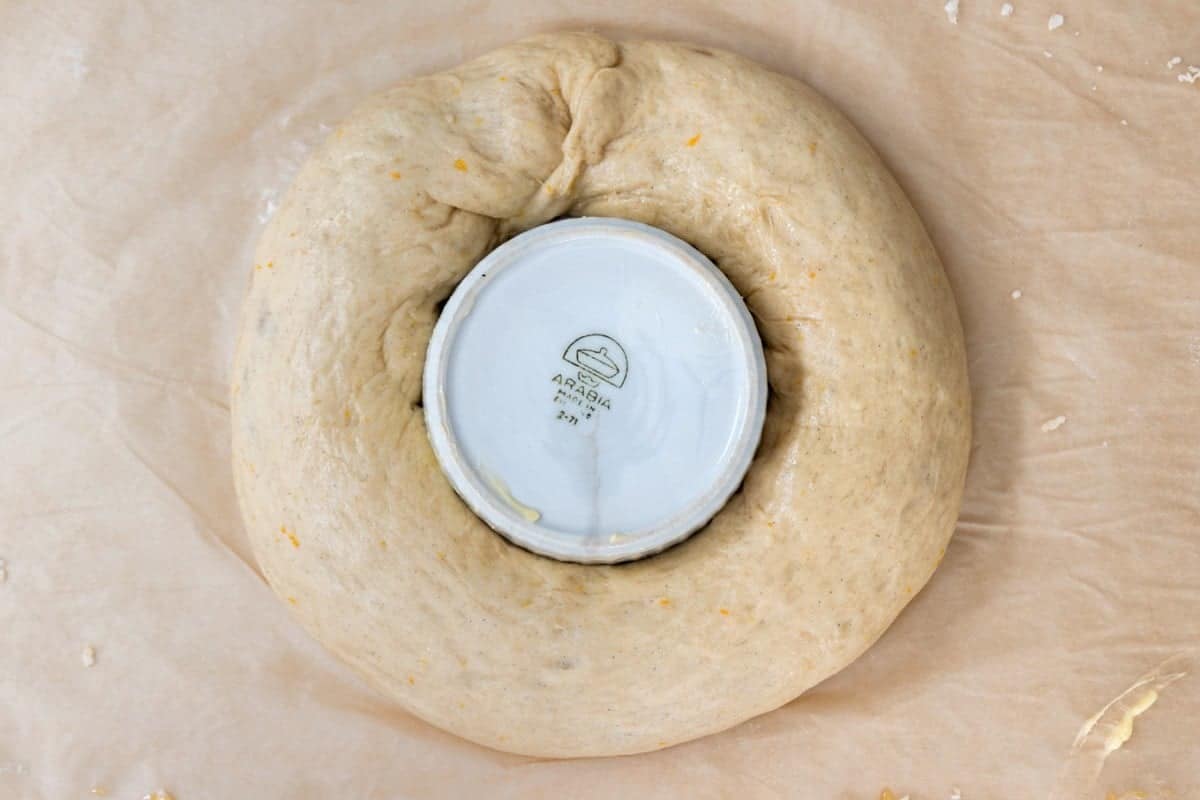
Shape the log into a ring shape, placing a greased ramekin in the middle. Cover with greased cling film (I spray mine with cake release) and leave for about 20-30 minutes.
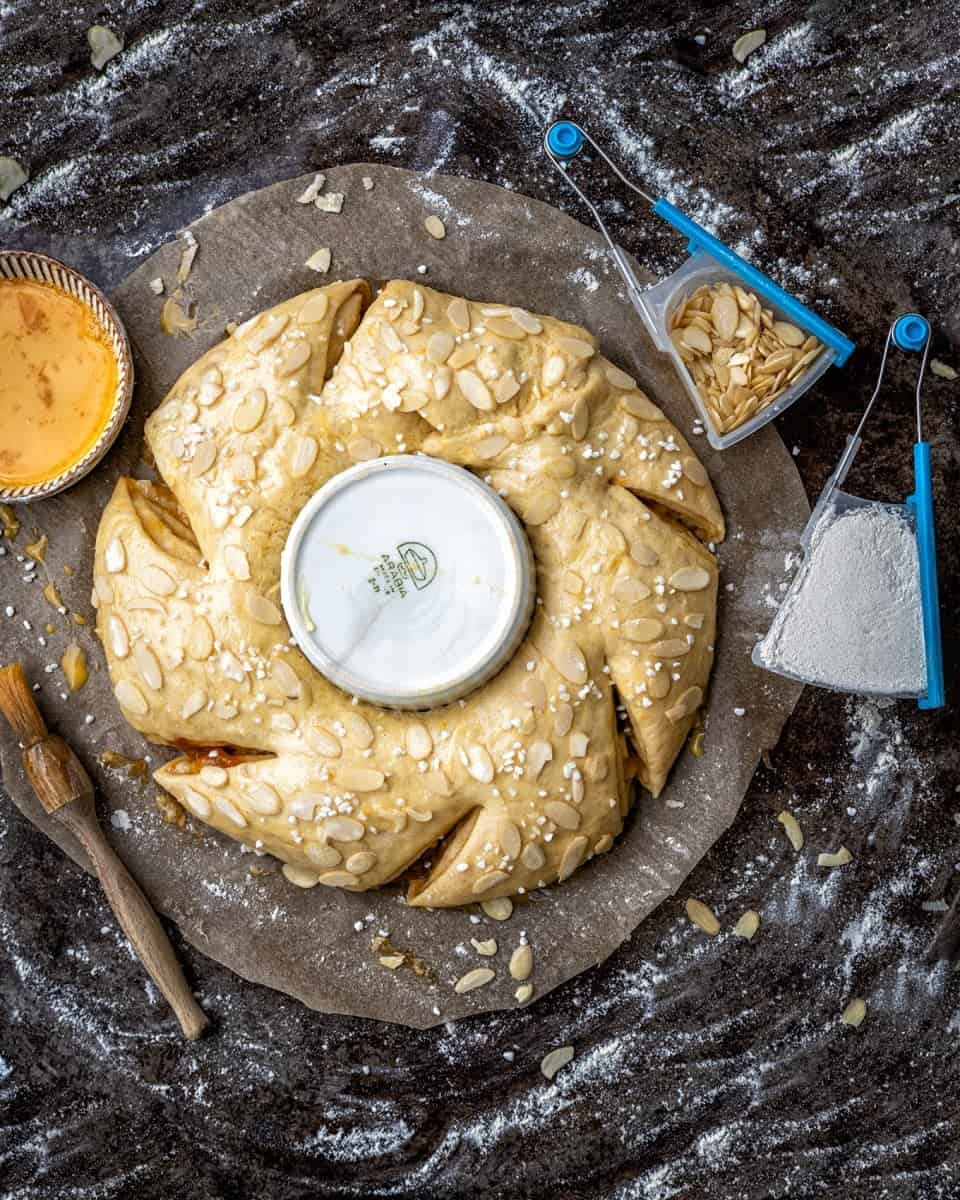
Use scissors or a sharp knife to cut diagonal slashes at regular intervals on the outer edge of the wreath. Brush with egg wash and sprinkle with flaked almonds and pearl sugar. Bake for 30 minutes until beautifully golden. Leave to cool before serving.
This wreath is best eaten when fresh and maybe even still slightly warm from the oven. But if you don’t demolish it all at once, it will keep for a couple of days.
Fancy trying some more yeasted bakes?
- Quick Method Almond croissants
- Quick and Easy Danish Pastries
- Bienenstich: Bee Sting Cake
- Hot Cross Cinnamon Buns
- Best cinnamon rolls with rum butter caramel sauce
Made one of my recipes? Tag me on Instagram or pop by on Facebook and make my day! 
Plum and marzipan sweet wreath
Ingredients
For the wreath
- 300 g | 2 1/2 cups all purpose flour
- 2 tsp | 1 sachet rapid rise yeast
- 3 tbsp sugar
- 1/4 tsp salt
- 60 ml | 1/4 cup whole milk
- 60 ml | 1/4 cup water
- 1 large egg
- 2 tsp vanilla extract
- 1 tbsp orange or lemon zest
- 3 tbsp unsalted butter at room temperature
- 1 egg lightly beaten for egg wash
- 1 tbsp flaked almonds
- 1 tbsp pearl sugar
To fill
- 4-5 tbsp Mirabelle plum jam
- 60 g | 2oz marzipan frozen until almost solid
Instructions
To make in a stand mixer
- Put all the dry ingredients – flour, yeast, sugar, salt – in the bowl of your stand mixer and mix together to combine with a balloon whisk.
- Mix the water, milk, egg, vanilla extract and zest in a measuring jug. If your milk is cold then add warm water to bring everything to body temperature before adding to the flour.
- Fit the dough hook in your stand mixer and start mixing at low speed, gradually adding the liquid ingredients.
- Mix for a minute until a shaggy dough forms and then add the butter.
- Continue mixing on medium-low speed until the dough is elastic and forms a ball around the hook, about 6 minutes.
- Cover the bowl with cling film and leave to rise until doubled in size - about an hour. Meanwhile put the marzipan in the freezer.
To make in a bread machine
- Add the water, milk, egg, vanilla extract, zest, sugar and butter to your bread machine bowl.
- Top with the flour, salt and yeast and select the dough programme. Leave to mix and prove. Meanwhile put the marzipan in the freezer.
Shape and fill the wreath
- Preheat the oven to 180C (350F).
- Tip the dough onto a lightly floured large piece of baking paper and roll out to a rectangular shape, about 15x40cm (6x16in).
- Mix the jam so that it is pliable and then spread over the dough using a palette knife or back of a spoon. Leave a small border on one long side.
- Take the marzipan out of the freezer - it should be almost solid but not completely hard. Grate some marzipan over the entire surface.
- Roll the dough into a log and shape into a wring. Place a greased ramekin in the centre and cover with greased plastic wrap.
- Leave for 20-30 minutes, the dough should rise again.
- Transfer onto a large baking sheet and cut diagonal slashes on the outer edge of the wreath using a sharp floured knife.
- Brush all over with a lightly beaten egg, sprinkle with flaked almonds and pearl sugar.
- Bake for 30 minutes until golden. Cool before serving.
Notes
Nutritional Info
Lucy says
Lovely looking recipe! I was wondering if this could be twisted into a circle – more like babka style so the filling could be seen on the surface, or would this cause the filling to spill out/burn? Can’t wait to give this a go!
Lucy Parissi says
You can certainly do that but the filling might burn. So if you do bake it in this style maybe keep an eye on it and keep partially covered with foil.