Gingerbread Salt Dough Ornaments
, Published Dec 12, 2025
This post may contain affiliate links. Please read our disclosure policy.

Make Gingerbread Salt Dough Ornaments with this easy DIY recipe – simple, family-friendly and perfect for tree decorating and holiday gifts!

There’s something really special about sitting down together to make gingerbread ornaments – the kind of slow, cozy Christmas craft that turns into a tradition without you even noticing. Kids get to roll and cut their own masterpieces, grown-ups handle the oven and the “this is not food” reminders, and everyone has a jolly good time.
Unlike real gingerbread cookies that get eaten and forgotten, these gingerbread salt dough ornaments are made to last. You’ll pull them out of the box year after year, remembering who made which slightly wonky star or gingerbread man with three buttons on one side and none on the other.
This simple family craft is a great way to mark the years, start a family tradition and trim your tree with memories as well as decorations. So crank the Christmas tunes up high and let’s get rolling!
Why I ❤️ DIY Gingerbread Ornaments
- Festively fragrant – Ground cinnamon, ginger, cloves, molasses and gingerbread fragrance oil give the ornaments a cozy bakery scent.
- Kid-friendly – The dough is easy to roll and cut, so little hands can help make their own gingerbread man ornaments.
- A lasting Christmas decoration – Once baked and fully dried, the ornaments are hard, sturdy and can last for years with proper storage.
- Endlessly customizable – Keep them simple and rustic or decorate with paint, markers, faux icing and glitter to match your color scheme.
- Great for gifting – Tie them onto presents as reusable tags, tuck into gift boxes or create personalized keepsakes with names and dates.

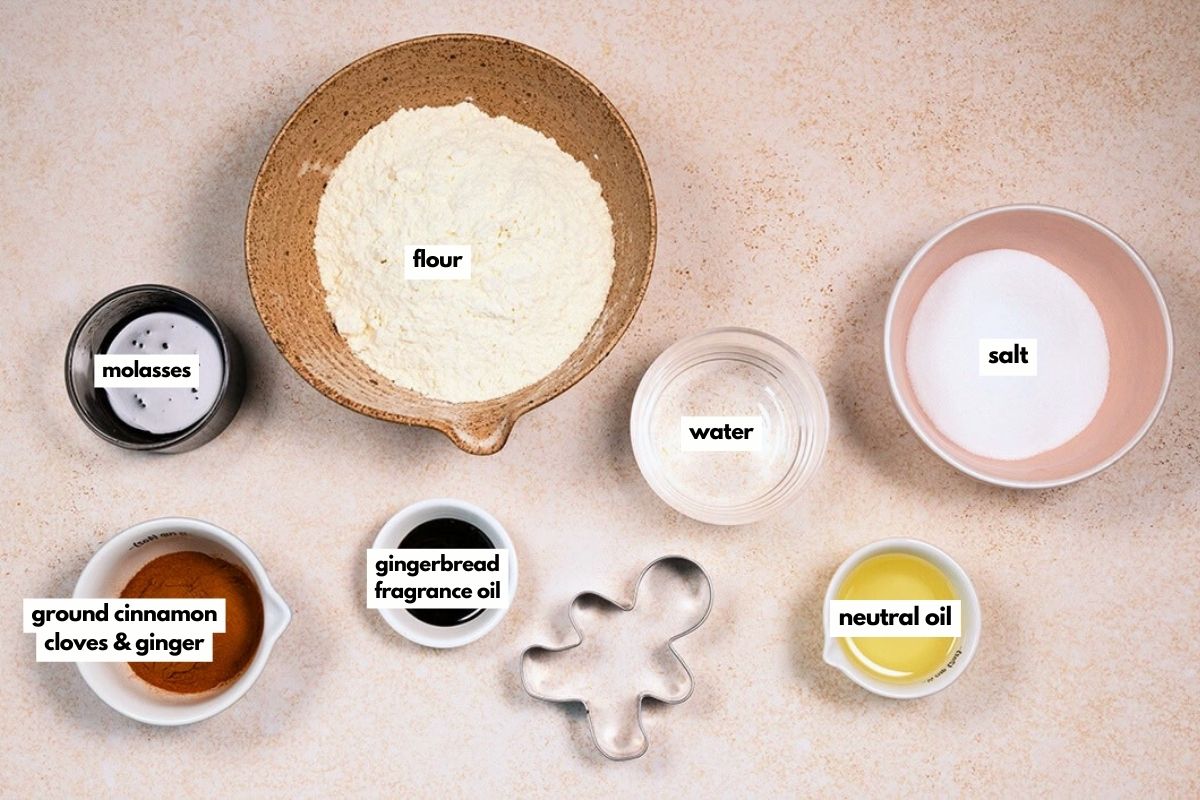
Here’s What You’ll Need
- Flour: all-purpose flour forms the structure of the salt dough, helping it roll out smoothly and bake firm.
- Salt: Regular table salt is essential in any salt dough ornaments recipe. It hardens the dough as it dries and helps preserve the ornaments so they last.
- Water: Brings the dough together. Warm water makes it easier to mix everything into a smooth, pliable ball.
- Molasses: Adds a deep brown color that makes the ornaments look like real gingerbread cookies and contributes to that rich, “baked” appearance.
- Ground cinnamon, cloves and ginger: Classic gingerbread spices that tint the dough and add a warm, cozy aroma and make the ornaments look like real cookies.
- Gingerbread fragrance oil (optional): Boosts the scent so your ornaments smell amazing on the tree. Use a craft-safe fragrance oil designed for candles, soaps or similar projects and remember these ornaments are not for eating.
- Neutral oil: A small amount of vegetable or canola oil keeps the dough workable and helps prevent cracks as the ornaments dry.
- Gingerbread man cookie cutter (and other festive cutters): The key to creating classic gingerbread ornaments – although you can use any type of cutters or even stencils to create your own decorations.
- Molding paste, glitter, beads etc: To decorate your homemade gingerbread salt dough ornaments.
- String, ribbon or hooks to hang the ornaments on the Christmas tree.
⚠️ PLEASE NOTE: These decorations are not edible! ⚠️
The high salt content and fragrance oil make them strictly for decorating, not snacking. They do smell incredible though and they look so convincing that you’ll want to warn little ones before they try to sneak a “cookie” off the tree.
How to Make Gingerbread Salt Dough Ornaments
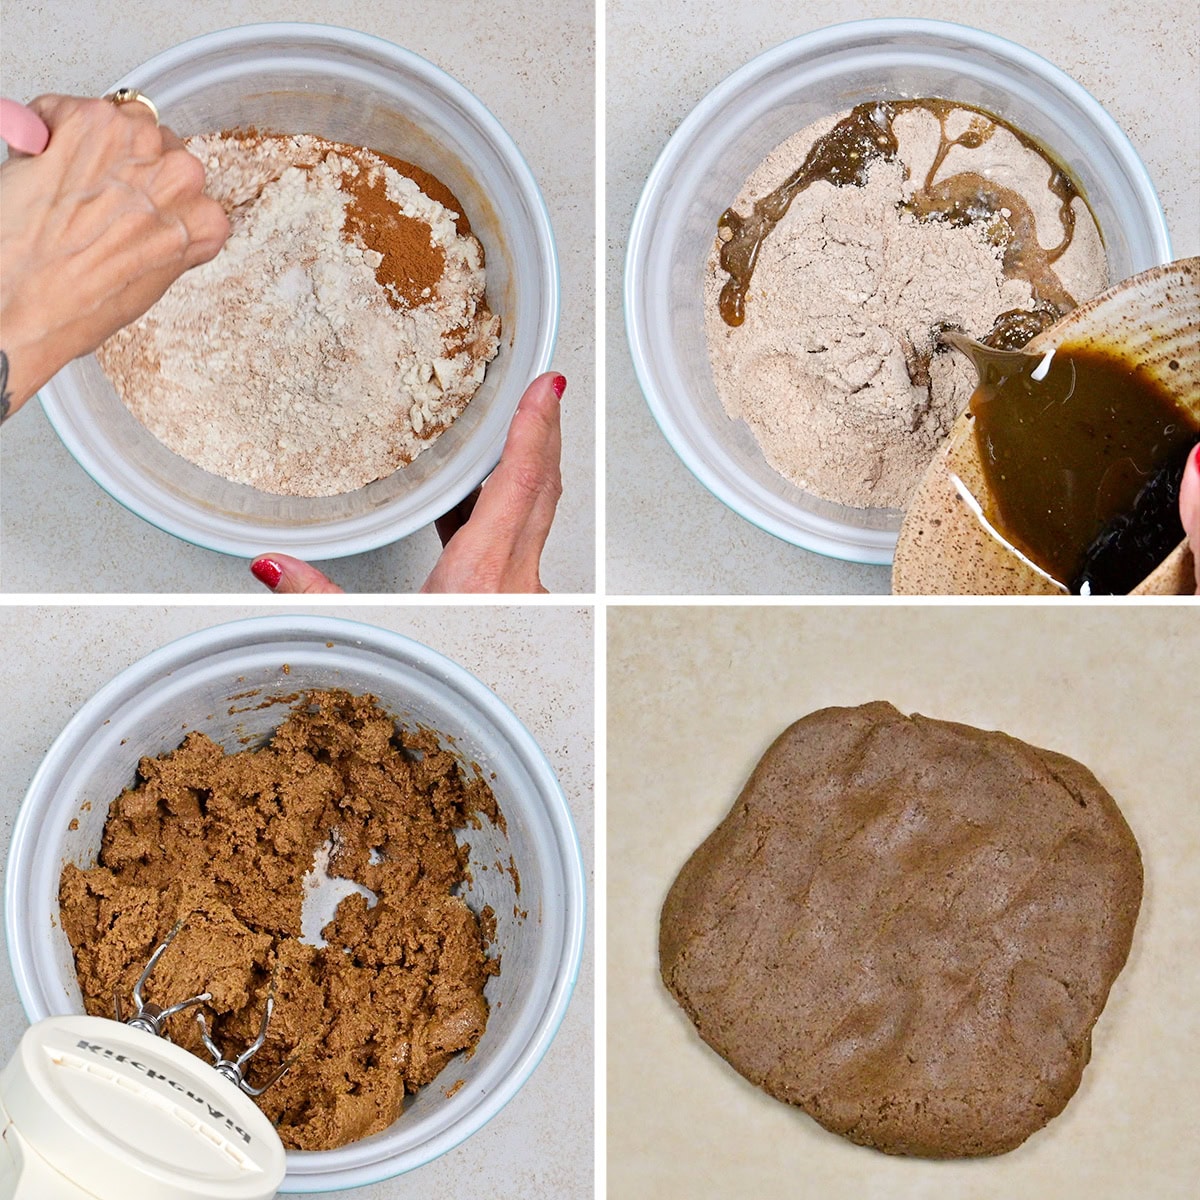
Make the dough
- Stir together the water, oil, molasses and gingerbread oil fragrance in a measuring jug. Combine the flour, salt and spices in a large mixing bowl.
- Pour the wet ingredients into the bowl and mix together with a spoon or a hand mixer until you have a smooth pliable dough. Gather into a ball and cover with plastic wrap to prevent from drying out.
Roll out and cut
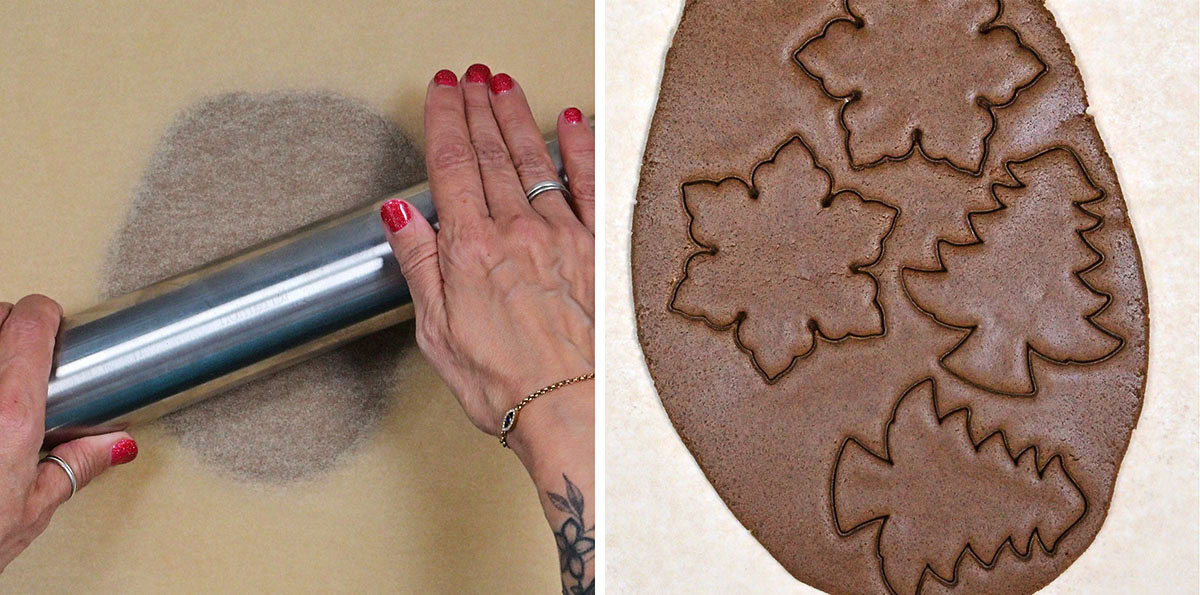
- Divide the dough into portions and roll out between two pieces of parchment paper. A rolling pin with ring spacers is useful here but you can also use an embossing rolling pin to give your ornaments texture.
- Use festive Christmas cookie cutters to cut your ornaments, gathering any dough scraps to roll out again. Use letter stamps to personalize your decorations or use a toothpick to write your initials. Cut a hole in the ornaments using a straw if you want to use them as Christmas decorations.
Dry in the oven
- Preheat the oven to 230°F (110°C). Place the ornaments on a parchment lined cookie sheet and bake for 2 hours, flipping them over halfway through. You may need to bake for longer depending on the size and thickness or your ornaments.
- Turn the oven off but leave the ornaments inside until cool to dry out completely. File with a Microplane zester or a clean emery board if you need to refine their shape.
Decorate and hang on the tree
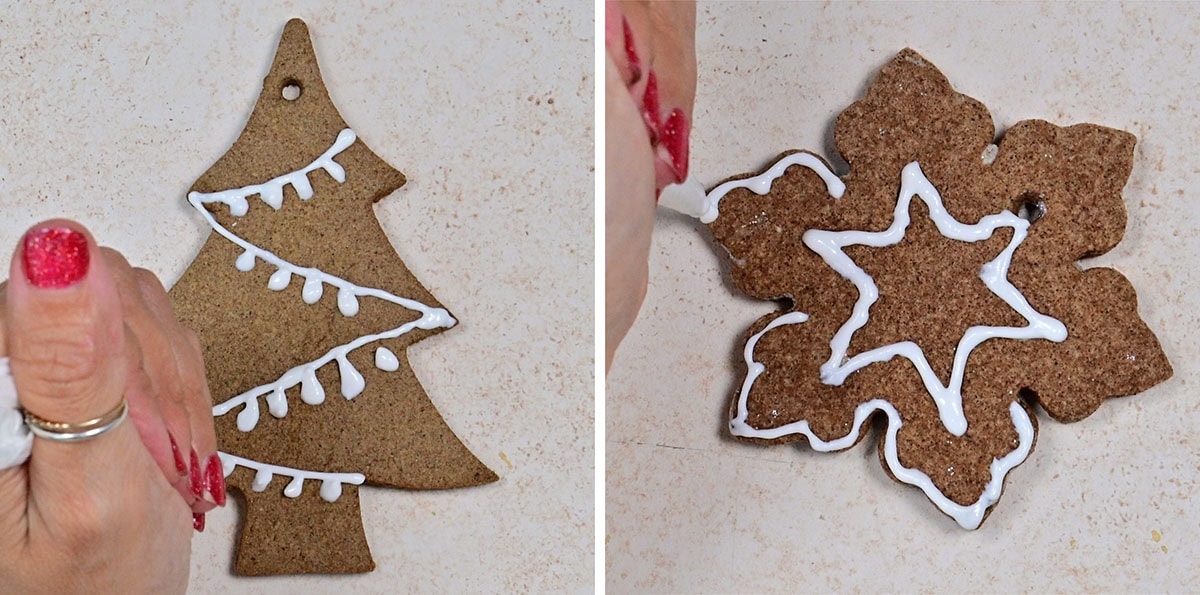
- Add a few drops of water to light molding paste and mix well to combine. Transfer to a piping bag or silicone decorating bottle fitted with a small round tip.
- Place the ornaments on parchment paper to avoid drips and mess and decorate. Add glitter or decorations now if using and leave the ornaments to dry for at least four hours or overnight.
- Thread with ribbon or string and hang on the tree or use them as gift tags, thread into garlands or table setting cards.
How to Store Gingerbread Ornaments
- Cooling: Make sure the ornaments are completely dry and fully cooled before decorating or storing. Any residual moisture can lead to soft spots or mold.
- Sealing (optional): For extra durability, brush the cooled ornaments with a clear craft varnish or spray sealant on both sides to help protect from humidity and fingerprints.
- Short-term storage: Store finished ornaments in a cardboard box or plastic container lined with tissue paper. Keep layers separated with more tissue so they don’t scratch each other.
- Long-term storage: Keep the box in a cool, dry place away from direct sunlight and moisture. Avoid storing in damp basements or humid attics.

Frequently Asked Questions
If properly dried and stored, your gingerbread ornaments can last for several years. Check them each season and discard any that show signs of softening or mold.
No – this gingerbread ornaments recipe is for crafting only. The dough contains a lot of salt and added fragrance oil so it is not safe to eat. Make sure to supervise young children accordingly!
You can skip it if you like. The spices already smell lovely. Fragrance oil simply boosts the scent and helps it last longer. Be sure to use a skin-safe fragrance oil and avoid essential oils that might be irritating.
Yes. Kids can help mix the dough, roll it out and cut shapes with cookie cutters. Adults should handle the baking and carefully supervise any use of fragrance oils, varnish or hot ovens.
Roll the dough to about ¼ inch thick. Thinner ornaments dry faster and are lighter on the tree, but if they’re too thin they may be fragile.
The oven might be a bit too hot or the ornaments may be too thick. Bake at a low temperature and flip them halfway through to help them dry flat.
⭐ I hope this gingerbread salt dough ornaments recipe inspires you to plan a cozy craft afternoon and fill your home with handmade holiday charm! Please leave a comment and rating if you try this recipe, follow me on Pinterest for more easy recipes and don’t forget to tag me on @Instagram or TikTok so I can see your creations.

Gingerbread Salt Dough Ornaments
Equipment
Ingredients
For the gingerbread salt dough
- 2 cups (250g) flour all-purpose / plain
- ½ cup (145g) salt
- 2 tbsp ground cinnamon
- 1 tbsp ground ginger
- 1 tsp ground cloves
- 1 cup (250ml) water
- 3 tbsp dark molasses (treacle)
- 2 tbsp vegetable oil
- a few drops gingerbread oil essence (optional)
To decorate
Instructions
Make the salt dough
- Combine the flour, salt and spices in a large mixing bowl.2 cups (250g) flour, ½ cup (145g) salt, 2 tbsp ground cinnamon, 1 tbsp ground ginger, 1 tsp ground cloves
- Stir together the water, oil, molasses and gingerbread oil fragrance in a measuring jug.1 cup (250ml) water, 3 tbsp dark molasses, 2 tbsp vegetable oil, a few drops gingerbread oil essence
- Pour the wet ingredients into the bowl and mix together with a spoon or a hand mixer until you have a smooth pliable dough. Gather into a ball and cover with plastic wrap to prevent from drying out.
Roll out and cut
- Divide the dough into portions and roll out between two pieces of parchment paper. A rolling pin with ring spacers is useful here but you can also use an embossing rolling pin to give your ornaments texture.
- Use festive Christmas cookie cutters to cut your ornaments, gathering any dough scraps to roll out again. Use letter stamps to personalize your decorations or use a toothpick to write your initials. Cut a hole in the ornaments using a straw if you want to use them as Christmas decorations.
Dry in the oven
- Preheat the oven to 230°F (110°C). Place the ornaments on a parchment lined cookie sheet and bake for 2 hours, flipping them over halfway through. You may need to bake for longer depending on the size and thickness or your ornaments.
- Turn the oven off but leave the ornaments inside until cool to dry out completely. File with a Microplane zester or a clean emery board if you need to refine their shape.
Decorate and hang on the tree
- Add a few drops of water to light molding paste and mix well to combine. Transfer to a piping bag or silicone decorating bottle fitted with a small round tip.light molding paste
- Place the ornaments on parchment paper to avoid drips and mess and decorate. Add glitter or decorations now if using and leave the ornaments to dry for at least four hours or overnight.glitter
- Thread with ribbon or string and hang on the tree or use them as gift tags, thread into garlands or table decor.