Mirror Glaze Cake
, Updated Oct 04, 2025
This post may contain affiliate links. Please read our disclosure policy.

Make a beautifully glossy Mirror Glaze Cake at home following my video tutorial, step-by-step instructions and expert tips.
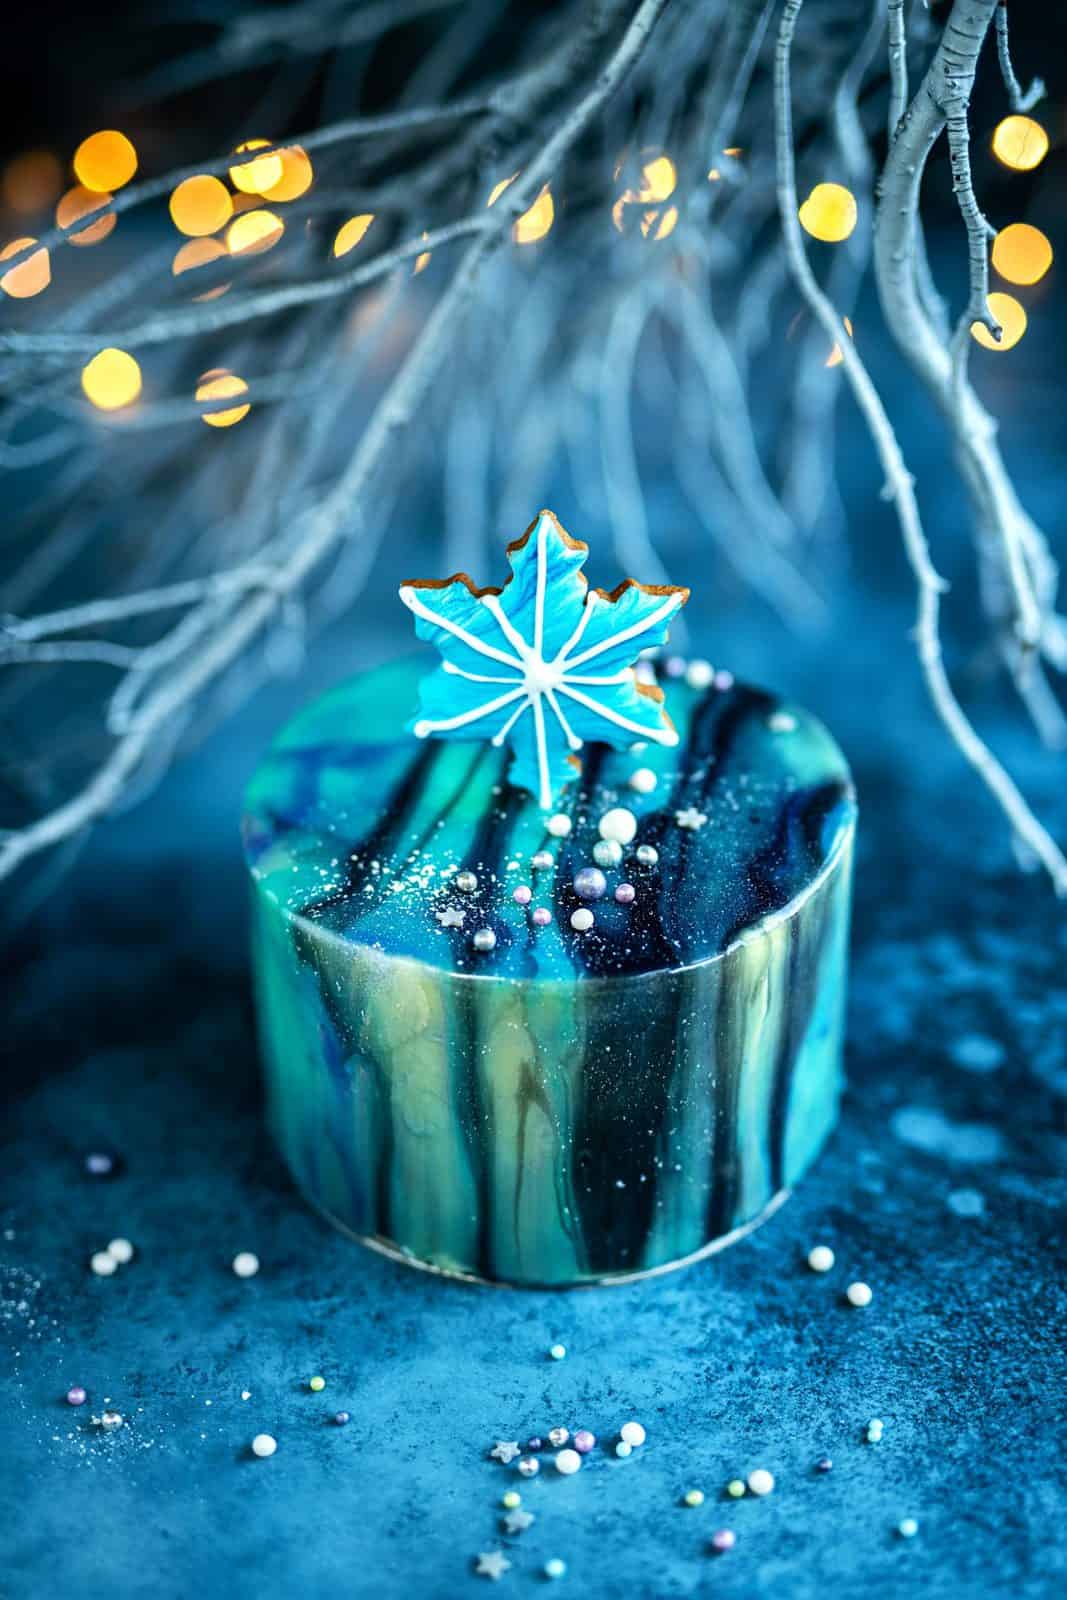
Cake lovers have been enchanted with Mirror Glaze cakes ever since stunning creations made a splash on Instagram. No surprise there, mirror glaze cakes are pure eye candy! That glassy, reflective finish looks like something from a high-end patisserie, but you can absolutely make it at home. In this post, you’ll find my full video walkthrough, easy-to-follow steps, and tips for each stage, from blooming gelatine to pouring the final glaze. Whether you’re doing it for a big celebration or just because, you’ll walk away with a cake that wows.

What is Mirror Glaze?
Mirror glaze is not new – this glazing technique has been used by pastry chefs for many years to cover mousse cakes (entremets). This shiny glaze creates a highly polished surface that is actually reflective, hence the name.
This highly reflective glaze is made with water, sugar, glucose, sweetened condensed milk, gelatin and white chocolate. It is then tinted with gel food coloring and then poured over a frozen cake once it reaches a certain temperature. Contrasting colors create intricate patterns as the glaze drips off

Here’s What You’ll Need
Let’s take a look at the ingredients needed to create the mirror glaze at home.
- Sugar, water and glucose (or corn syrup): The sweet base and body of the glaze. Gelatin: Gives the glaze structure so it sets without turning hard.
- Sweetened condensed milk: Adds richness and helps the glaze stay glossy and creamy.
- White chocolate: The canvas — it melts into the liquid glaze and provides opaqueness and sheen.
- Food color gels in a variety of striking vibrant tints.
- Luster powder and decorations: Optional extras that let you add sparkle, accent colors and texture to your Mirror Cake masterpiece!

Essential Equipment
This is the type of recipe that demands a certain set of tools:
- Instant Read Thermometer – temperature is absolutely key in making mirror glaze. If the glaze is too hot it will simply drip off the cake. I rely on my Thermapen for its incredible 3 second response time.
- Digital scales – I use a scale for all my bakes but it is especially useful for mastering tricky skills like macarons or mirror cakes
- Immersion blender (optional) for blending the glaze
- Fine strainer to get rid of any lumps
- Palette knife – for scraping the glaze as it drips off the cake
- Cake boards – useful when covering cakes with buttercream
- Cake lifter – for transferring cakes safely
What cakes are best for glazing?
You can use any layer cake that’s entirely covered with a thick layer of white buttercream. The surface needs to be as smooth as possible for best results. I used my vanilla cake recipe and my easy Swiss Meringue buttercream from my Salted Caramel Cake.
The cake also needs to be frozen, so I prefer to make it at a day in advance. I would say the minimum freezing time would be at least 2 hours. This recipe makes enough glaze to cover a 8-inch layer cake, bearing in mind that a lot of the glaze will drip off the cake as you are pouring it.
How To Make Mirror Glaze Step-by-Step
- Prepare the gelatin: Put cold water in a bowl and sprinkle the gelatin powder over the surface. Leave for 5 minutes to allow the gelatin to bloom (swell).
- Add water, sugar and glucose in a saucepan, bring to a gentle simmer and stir to dissolve the sugar. Take off the heat as soon as bubbles appear.
- Stir in the bloomed gelatin into the hot liquid so that it melts.
- Pour in the condensed milk and stir to combine. You can also use an immersion blender here if you prefer.

- Strain the mixture into a bowl over a fine mesh sieve to remove any solids.
- Create your base color: Add a few drops of gel food coloring to the glaze, starting with a very small amount and adjusting until you are happy with the tint. You want the base to be a pale color – I went with light blue.
- Make the accent colors: quickly pour some of the base color into three smaller bowls or measuring jugs and tint these three contrasting or complementary colors.

How to Cover A Cake With Mirror Glaze
- Freeze a buttercream-covered 8 inch layer cake for at least two hours. Put a small can into a large rimmed baking sheet and place the your cake on it.
- Check the glaze is the right temperature – it needs to be 89°F / 30°C when checked with your thermometer. If it is too hot it will simply drip off the cake and if it is too cold it will set immediately!
- Start pouring the glaze over the cake starting at the edges then moving in to cover the centre. The glaze will drip down the sides and cover the cake.
- Start layering the accent glaze over the base color. The glaze will keep moving and pouring off the cake blending the colors together. Continue adding glaze until you are happy with the look.

- Finishing touches: Put the luster powder in a small bowl and tip a clean brush in it. Flick the brush over the cake to add some sparkle!
- Use a small palette knife to clean the drips off the bottom edge of the cake. Use a cake lifter to transfer the cake onto a stand or plate.
- Add sprinkles or any decorations now but a word of warning: you won’t be able to move them if you are unhappy with their position! You can put the cake in the fridge at this point or serve it.

Tips for Mirror Glaze Cake Perfection!
- Prep ahead: Set up your work station so that everything is ready to go. Once the glaze is made you will need to work quickly. Oh and a personal tip from me to you – don’t wear a fuzzy sweater!
- Temperature is the key! Use your instant-read thermometer to check the glaze has reached the optimum temperature before pouring. Continue to check the temperature especially in smaller bowls – you might need to quickly reheat in the microwave if they cool too quickly.
- Choose your color scheme: I went with a blue/green tints to create a Disney Frozen-inspired birthday cake. A darker version of same color theme would be ideal for a Galaxy Cake.
- Fix the glaze color: If you are unhappy with the color of your mirror glaze cake then allow it to set first. Use a small amount of an accent color (make sure it is heated to the right temperature) then add a small pattern over the cake to add visual interest.
- Can I save leftover glaze? Most of the mirror glaze will drip off the cake and into the pan place underneath for that purpose. Pour the leftover glaze into a bowl or measuring cup and store to use on another bake. Reheat the glaze over low heat until it becomes liquid and use as a base color.
- Leftovers and storage: Store leftover cake in an airtight container in the fridge for up to three days.

If you give this mirror glaze cake a try, I’d love to hear how it turned out for you!
Please leave a comment and rating if you try this recipe, follow me on Pinterest for more easy recipes and don’t forget to tag me on @Instagram or TikTok so I can see your creations.

Mirror Glaze Cake
Video
Equipment
Ingredients
Mirror Glaze Recipe
- 2 tbsp (15g) powdered gelatin
- ⅓ cup (80ml) cold water to bloom the gelatine
- 1 cup (200g) granulated sugar
- ¾ cup (200g) liquid glucose or light corn syrup
- ⅓ cup + 1 tbsp (95ml) water
- 5.3 oz (150g) sweetened condensed milk
- 7 oz (200g) white chocolate chips
- selection gel food colors
You Will also Need
- 1 8-inch layer cake covered in buttercream frozen for at least 2 hours
- luster powder optional
- selection of sprinkles optional
Instructions
Prepare the mirror glaze
- Put the powdered gelatin in a small bowl and add the cold water. Allow it to 'bloom' – it will swell and become almost solid. Set aside.2 tbsp (15g) powdered gelatin , ⅓ cup (80ml) cold water
- Put the sugar, corn syrup and water into a saucepan and heat until sugar dissolves. Do not allow it to boil. Take off the heat and stir in the gelatin until it melts.
- Add the condensed milk and stir until smooth.5.3 oz (150g) sweetened condensed milk
- Put the chocolate into a bowl and pour the hot mixture over it. Allow it to sit for a couple of minutes then stir slowly using a balloon whisk. Start from the centre and increase your stirring motion outwards until the glaze is completely smooth.7 oz (200g) white chocolate chips
- Strain the glaze using a fine sieve and discard any solids.
- Add a small amount of your base colour into the glaze and stir until smooth. Adjust until you are happy with the colour.selection gel food colors
- Pour a small amount of the glaze into three smaller bowls and tint each bowl a complementary colour (I used blue, black and purple).
- Check your glaze has reached 89°F (30°C) before using with a digital thermometer. It can be a couple of degrees either side of this temperature.
Pour glaze over the cake
- Remove the cake from the freezer. Place on tin set over a rimmed tray to catch the excess glaze.1 8-inch layer cake covered in buttercream
- Smooth the top of the cake with a palette knife so it is as even and smooth as possible.
- Pour the base colour glaze over the entire cake, starting at the edges and moving in towards the centre.
- Drizzle the contrasting colours over the top to create and interesting pattern – work quickly before the glaze has a chance to set.
Finishing touches
- Add a dusting of luster powder and any other decorations if you like. Leave the glaze to set and cake to come to room temperature before serving.luster powder, selection of sprinkles
- If you are not serving immediately, keep in the fridge until ready to slice.
Notes
- Set up your work station so that everything is ready – once the glaze is made you will need to work quickly. Oh and a personal tip from me to you – don’t wear a fuzzy sweater!
- Temperature is the key! Use your Thermapen to check the glaze has reached the optimum temperature before pouring. Continue to check the temperature especially in smaller bowls, you might need to quickly reheat those in the microwave if they cool too quickly.
- Choose your colour scheme and if
- you are unhappy with the colour of your mirror glaze cake then allow it to set first. Use a small amount of an accent colour (make sure it is heated to the right temperature) then add a small pattern over the cake to add visual interest.
- Use a pin to pop any small air bubbles in the glaze before it sets.
Nutrition
Nutritional information is always approximate, and will depend on quality of ingredients and serving sizes.