
Instant Pot Peanut Butter Cheesecake
, Updated Mar 11, 2020
This post may contain affiliate links. Please read our disclosure policy.

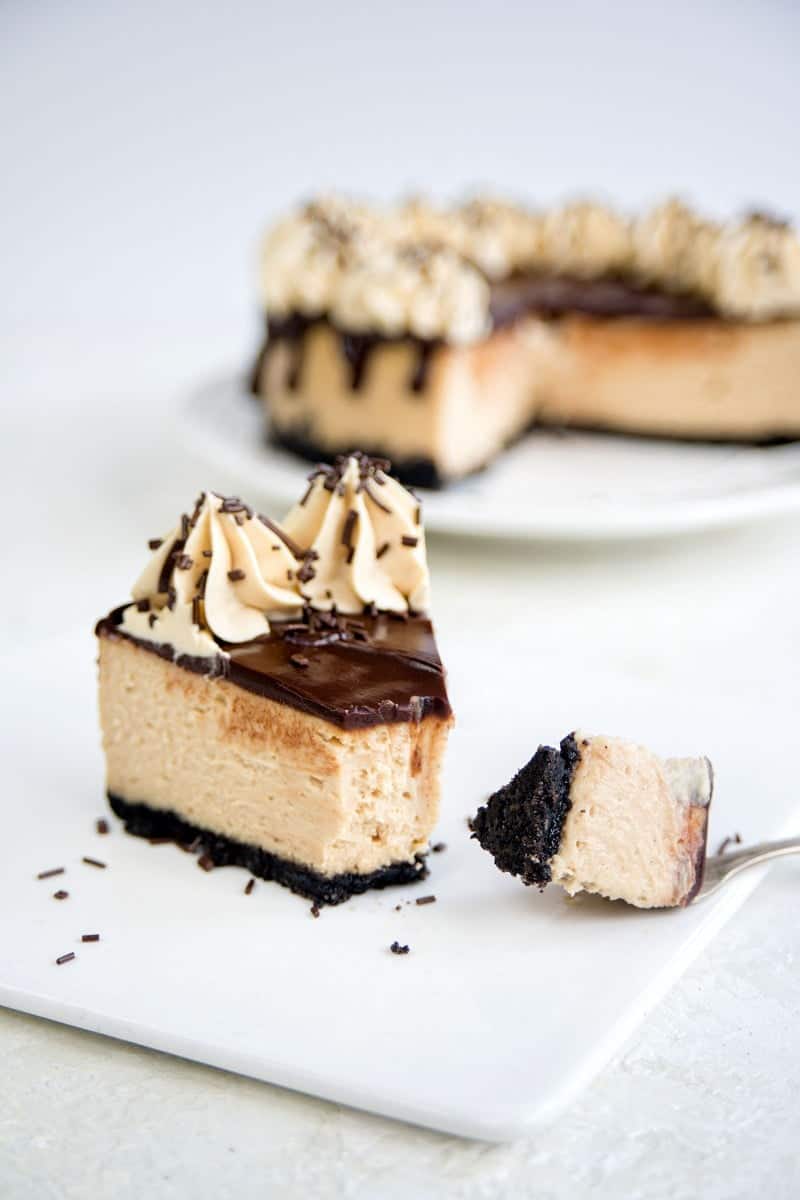
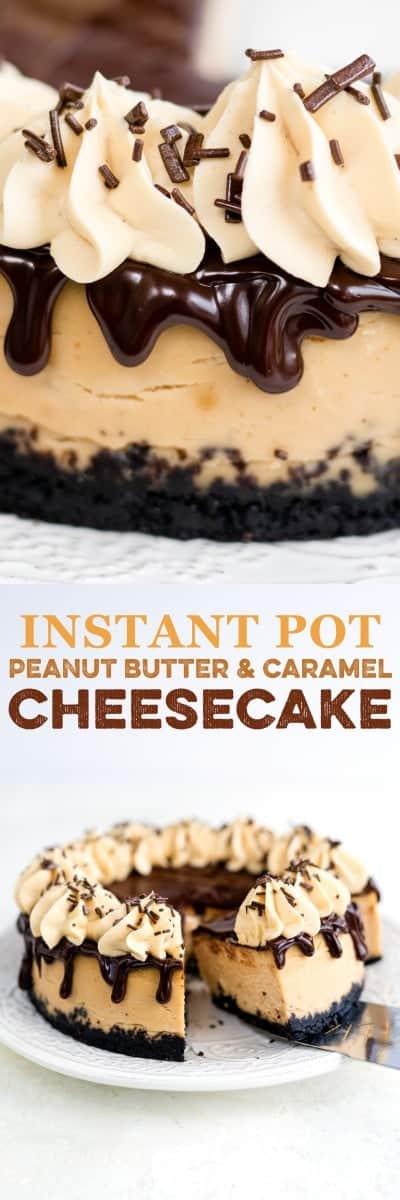
This heavenly Instant Pot peanut butter and caramel cheesecake is almost worth the price of your pressure cooker! It is intensely rich, dense and silky in texture. Read on to get the recipe plus tips on how to achieve cheesecake perfection and avoid common mistakes.
Post may contain affiliate links. For more information, check my disclosure
It’s fair to say that I have a little crush on my Instant Pot pressure cooker 🙂 But I am not alone in my infatuation, judging but the sheer volume or recipes cropping up online or the number of Facebook fan groups.
For the most part I have been making savoury recipes, family dinners such as my Vietnamese beef stew, Italian chicken soup or the lentil and bean chili.
This peanut butter and caramel cheesecake is my first sweet Instant Pot recipe and guaranteed not to be the last.
Making cheesecake in a pressure cooker is such a game changer – it is so much easier and less fussy than baking in an oven. You don’t have to bother with a water bath, or pre-baking the crust.
That’s not to say that making it is totally trouble-free. Learn from my mistakes, avoid some common errors and achieve cheesecake perfection ‘under pressure’.
Which pan should I use?
The first time I made cheesecake in my pressure cooker, I used my 7 inch springform pan. It worked reasonably well, but I had great trouble removing the cheesecake cleanly. I was more than a little gutted, if I am honest, as my first cheesecake was otherwise perfect.
I invested in a 7 inch deep loose base pan for my later efforts and was relieved to be rewarded with an easy to remove cheesecake with a perfectly crisp crust. The closest tin to Fat Daddio’s cheesecake pan – recommended by almost everyone in North America – was Alan Silverwood anodised 7″/18cm cake pan and I couldn’t recommend it more highly.
Cheesecake troubleshooting
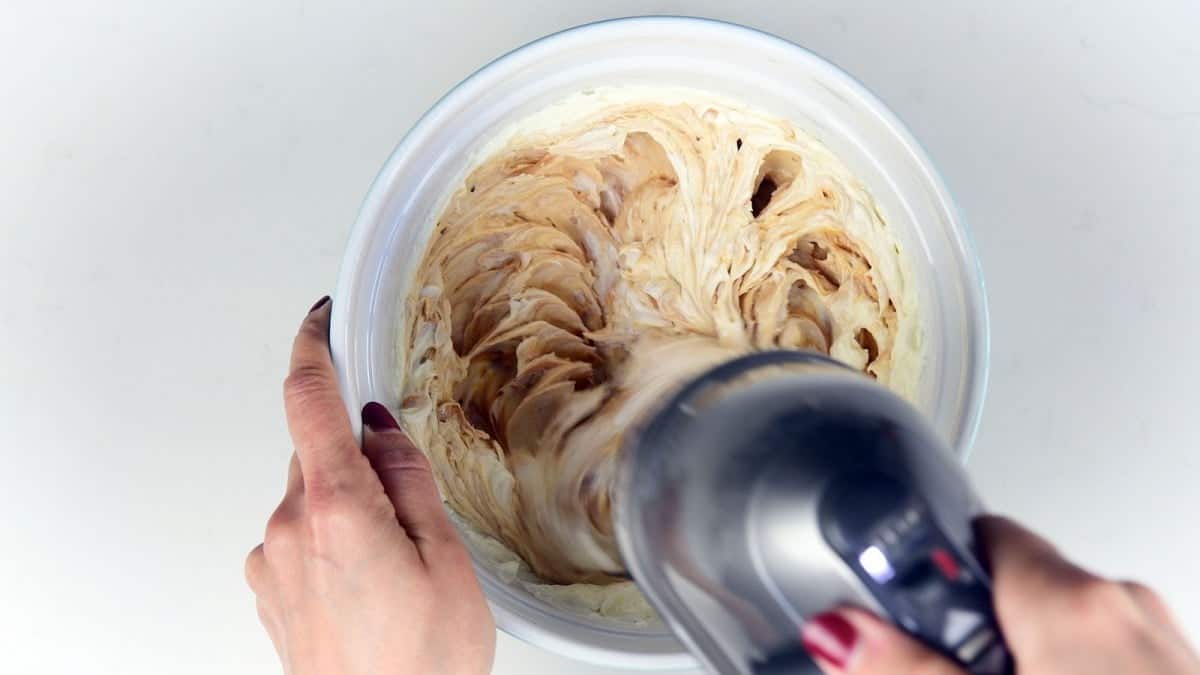
My second attempt came out of the cake tin in one piece, but it puffed up in my Instant Pot like a soufflé and the top stuck to the foil I had covered the tin with. This is basically a sign that I had beaten the ingredients a little too energetically, introducing air into the filling which then expanded during the cooking.
To achieve a texture that’s dense and yet silkily creamy, the ingredients have to all be at room temperature first and beaten just enough to combine. I used a hand mixer for this but if you only have a stand mixer then use the paddle attachment.
To cover or not to cover
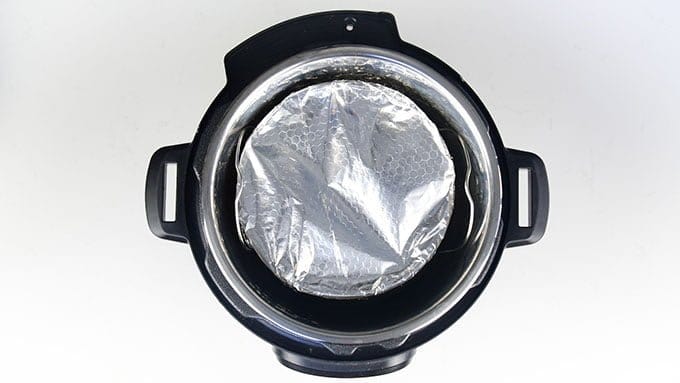
Some prefer to cook their cheesecakes uncovered which takes less time. I found that with this method, condensation collects on the surface which I wasn’t too happy with. So I opted to cover my cheesecake with foil and to also line the base with kitchen towel and foil.
How long to cook for?
In terms of cooking times, Instant Pot cheesecake recipes vary quite a lot. I found that this cheesecake needed 50 minutes cooking at high pressure and a 10 minute natural release. When the cheesecake is lifted out it should still have a little ‘jiggle’ in the centre.
If the cheesecake is too jiggly, then it hasn’t cooked for long enough. Cook for a further 5 minutes and allow for a further 10 minutes natural release before taking out again.
The cheesecake needs to cool completely at room temperature first – make sure you remove all the foil – and then chilled in the fridge overnight. It needs a few hours to set and achieve the perfect texture so don’t rush it.
Avoid unpleasant odours
Anyone fancy garlic-scented cheesecake? I didn’t think so! Your pressure cooker’s silicone ring can hold on to strong odours from savoury recipes and then lace your sweet ones with unwelcome faint smells.
This is easily avoidable – simply invest in a separate silicone ring for sweet recipes, they even come colour-coded for this purpose. Make sure to pick the right size for your pressure cooker.
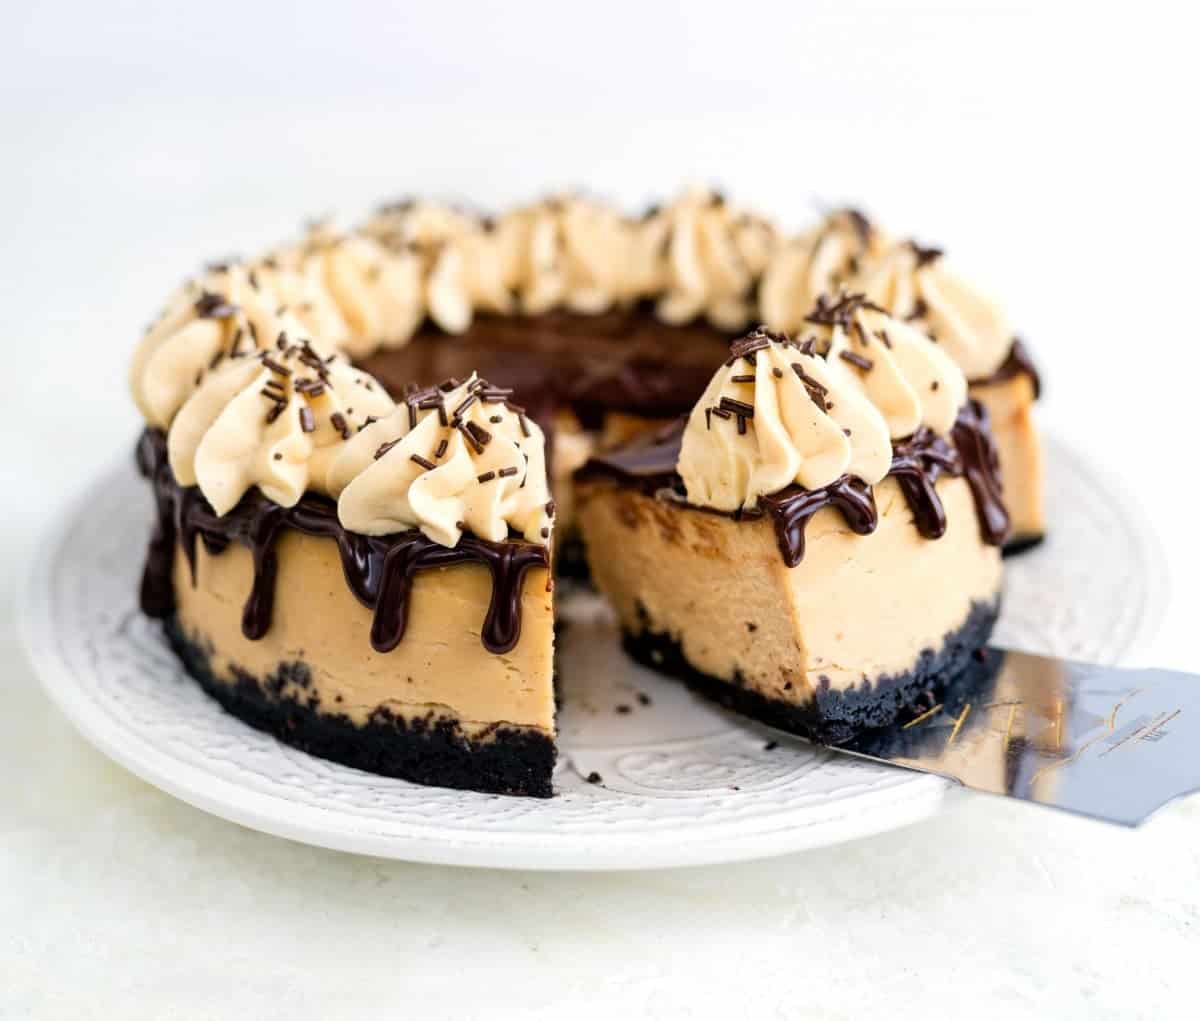
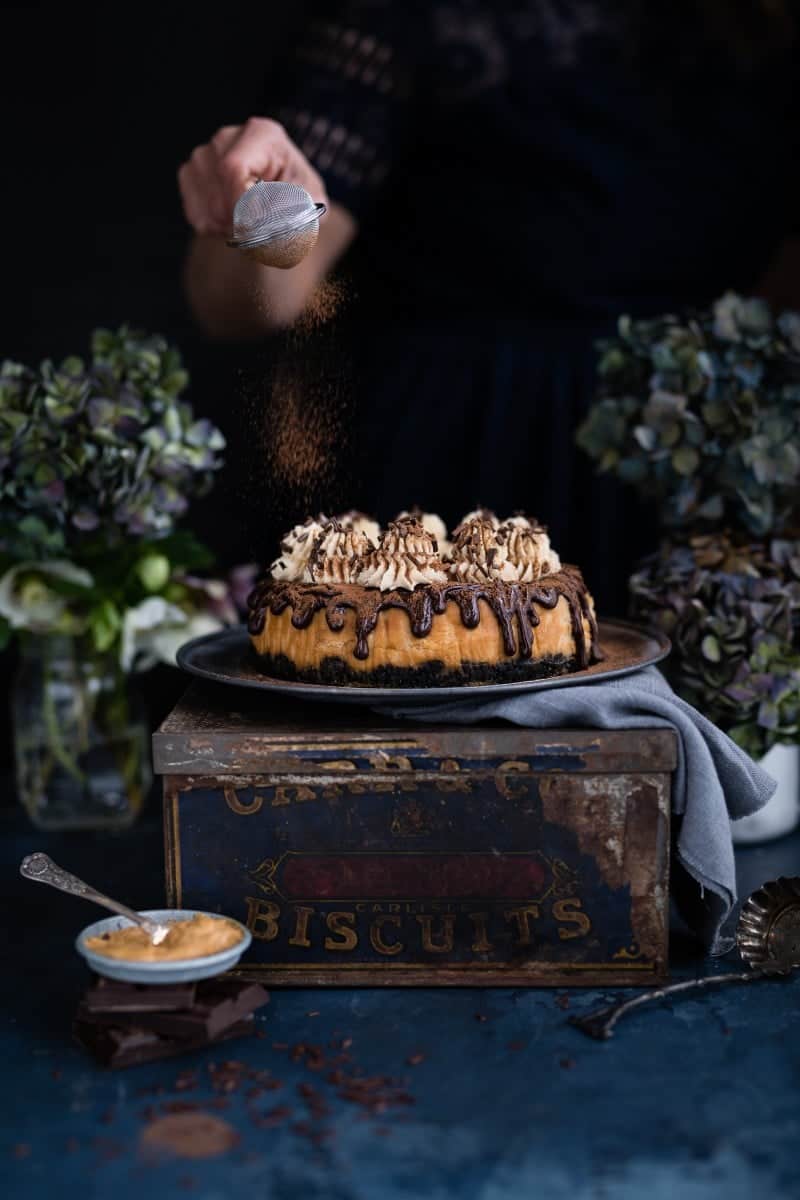
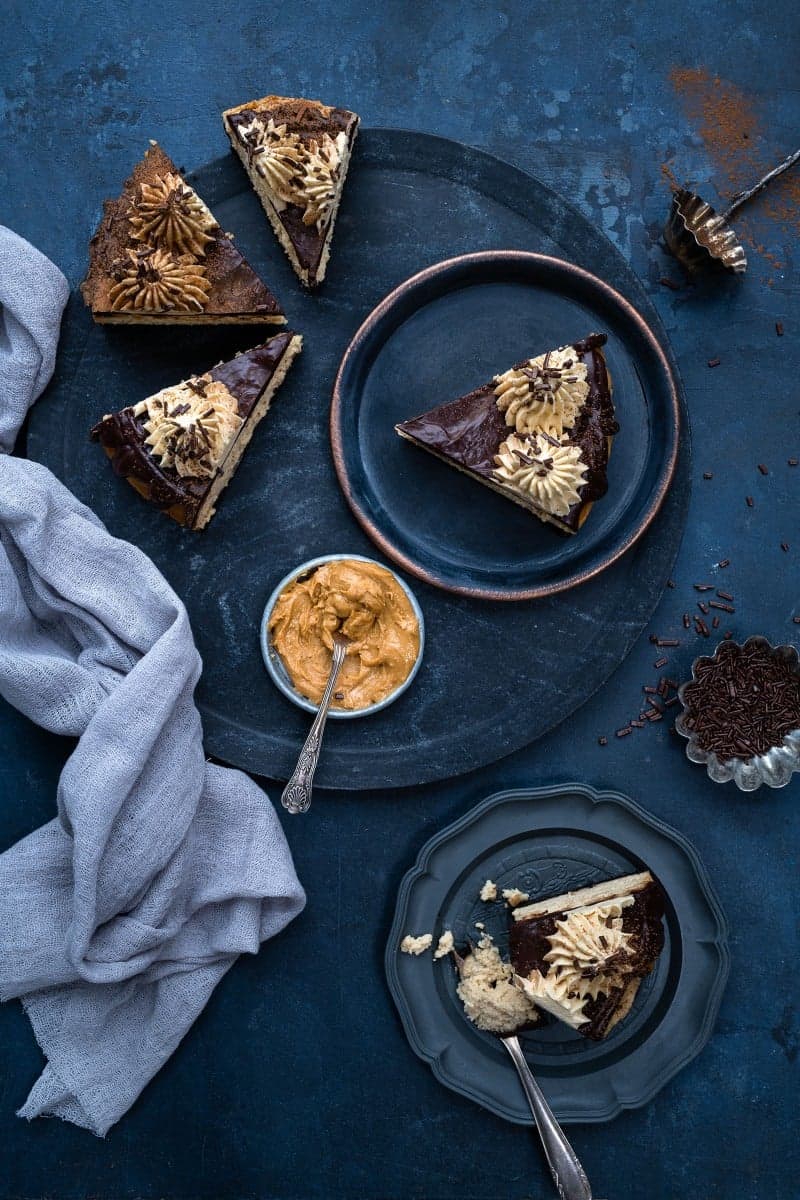
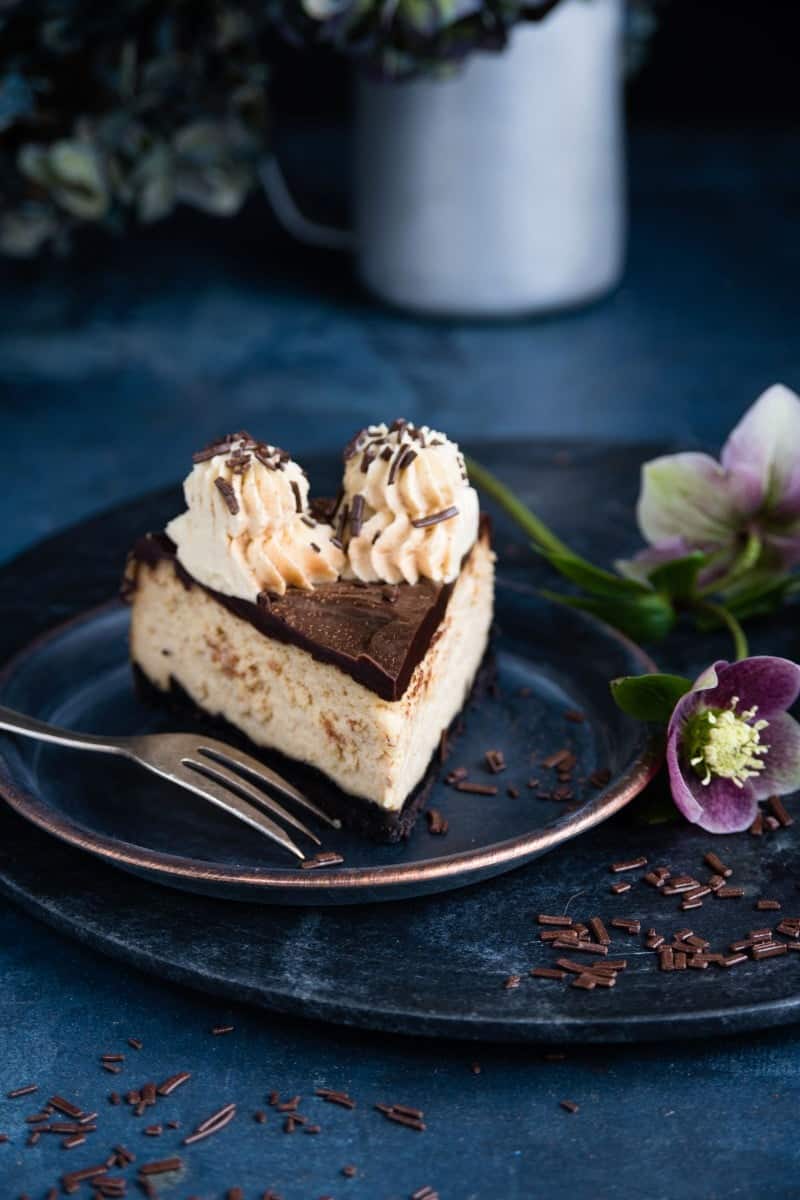
To get back to the peanut butter cheesecake – “finally!” I hear you sigh – this is insanely delicious and equally rich. I would say that a smallish cheesecake could easily serve 8-10 people provided the slices are not too generous.
Once the cheesecake is cooked, the top is smothered in dark chocolate ganache and topped with caramel whipped cream. You could add mini Reece’s peanut butter cups as decorations instead or in addition to the cream. Can we all say YUM?! 🙂
Made one of my recipes? Tag me on Instagram or pop by on Facebook and make my day! 🙂
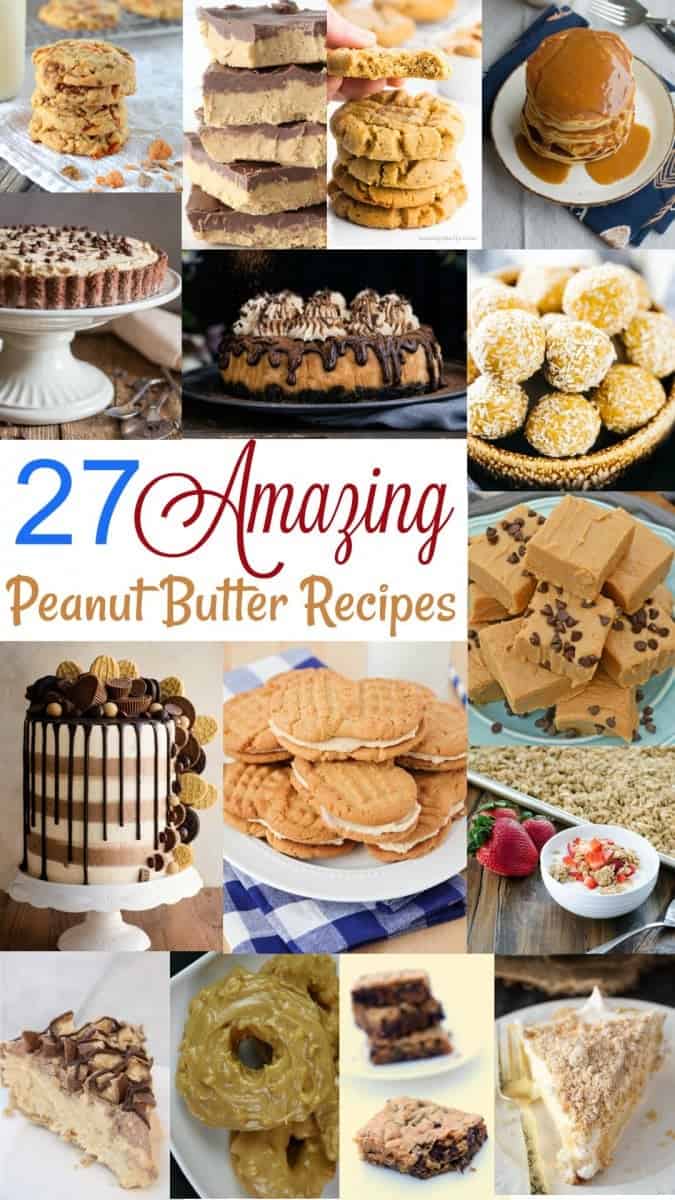
To celebrate Peanut Butter Lover’s Day, I’m teaming up with the Celebrating Food Holiday bloggers to bring you over two dozen spectacular peanut butter recipes.
Peanut Butter Butterfinger Cookies by Creations by Kara
Reese’s Peanut Butter Bars from Pretty Providence
Peanut Butter Cookies from Namely Marly
Peanut Butter Lover’s Pancakes from Crumb
Creamy Peanut Butter Chocolate Chip Pie from An Italian in My Kitchen
No Bake Peanut Butter Protein Balls from Heather Likes Food
Peanut butter Twix Pie from My Mommy Style
Homemade Nutter Butter Cookies from The Baker Upstairs
Easy Peanut Butter Fudge from Savory Experiments
Triple Peanut Butter Cake from Ashlee Marie
Easy Peanut Butter Granola from Real Mom Kitchen
Peanut Butter Doughnuts with Chunky Peanut Butter Glaze from Premeditated Leftovers
Peanut Butter Chocolate Chip Blondies from 365 Days of Pressure Cooking
Peanut Butter Pie from Simply Stacie
Plus more peanut butter recipes to choose from
Peanut butter & caramel millionaires shortbread bars from the blog archives
5 ingredient chocolate peanut butter mousse from the blog archives
Peanut butter pretzel brownies from the blog archives
Spiralised vegetable noodles with spicy peanut sauce from the blog archives
African sweet potato soup from the blog archives
Peanut butter and jelly milkshake from Little Sugar Snaps
Gluten-free peanut butter cheesecake bars from Giraffes Can Bake
Peanut butter and jam waffles from Domestic Gothess
Chewy peanut butter granola bars from Domestic Gothess
Chicken Kabob salad from Salt & Lavender

Instant pot peanut butter and caramel cheesecake
Video
Ingredients
For the crust
- 12 Oreo cookies peanut butter flavour or original
- 2 tbsp melted butter
For the filling
- 450 g (16oz) full-fat cream cheese at room temperature
- 100 g (1/2 cup) granulated sugar
- 125 g (1/2 cup) smooth peanut butter
- 2 tbsp caramel or dulce de leche
- 60 g (1/4 cup) sour cream
- 1 tsp vanilla paste or extract
- 2 large eggs at room temperature
Chocolate ganache
- 115 g (4oz) dark chocolate chips
- 120 ml (1/2 cup) double (heavy) cream
Caramel whipped cream
- 120 ml (1/2 cup) double (heavy) cream
- 50 g (1/2 cup) icing sugar
- 1-2 tbsp caramel or dulce de leche
- chocolate sprinkles
- cocoa powder to dust optional
Instructions
- Place a piece of aluminium foil on your counter top and place a kitchen towel square in the centre. Position your cheesecake tin over the kitchen towel and tightly wrap the foil around the base.
- Spray the tin with cake release and line the bottom and sides with greaseproof paper.
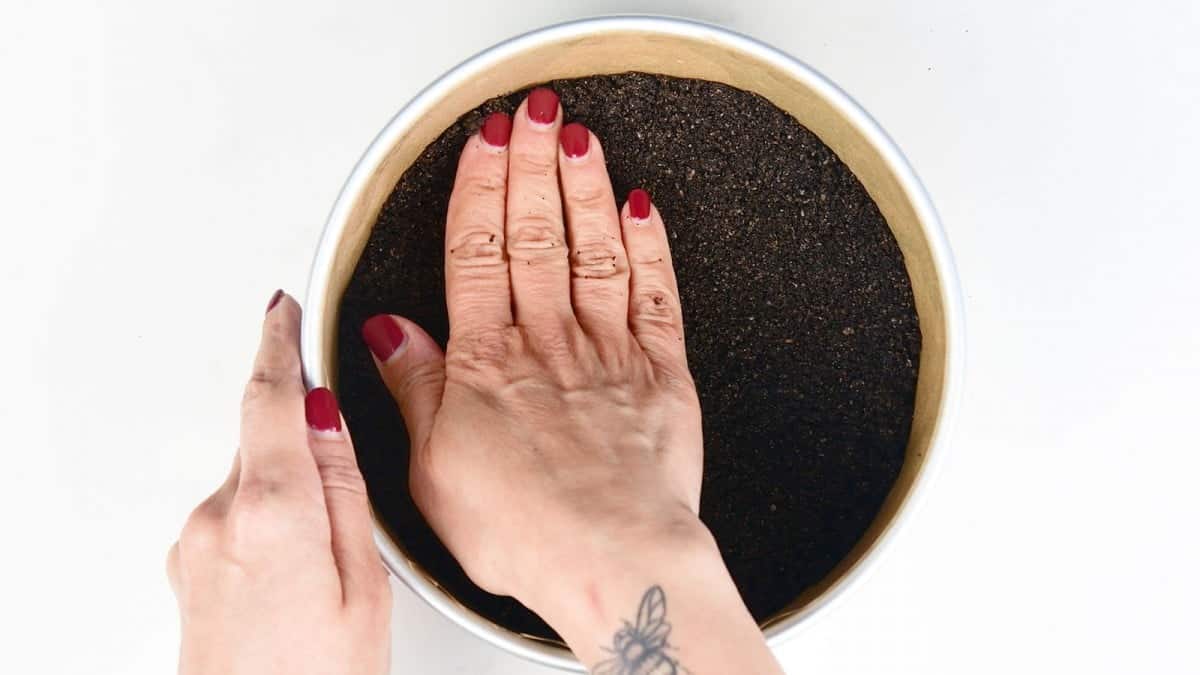
- Grind the Oreos to a powder using a food processor. Mix with the melted butter.
- Press the crust over the bottom of the prepared pan in an even layer and put in the freezer.
- Put the cream cheese and sugar in a bowl and briefly mix together with a hand mixer on low speed until it is smooth and creamy.
- Add the peanut butter and caramel and mix again until smooth.
- Add the sour cream and vanilla and mix once more.
- Add the eggs and mix until combined – do not over mix at this stage!
- Pour the filling over chilled crust and gently tap the pan on counter so that it settles.
- Cover the top of the pan with a piece of foil.
- Pour 350ml (1 1/2 cups) water into your pressure cooker and place the trivet in the bottom of the pot. If your trivet doesn’t have handles, create a foil ‘sling’ by folding a long piece of foil in half lengthwise and place your cheesecake over it to lower (and lift) out of the pot. Tuck the foil sling edges down the side of the pan.
- Set vent to ‘sealing’, choose ‘manual’ and set cooking time for 50 minutes at high pressure.
- Allow pressure to release naturally for 10 minutes and then manually release.
- Lift the pan out of the pressure cooker and carefully remove the foil. The cheesecake should have a bit of jiggle in the centre, but if it seems really jiggly then cover and return to the cooker for a further 5 minutes high pressure cooking (+ 10 mins NPR then manual release).
- Remove the foil from the bottom of the pan and place on a cooling rack for a couple or hours.
- Place in the fridge for 8 hours or overnight. To remove the cheesecake from the pan run a small knife around the edge to loosen the paper. Place the pan over a tin and gently push the tin downwards to release the middle. Peel the paper off the sides and gently remove the bottom of the cake pan. Transfer the cheesecake to a platter or cake stand.
- Make the ganache: place the chocolate and cream in a bowl and microwave for 30 second bursts, stirring after each, until completely melted and smooth.
- Spoon (or use a piping bag) the ganache over the perimeter of the cheesecake, encouraging it to drizzle down the sides. Spread the remaining chocolate over the cheesecake to cover.
- Whisk the cream, icing sugar and caramel together until it forms peaks. Transfer to a piping bag fitted with a large star tip and pipe over the cheesecake.
- Add chocolate sprinkles and a dusting of cocoa powder and serve.
Notes
Nutrition
Nutritional information is always approximate, and will depend on quality of ingredients and serving sizes.


This is the best cheesecake I have ever made – Instant Pot or otherwise. It got rave reviews! I couldn’t get the whipped cream to work with the caramel in it, so I just did regular homemade whipped cream and used the failed caramel whipped cream as optional drizzle over the cheesecake, so…silver linings. Thanks so much for sharing!
Does it have to stay 8 hours in the fridge? Just put the instant pot on now at 2 was hoping to eat it at 6;30?
Ideally yes so it has time to firm up
To remove cheese cake, you mentioned running a knife around paper to loosen…do you line sides & bottom with parchment paper?
Yes line the sides and bottom with baking paper to achieve a nice clean edge
Sweet Heavens ! Thank you for the beauty !
OMG that looks insanely delicious! I have an Instant Pot but had never thought to make cheesecake. Brilliant!
Your recipe calls for caramel. This is probably a dumb question, but did you use caramel sauce or something else. This looks really good. Thank you for your help.
Shirley
Hi Shirley – yes I used store-bought caramel. In the UK Bonne Maman do a version but you could also use Dulce de Leche. Salted caramel would also work really well – I will add a link to a homemade version also.
These are some of the most gorgeous photos of cheesecake I have ever seen! Wish I could reach right into my screen and grab a slice. I really need to try cheesecake in my instant pot!
Mind blown! I had no idea you could make something like a cheesecake in an instant pot. I fear when I get mine my oven may be abandoned! This recipe looks delicious!
Gorgeous! This looks heavenly indeed!!
I’d love to attempt this recipe, it looks so good.
What kind of PB did you use – All natural (just peanuts) or the regular kind with icing sugar and other ingredients in it.
Thanks.
You can use either – hope this helps!