
Quick and Easy Croissants from Scratch

, Updated Oct 15, 2026
This post may contain affiliate links. Please read our disclosure policy.
Making homemade croissants from scratch is easy using this quick-method dough. Great for beginners and well worth the effort!
You will also love my Almond Croissants
Post may contain affiliate links. For more information, check my disclosure

To celebrate 2014 and before I settle into a healthy diet lifestyle (ha!) I have to share this post… Croissants have been at the top of my to-bake list for an embarrassingly long time. Somehow I never got round to making any, put off by the lengthy dough making process.
When I came across Edd Kimber’s (winner of the first Great British Bake Off) recipe for 20 minute (!) croissant dough I knew I had no more excuses.
Edd was inspired by Julia Child’s Quick Danish Pastry dough recipe – actually a recipe by Beatrice Ojakangas which which she shared with Julia.
I have tweaked the recipe and method somewhat, but you can check the links to Edd’s recipe and the video of Bea and Julia.
This croissant dough super easy to make. The croissants themselves take some time to rise properly but the results are definitely worth the wait. I made two batches in two days and each one disappeared almost instantly!

Croissants Step by Step
↓ For the full ingredients and detailed method, jump to the recipe card.
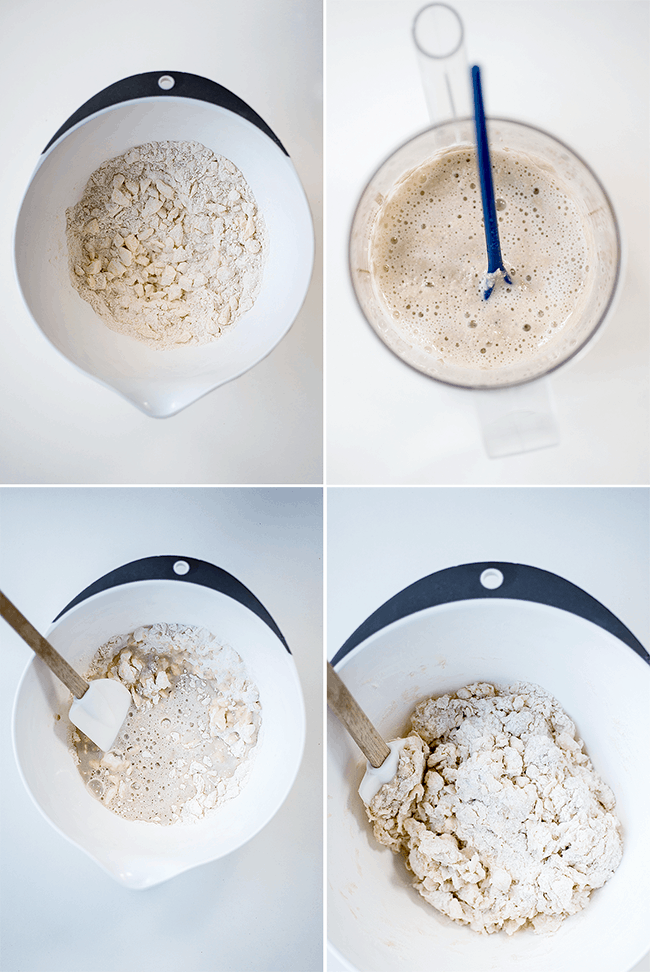
Warm your milk until it is body-temperature. Add the sugar and yeast and whisk to combine. Let it stand until the yeast is frothy and milk has cooled completely. If it’s too warm it will melt the butter and undo all our good work.
Put your flour and salt in a food processor fitted with a metal blade. Add the cubed butter and briefly pulse a few times until mixture resembles chunky breadcrumbs.
Put the flour/butter in a large bowl and add the milk/yeast mixture. Gently combine using a spoon or pastry scraper until the dough just comes together. You want the butter to remain in pea-sized pieces so don’t be too enthusiastic when mixing the dough!
Turn the dough out of a lightly floured work top and press together to form a square. Wrap in cling film and put in the freezer for 30 minutes or in the fridge for a couple of hours.
Lightly dust your worktop and rolling pin with flour. Roll your dough out to a rectangle roughly two to three times as long as it is wide, counter space allowing (pic. 1). Initially the dough may be quite brittle but it will come together as you roll and fold.
Fold the short sides of the dough into the middle (pic. 2). Rotate the dough by a quarter turn. Roll out slightly to lengthen. Fold the short ends towards the middle.
Flip the dough over so the seams are underneath. Roll it out again repeating steps 5-7 three more times. The dough will become more elastic as you are rolling and folding it. Fold dough into a smallish rectangle, wrap it twice with cling film and put in the fridge for a couple of hours or overnight.
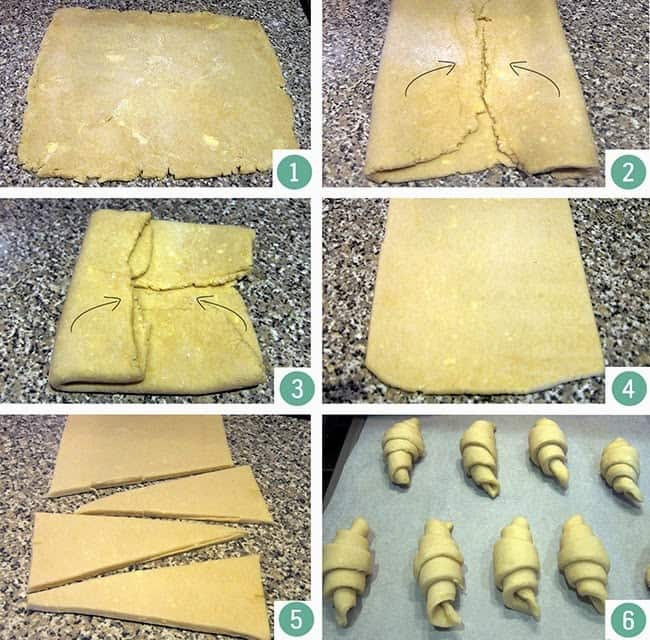
Roll the dough out to a rectangle three times as long as it is wide and at least 4mm thick. Trim the edges with a pastry scraper (pic.4).
Cut the dough into triangles about 30cm/12in long and 8cm/3in at the base. Score a small slit in the centre of each triangle base (pic 5).
Place, tip side down, on a large tray lined with baking paper. Repeat with the rest of the dough, spacing the croissants a few inches apart on the tray (pic.6).

HAVE YOU MADE MY CROISSANT RECIPE? Post a photo on my Facebook page, share it on Instagram, or save it to Pinterest with the tag #supergoldenbakes and make my day!

Quick and easy croissants from scratch
Ingredients
- 2 cups (250g) strong bread flour
- ⅔ cup (150g) cold unsalted butter cubed
- ½ cup (120ml) tepid milk
- 3 tbsp sugar
- 7 g 1 sachet dry active yeast
- ½ tsp salt
- 1 egg yolk beaten with 1 tbsp milk to glaze
Instructions
- Warm your milk until it is body-temperature. Add the sugar and yeast and whisk to combine. Let it stand until the yeast is frothy and milk has cooled completely. If it’s too warm it will melt the butter and undo all our good work.
- Put your flour and salt in a food processor fitted with a metal blade. Add the cubed butter and briefly pulse a few times until mixture resembles chunky breadcrumbs.
- Put the flour/butter in a large bowl and add the milk/yeast mixture. Gently combine using a spoon or pastry scraper until the dough just comes together. You want the butter to remain in pea-sized pieces so don’t be too enthusiastic when mixing the dough!
- Turn the dough out of a lightly floured work top and press together to form a square. Wrap in cling film and put in the freezer for 30 minutes or in the fridge for a couple of hours.
- Lightly dust your worktop and rolling pin with flour. Roll your dough out to a rectangle roughly two to three times as long as it is wide, counter space allowing (pic. 1). Initially the dough may be quite brittle but it will come together as you roll and fold.
- Fold the short sides of the dough into the middle (pic. 2).
- Rotate the dough by a quarter turn. Roll out slightly to lengthen. Fold the short ends towards the middle (pic. 3 shows only left side folded in).
- Flip the dough over so the seams are underneath. Roll it out again repeating steps 5-7 three more times. The dough will become more elastic as you are rolling and folding it. If at any point the butter softens too much, cover and pop in the freezer to firm it before continuing with rolling and folding.
- The dough should be formed into a smallish rectangle. Wrap it twice with cling film and put in the fridge for a couple of hours or, ideally, overnight.
- Roll the dough out to a rectangle three times as long as it is wide and at least 4mm thick. Trim the edges with a pastry scraper (pic.4).
- Cut the dough into triangles about 12-inch (30cm) long and 3-inch (8cm) at the base. Score a small slit in the center of each triangle base (pic 5). Any scraps and cut-offs can be layered on top of each other, rolled out again and used.
- Gently stretch the corners and tip, then loosely roll the dough up. Place, tip side down, on a large tray lined with baking paper. Repeat with the rest of the dough, spacing the croissants a few inches apart on the tray (pic.6).
- Cover loosely with greased cling film and let the croissants rise for 2-3 hours at room temperature – sorry, there are no shortcuts here!
- Preheat the oven to 230C | 450F. Brush the croissants with the egg wash and bake for ten minutes then reduce temperature to 190C | 375F and bake for another 5-10 minutes or until the croissants are a deep golden brown. Cool on a wire rack before serving.
Nutrition
Nutritional information is always approximate, and will depend on quality of ingredients and serving sizes.



You've made this look so easy, and they look amazing. I feel inspired to try them out.
Wow! Amazing!
Those look amazingly professional.
I made these yesterday and they were eaten straight away! So proud of them too as first time!
Need to try these, thank you!
They look nice, but it still doesn't seem very quick!
These look gorgeous – perfect for eating breakfast alfresco during the Summer!
These look fabulous – I need to try this one… In the past, my kitchen's always been too hot, too cold, too humid, too dry etc etc for them to work… Maybe a quick method will be better!
Wow, these look delish! I never knew there was a "quick" method of making croissants! Can't wait to try it 🙂
I have always wanted to try making my own croissants so I'll definitely be trying these. Thanks.