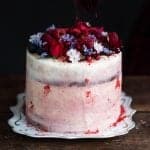
This romantic Red Velvet Cake is sandwiched with vanilla and strawberry frosting and decorated with a medley of berries and flowers. Perfect for birthdays, celebrations and Valentine’s Day.
Post may contain affiliate links. For more information, check my disclosure
I have to admit that I was never a big fan of red velvet cake. I could see that it was hugely popular, but I couldn’t really figure out why. Until, one day, I tried a red velvet cupcake from Peggy Porschen.
What a revelation! The cupcake was fluffy, delicious and so seductive that even my cake-phobic husband was enamoured.
I have used a variation of Peggy’s recipe for this cake, having had the chance to test it during my cake course at the Peggy Porschen academy this summer.
The trick to this cake is creaming the butter and sugar together until it is so pale, light and fluffy that it resembles buttercream frosting. For this you will need to be patient and continue to beat the ingredients and scrape the bowl several times.
Frequently when baking cakes we – and be ‘we’ I mean me – like to take shortcuts. This is fine for certain bakes but it can be the downfall of others – and this red velvet layer cake is one of the tricky ones.
Another very important element to red velvet cake is the right food colouring. It needs to be strong, heat stable and well mixed into the batter. The best one is Sugarflair Red Extra* or Christmas red – the colour is extremely intense and perfect for this cake.
It is best to work the colouring paste with a little of the buttermilk in order to avoid streaks. Then you then can mix that with the remaining buttermilk to get an even colour for the cake.
The final tip that we learned at the cake course, is that once the flour is added it is best not to overwork the batter. Mix on relatively low speed and finish off by mixing the batter by hand.
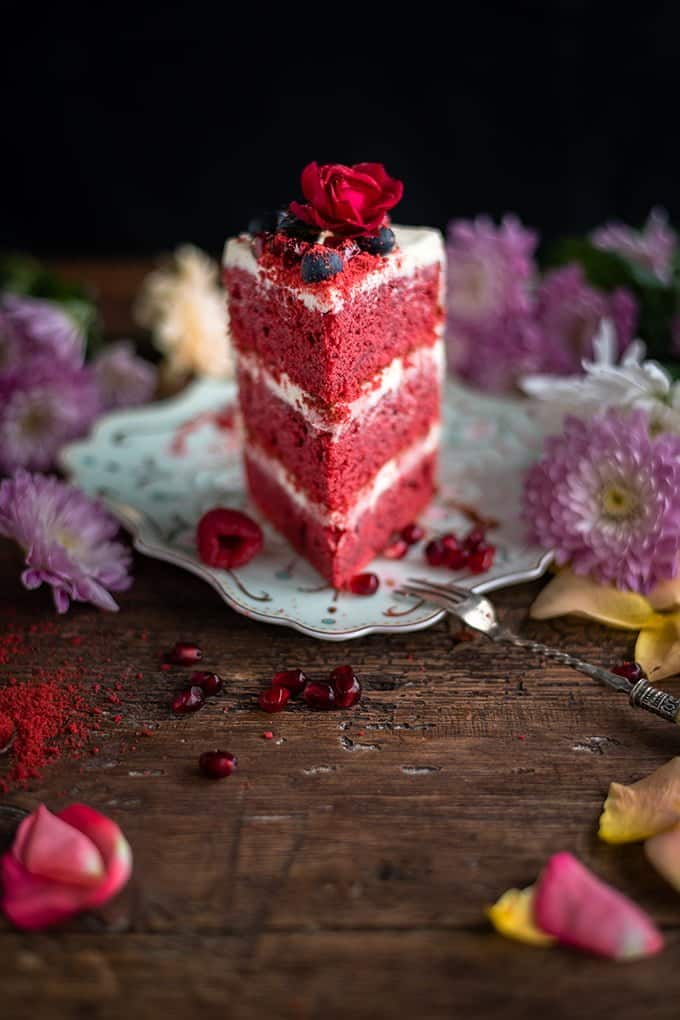
This recipe makes three small layers – I used my favourite 15cm/6in cake tins. That may sound small, but with the frosting you will get a tall cake that can yield 8-10 slices. If you wanted to bake in larger tins you would get two layers of 20cm/8in.
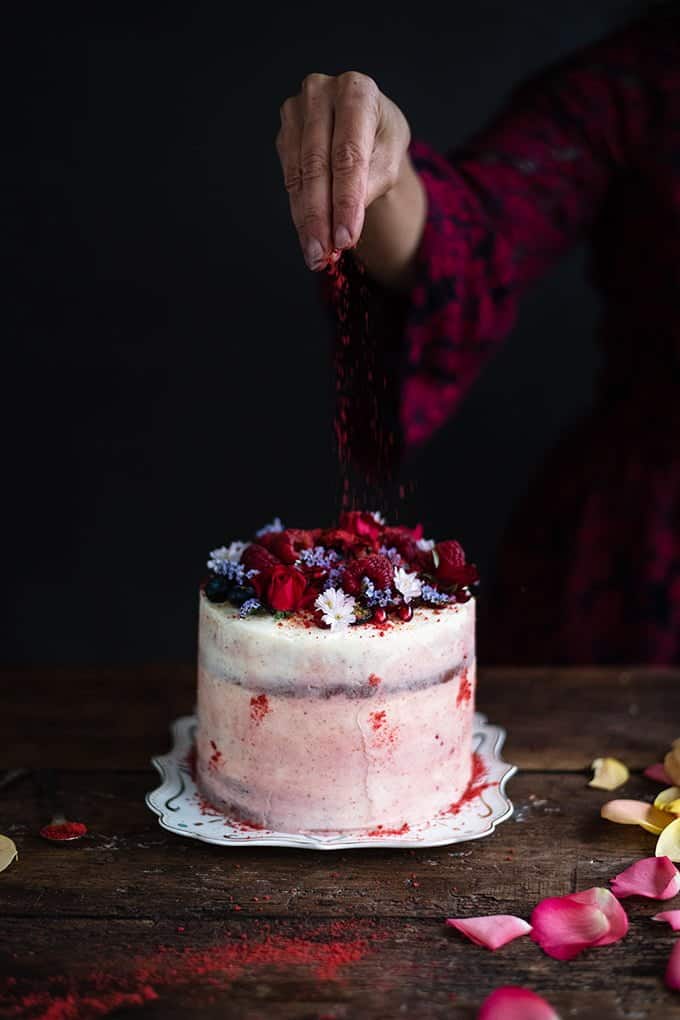
Don’t eat all the cake scraps from levelling the cakes. If you spread them on a tray and dry over low heat, you can blitz them to create a fine powder that’s great for decorating the cake.
For the frosting I made a batch of plain vanilla frosting and a batch of strawberry frosting using freeze dried strawberry powder* (you can also use raspberry powder). The powder has the loveliest concentrated strawberry flavour and it can be used in so many sweet recipes.
You can skip the strawberry frosting if you prefer as this recipe makes a generous amount of frosting and you will likely have extra. Extra frosting is a good thing if you are looking for a perfectly frosted cake – it will allow for some frosting to be used for the crumb coating and the remaining to achieve a smooth finish.
I am so exited to finally share this cake with you – it is the first time me and my BFF Julia of Vikalinka have collaborated on a recipe. Make sure to check out her incredibly romantic red velvet truffle cake.
HAVE YOU MADE MY RED VELVET CAKE RECIPE? Please leave a rating, post a photo on my Facebook page, share it on Instagram with @supergolden88 and the tag #supergoldenbakes and make my day!
Red velvet layer cake with vanilla and strawberry frosting
Ingredients
For the cake
- 300 g | 1 1/2 cups sugar
- 120 g | 1/2 cup soft unsalted butter
- 1/2 tbsp vanilla paste or 1 tsp vanilla extract
- 2 large eggs lightly beaten
- 240 ml | 1 cup buttermilk
- 1/4 tsp red paste food colouring (or more as needed0
- 280 g | 2 1/4 cups plain all purpose flour
- 2 tbsp unsweetened cocoa powder
- 1/4 tsp salt
- 3 level tsp white wine vinegar
- 2 level tsp bicarbonate of soda
For the vanilla frosting
- 450 g | 1lb full fat mascarpone
- 200 g | 2 cups icing sugar
- 120 ml | 1/2 cup double heavy cream
- 2 teaspoons vanilla extract
For the strawberry frosting
- 200 g | 7oz full fat cream cheese
- 80 ml | 1/3 cup double heavy cream
- 2 teaspoons vanilla extract
- 3-4 tbsp freeze dried strawberry powder
- 50 g | 1/2 cup icing sugar
Instructions
- Preheat the oven to 170°C (325°F). Spray three 6-inch cake tins with cake release and line the bottoms with baking paper.
- Sift the flour and cocoa powder together into a bowl and set aside.
- Cream the butter, sugar and salt in a stand mixer fitted with the paddle attachment until pale and fluffy – this will take several minutes. Make sure to stop the mixer and scrape the bottom and sides of the bowl a couple of times so that everything is well incorporated.
- Mix the eggs with the vanilla extract and gradually add to the batter, beating constantly. If the mixture curdles, add a spoonful of flour.
- Mix the food colouring with a little buttermilk, then add to remaining buttermilk and mix well until the colour is even.
- Alternate adding the flour and buttermilk into the batter, starting and ending with the flour. Mix on low speed and scrape down the sides of the bowl to make sure the ingredients are well blender.
- Mix the vinegar and baking soda together and immediately mix it into the batter. Either fold together by hand using a large spatula or beat briefly on medium speed to combine. Divide the batter between the prepared cake tins and level.
- Bake for 30-35 minutes, or until a skewer inserted in the centre comes out clean and the cakes are coming away from the edges of the tin.
- Leave to cool in the tins for 10 minutes, then carefully turn out onto a wire rack to cool completely.
- Level the tops of the cakes and reserve any offcuts. Spread those on a tray and dry in the oven at 100°C (215°F) for 10 minutes. Cool and blitz in a blender to make a fine red powder which you can use to decorate the cake.
- Make the vanilla frosting: beat the mascarpone, icing sugar, vanilla paste and double cream together until you have firm peaks.
- Mix the strawberry powder with the double cream until you have a smooth paste. Beat this with the cream cheese and icing sugar to make the strawberry frosting.
- Transfer the two frostings into piping bags fitted with plain round or large star tips (the tip is not really relevant).
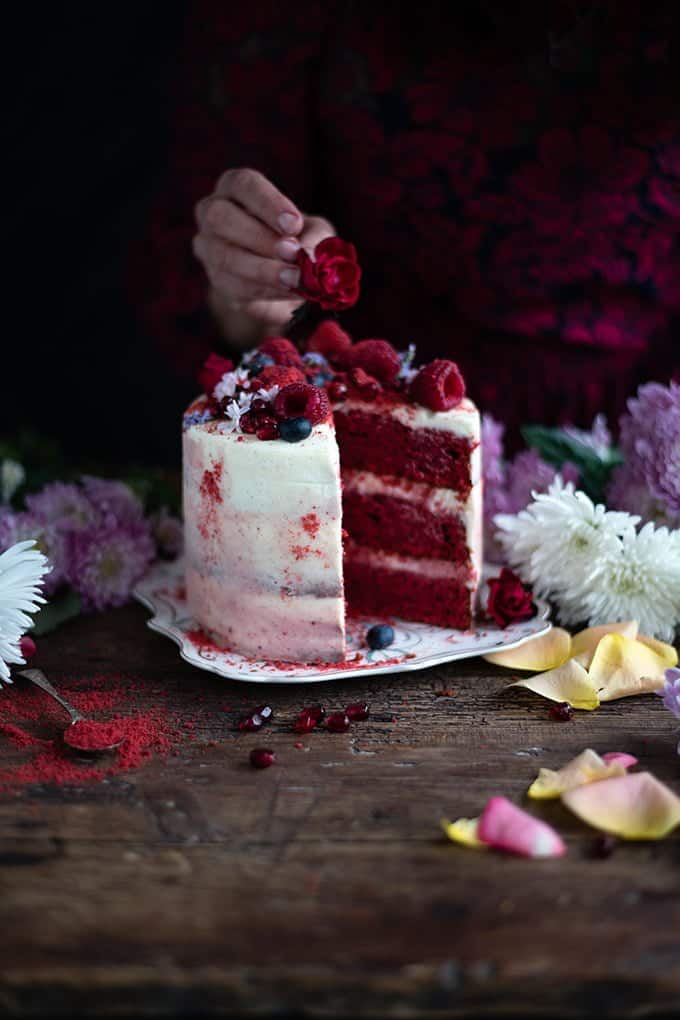
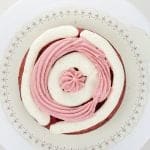
- Pipe two concentric circles of the mascarpone frosting over bottom cake layer and fill with the strawberry frosting. Sandwich with second layer and repeat.

- Finish off by covering the entire cake with a thin layer (crumb coat) of the mascarpone frosting, smoothing it over the top and sides with a palette knife and side scraper. At this point you can freeze the cake for 30 minutes.
- Add another layer of frosting over the cake to create a really smooth finish – or leave the sides showing through for a ‘naked cake’ effect.
- You can alternate the vanilla and strawberry frostings to create a slightly ombré or watercolour look.
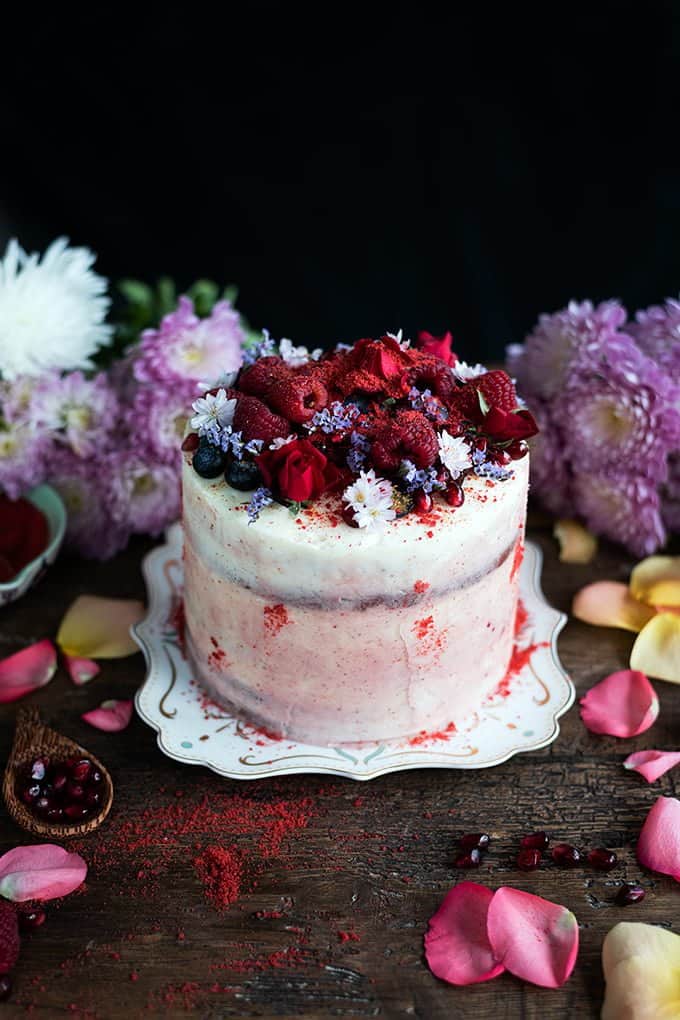
- Decorate the top of the cake with a medley of red berries, blueberries, pomegranate seeds and edible flowers plus a dusting of the red velvet crumbs. Alternatively pipe any excess frosting over the top of the cake and decorate with the crumbs.
Alia says
Slowly making my way through every cake on this blog.
It’s the only baking blog where I’ve not had a cake fail (as yet).
This was no exception.
Not yet made the frosting, but have prepared the sponge layers. It tastes AMAZING. Baked to perfection.
Actually very simple if you follow the instructions carefully.
Now to decide which cake to try next.
Lucy Parissi says
Thank you for your wonderful comments ❤️❤️
Darlene @ Dip Recipe Creations says
This has to be the prettiest red velvet cake I’ve ever seen! I love the idea of the strawberry frosting for a different twist.
Lucy Parissi says
Thank you so much Darlene – I love using freeze dried strawberry powder!
Jillian says
Beautiful & delicious!
camila says
how seriously moist does this cake look!!! So amazing!!! Great job!
linda spiker says
That is a gorgeous cake! I am sure it’s tasty too!
Kate - gluten free alchemist says
Pretty as a picture Lucy. I have never been big on Red Velvet Cake either though…. mainly because of the amount of colouring that is needed. I have tried making with natural colour in the past, but it never quite gets the intensity of brightness to wow. The decoration you have put on top of your cake is stunning and very tempting however x
Lucy Parissi says
Yes I see your point Kate it does need a lot of colouring! I am wondering if beet powder would impart that same intensity of colour.