Pink Ombre Cake with Mock Swiss Buttercream Frosting
This show-stopping Pink Ombre Cake with easiest Swiss Buttercream is easy to prepare and perfect for birthdays and celebrations.
Servings: 10 servings
Calories: 928kcal
Ingredients
- 340 g (1 3/4 cups) sugar granulated or caster sugar
- 255 g ( 2 1/4 cups) plain flour
- 4 tsp baking powder
- 1/2 tsp salt
- 170 g (1 1/2 sticks) unsalted butter cold and cubed
- 240 ml (1 cup) whole milk ideally room temperature
- 180 ml (3/4 cup) pasteurised liquid egg whites or from 6 eggs
- 2 tsp almond extract
- 1 tsp vanilla extract
- pink paste food colouring
For the buttercream
- 180 ml (3/4 cup) pasteurised liquid egg whites or from 6 eggs
- 500 g (6 cups) icing sugar
- 500 g (3 cups) unsalted butter room temperature
- 1 tbsp vanilla extract
- 1/4 tsp salt
Instructions
- Preheat the oven to 180C. Spray 4 x15cm/6in cake tins (or 3x20cm/8in tins) with cake release and line with baking parchment.
- Put the (empty) bowl of your stand mixer on the scales and make a note of the weight.
- Put the flour, sugar, baking powder and salt in the bowl of your stand mixer and briefly beat together with the paddle attachment on low speed to combine.
- Add the cubed butter and beat on low speed until the mixture resembles coarse sand.
- In a measuring jug, mix together the milk, egg whites and extracts.
- Add the liquid ingredients into the batter, in three stages, mixing well on low speed after each addition. Increase the speed and mix for a couple of minutes until batter is smooth.
- Weigh your (full) mixing bowl again and subtract the weight of the empty bowl. Divide the weight of the batter into 3 or 4 depending on how many cake tins you are using.
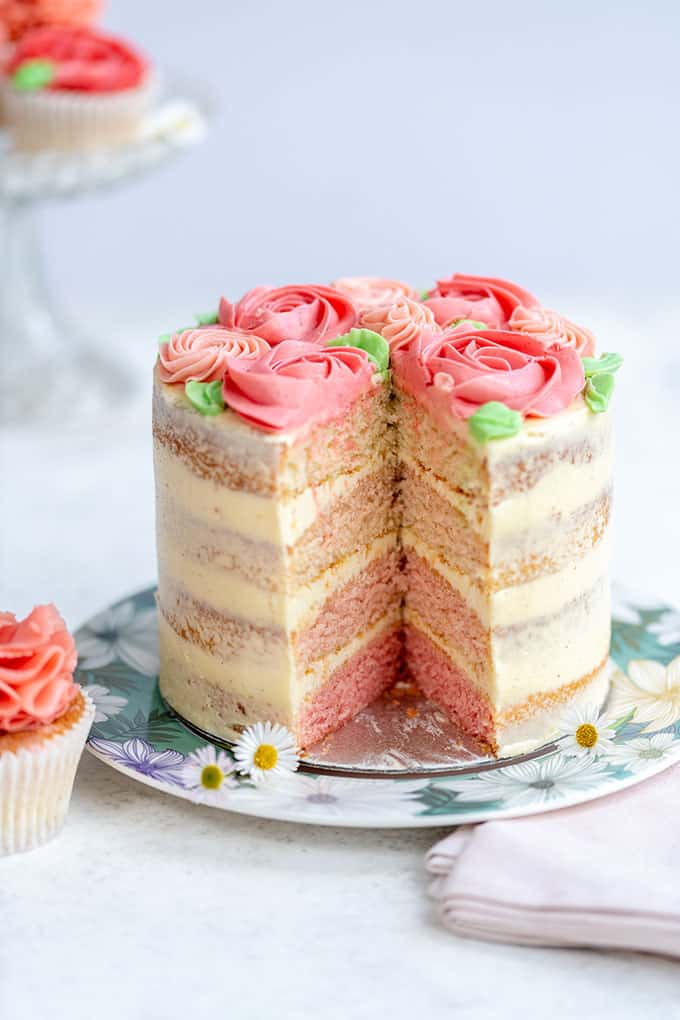
- Fill one prepared cake tin with untinted batter. This is your white layer.
- Put a ladleful of the batter in a small bowl and use pink paste food colouring to create a fairly strong pink shade.
- Add a small amount of your prepared pink batter to the mixing bowl and mix really well until you have a pale pink. Don’t make the shade too subtle - compare it to your white layer. Add this to the second tin.
- Add more of the tinted batter to build up the colour for your third layer and pour same amount into third your tin.
- Now tint your final layer and put into fourth tin.
- Bake for 20-25 minutes or until the cakes are well risen, firm on top and coming away from the sides of the tin. A skewer inserted in the centre should come out clean.
- Cool in the tins for 10 minutes and then carefully turn out on a wire rack lined with baking paper (the cake layers are quite sticky). Cool completely before frosting.
Make the buttercream
- Put the egg whites, icing sugar, vanilla paste and salt in the bowl of your stand mixer. Use the paddle attachment to beat together until thoroughly combined, about a a minute. Scrape the bottom and sides of the bowl if needed.
- Gradually add room temperature unsalted butter, one chunk at a time, beating on medium-low until all the butter is incorporated. Use a spatula to scrape the bottom and sides of the bowl as well as the paddle.
- Increase the speed slightly (not all the way to maximum, around 5 or 6 on dial) and beat for about 5-10 minutes until the buttercream is fluffy, smooth and silky.
- Transfer 2/3 of the buttercream to a piping bag fitted with a round tip to assemble the cake.
- Divide the remaining buttercream in two medium bowls and one small bowl and tint two shades of pink (for buttercream roses) and a green (for leaves).
Assemble the cake
- Use a little buttercream to stick a cake board onto a turntable. Add a dot of the frosting on the cake board and secure your bottom layer on it (I stacked them from darkest layer to lightest).
- Pipe an even layer of buttercream over the bottom layer, smooth with an offset spatula and sandwich with the second layer.
- Repeat the process with the third layer and top with the fourth. Make sure the stacked cake is flat on top and all the layers are even. If not you can nudge the layers slightly to make sure cake is level.
- Pipe more frosting over the top layer and use the offset spatula to smooth the buttercream so that it comes over the sides.
- Add more buttercream to the sides of the cake and smooth it to cover the cake completely. Use a pastry scraper (icing smoother to smooth the frosting. This is your crumb coating and you can stop here for a semi-naked cake effect.
OPTIONAL: Chill for 15 minutes then add another layer of buttercream to completely cover the cake. - Transfer the tinted buttercream into three piping bags fitted with a Wilton Open Star Piping Tip #1M to create the roses and a Wilton Open Star Piping Tip #32 for smaller rosettes and Wilton Leaf Tip, 352 for the green leaves. Create the decorations on top of the cake.
- Carefully transfer to a cake platter or stand. Serve immediately or keep chilled until needed. Bring back to room temperature before serving.
Video
Notes
OMBRE CAKE TIPS, TRICKS and FAQs
How to store the cake:put in a cake carrier and store at room temperature out of direct sunlight if the weather is cool. Store in the fridge for up to 3 days but bring back to room temperature before serving.
Can I make the cake in advance? The unfrosted cake layers can be made up to two days in advance and stored at room temperature. Place them on a piece for greaseproof paper, cover with another layer of greaseproof paper and cover with a clean towel. The layers are quite sticky so it would be best not to stack them.
How to store the buttercream:store the buttercream in the fridge for two weeks or freezer for up to 6 weeks. Bring back to room temperature and beat it again so that it is creamy and ready to use again.
Layer cake essentials: I have used four 15cm (6in) cake tins but you could also use three 18cm (7in) cake tins. A cake turntable is useful when frosting the cake but not essential. If you are creating the buttercream decorations then you will need piping bags and tips. Take a look at my affiliate Amazon list to see the products I used.
I want to make a blue ombre cake!You can tint this cake any colour you like to make a gender reveal cake or to suit a party theme. This cake is perfect for any celebrations: birthdays, baby showers, weddings, christenings etc.
I don't have a stand mixer...You can make the cake in a food processor fitted with a metal blade. Pulse the dry ingredients with the butter to achieve the sandy consistency. Gradually add the wet ingredients and mix until batter is smooth. You will need a stand or hand mixer for the buttercream however.
Nutrition
Calories: 928kcal | Carbohydrates: 105g | Protein: 7g | Fat: 55g | Saturated Fat: 34g | Cholesterol: 144mg | Sodium: 664mg | Potassium: 275mg | Fiber: 1g | Sugar: 83g | Vitamin A: 1830IU | Calcium: 108mg | Iron: 1.7mg