
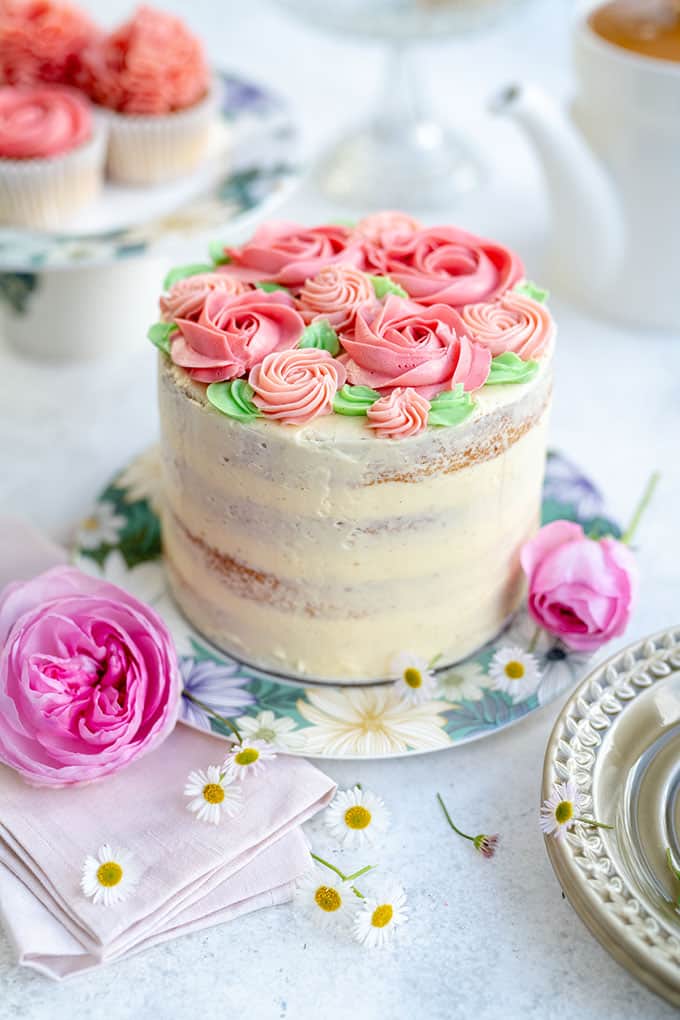
This beautiful Pink Ombre Cake with the BEST vanilla buttercream is perfect for birthdays and celebrations. Read my expert tips and watch the video on how to make the perfect ombre cake. Recipe in collaboration with Portmeirion. Post contains some affiliate links.
Try also… my dreamy Vanilla Sprinkle Cake (Funfetti Cake)
Nothing brings family and friends together better than birthdays, weddings, babies… am I right? And you know what all these occasions have in common: CAKE!
Well this Pink Ombre Cake holds a very special place in MY heart because it was the first big layer cake I made to celebrate my daughter’s birthday several years ago. She is turning 13 (!) soon – I may have to revisit this cake and make it in a more teen-appropriate shade 🙂
Loyal readers know that I have shared versions of this cake on the blog before, but I am so happy to finally include a video as well as detailed instructions and many tips on how to make an ombre cake.
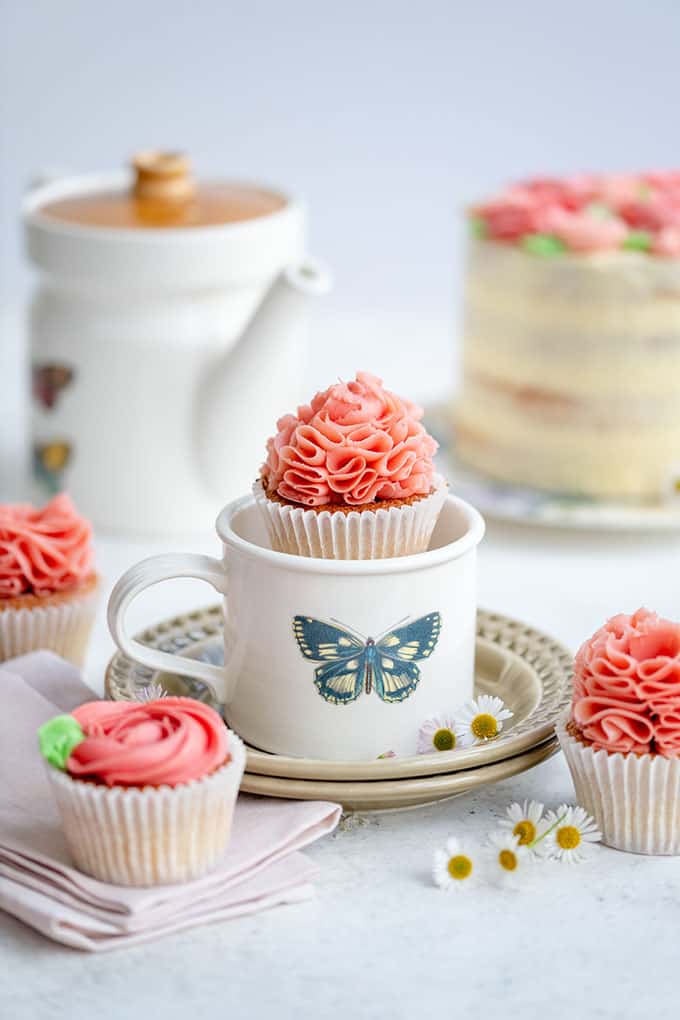
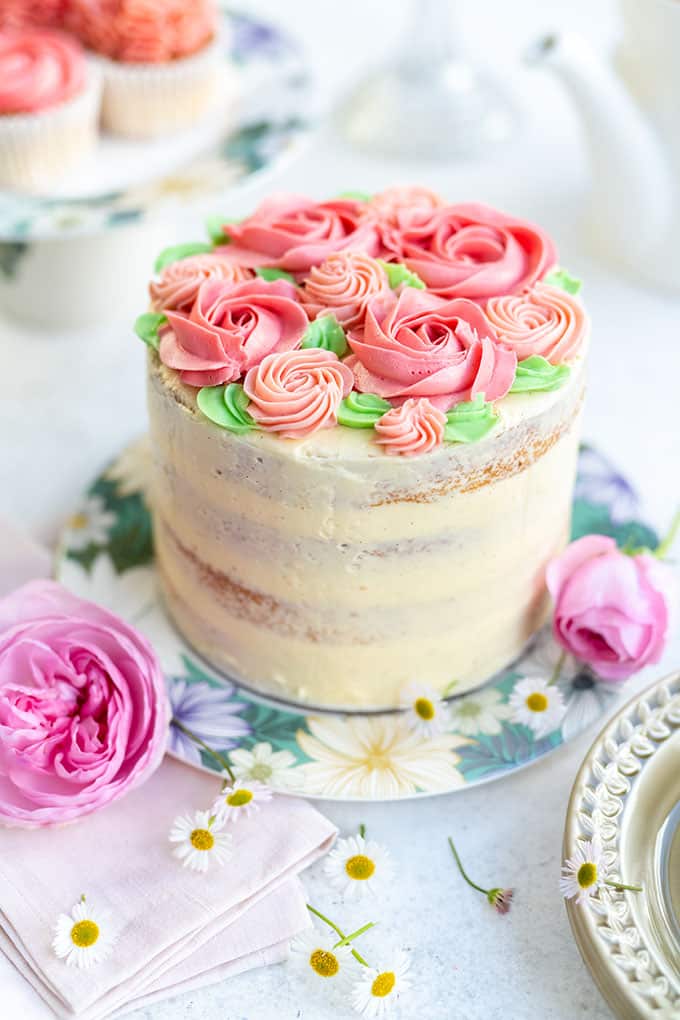
I have displayed my pink creation on beautiful Portmeirion tableware from the Botanic Garden Harmony and Atrium collections. I especially love the butterfly cups, perfect for summer Afternoon Tea don’t you think? Tag your photos with #gettogether on Instagram to be added to their gallery.
What IS an ombre cake?
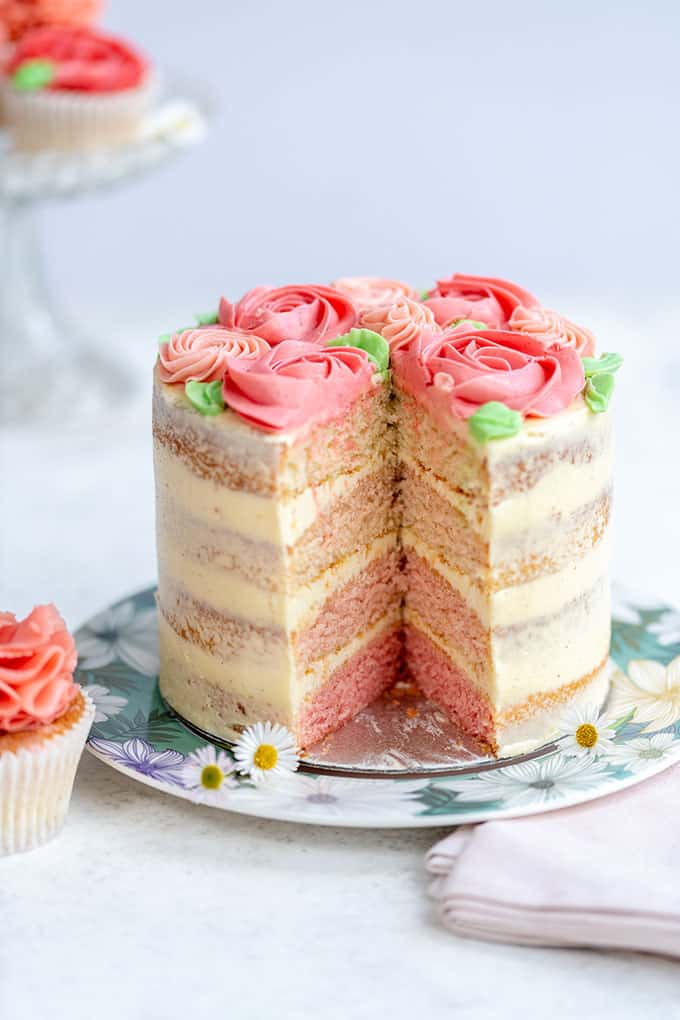
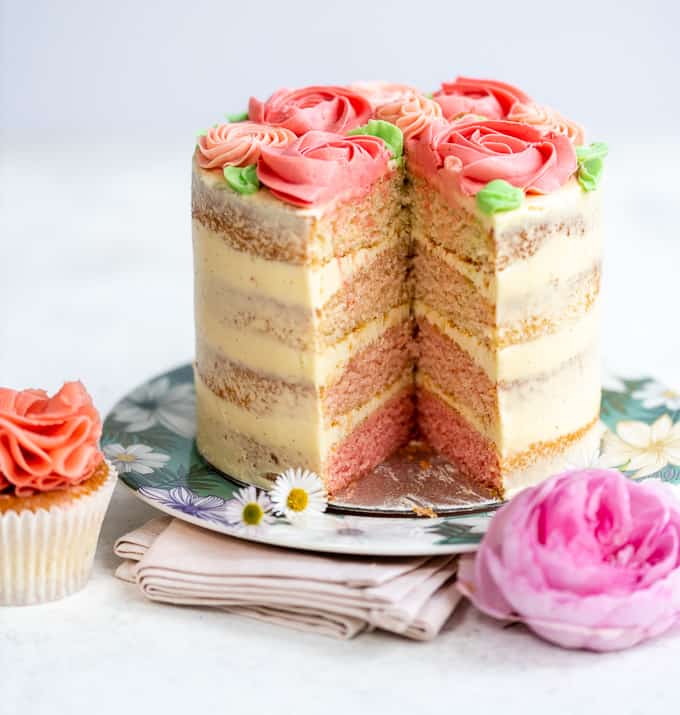
Ombré means shaded in French and ombre cakes have layers with subtle colour graduations. The ombre sometimes also refers to the frosting which is similarly tinted.
Ombre cakes can come in any colour so you can customise them as you like… but pink ombre cakes are the prettiest in my, admittedly biased, opinion.
Best cake recipe for ombre cakes
Not all cakes are suitable for this ombre technique. You must start with a white cake recipe as this will best show off the colour.
The best white cake recipe uses egg whites and a reverse creaming method to ensure a buttery moist crumb. As an even bigger bonus it is so easy to make, even novice bakers will find it foolproof.
50 shades of pink – food colouring tips
In this recipe you can choose between gel food colouring such as Americolor or paste food colouring such as Wilton or Sugarflair.
- Gel food colouring is easier to use but can be very strong so it’s harder to control. I think it is best suited to rainbow cakes where you want really vibrant colours that pop.
- Paste food colouring is a bit more fiddly but allows you to build the colour strength more gradually. Always start with a small amount and increase until you have your desired tint. I find it best to mix the colouring with a small amount of batter (or buttercream) in a separate bowl and use that to colour your cake lakers or frosting. This allows you to gradually build the tint of cake layers without having to separate the batter into bowls – hey, anything that cuts down on washing up!

Which frosting to use
You can use your favourite frosting in this cake: cream cheese, American buttercream or meringue buttercream all work well.
My absolutely favourite frosting at the moment is also one of the easiest – a sort of love child between American buttercream and Swiss meringue buttercream. I am so enamoured with this cheat’s Swiss Meringue Buttercream that I will devote an entire post to it soon.
All you need to know for now is that has the silky consistency of Swiss Meringue Buttercream without any of the work – or any meringue in fact.
It combines egg whites with icing sugar and indecent amounts of butter to create a very stable buttercream that is incredibly easy to make, a dream to pipe and delicious to eat.
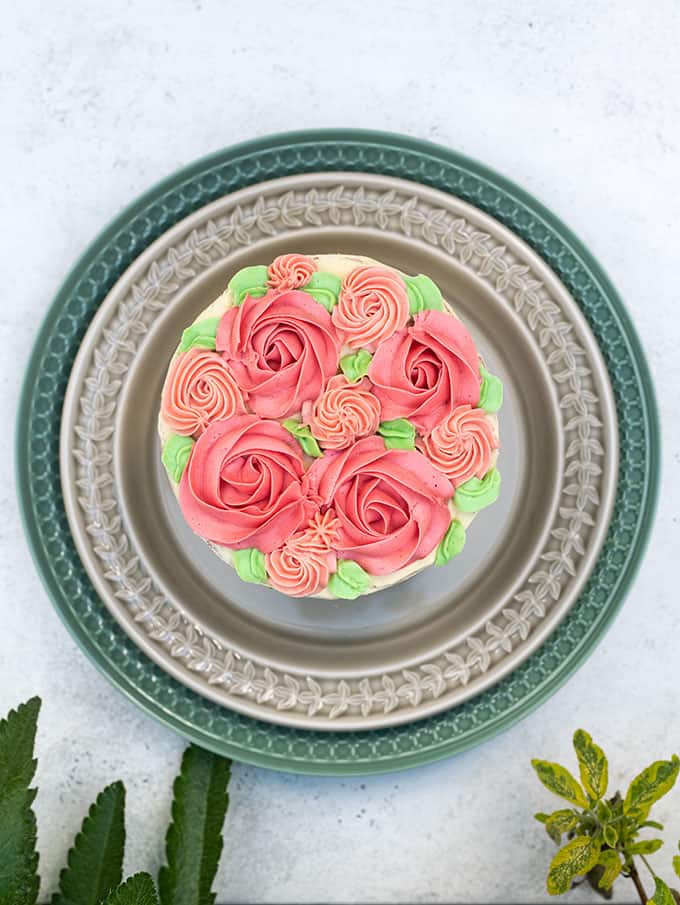
The recipe makes a generous amount of buttercream so you will have more than enough if you wish to frost the cake with rosettes or ruffles or add buttercream roses as decorations on the top as I have done.
How to make white buttercream
Since the buttercream contains a lot of butter – the clue is in the name! – it will not be a pure white but a creamy colour. If you want to create a pure white buttercream you can add some Sugarflair Superwhite Icing Whitener (Wilton also do a similar product).
Another tip is to add clear vanilla extract or balance the colour with a little purple as this post from She Who Bakes suggests.
HOW TO DECORATE AN OMBRE CAKE
This is such a pretty cake and you have many options on how to decorate it – here’s some ideas:
- BUTTERCREAM DECORATIONS: tint the buttercream and pipe roses over the top of the cake as I have done. Or you could pipe ruffles over the top of the cake using Russian piping tips as I have done in this Chocolate Cake with Italian buttercream.
Top tip: practice your decorations on a silicone mat until you are happy with your technique. - FRESH FLOWERS: roses, lilacs or other fresh flowers would look stunning on this pink ombre layer cake. Make sure you use unsprayed flowers, ask your florist for suitable ones. You can also use edible flowers such as pansies and sweet geranium.
- SPRINKLES, MERINGUE KISSES, MACARONS, COOKIES: Match them to your ombre colouring – take a look at this Winter Wonderland Cake for inspiration.
How to make a Pink Ombre Cake
Full measurements and instructions can be found on the printable recipe card at the bottom of the page. Please take a look at the steps and video before attempting this recipe!
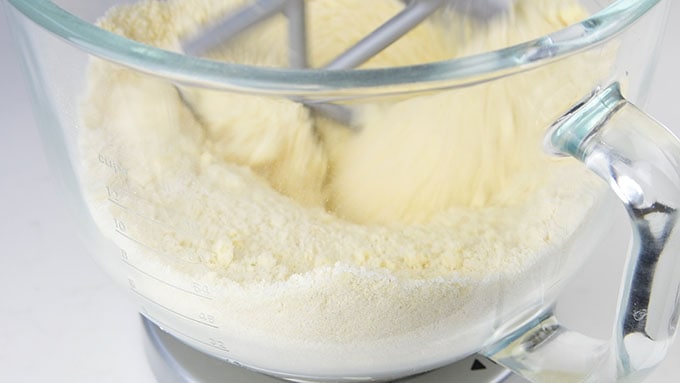
STEP 1. Put the dry ingredients (flour, sugar, baking powder, salt) in the bowl of your stand mixer and use a balloon whisk to combine or briefly mix using the paddle attachment.
STEP 2. Add the cubed butter and beat using the paddle attachment on low speed until you have a sandy texture with no dry pockets of flour.
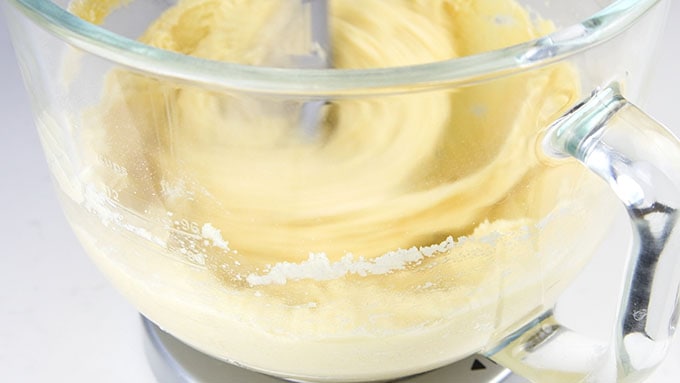
STEP 3. Mix your wet ingredients (egg whites, milk, vanilla and almond extracts) in a measuring jug. Add half the liquid ingredients and mix on low for 30 seconds. Use a spatula to scrape the sides of the bowl. Continue mixing on medium for 30 seconds.
STEP 4. Add remaining milk and mix on low initially then increase the speed to high and mix for a minute. Scrape bottom and sides of the bowl and mix again.
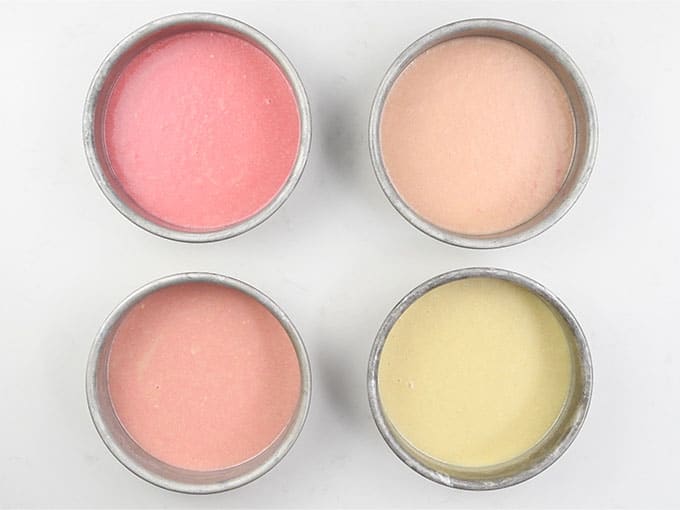
STEP 5. Fill one prepared cake tin with 230g (8oz)* of the batter for your white layer – *this only applies if you are making four layers. Weigh your stand mixer bowl empty and then weigh again when full. Subtract the empty weight from the full to calculate the amount of better then divide that into however many tins you are using.
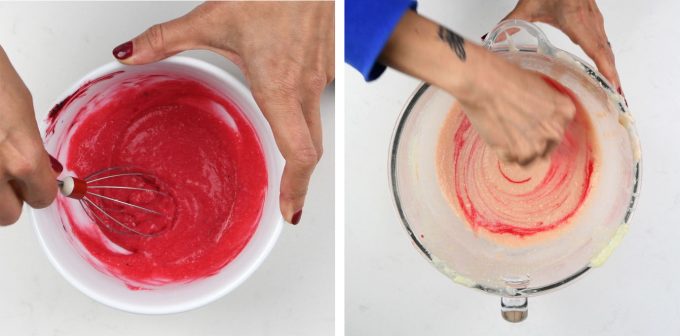
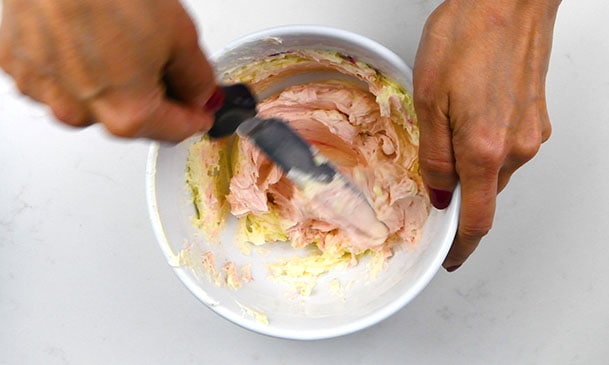
STEP 6. Put a ladleful of the batter in a small bowl and use pink paste food colouring to create a strong pink shade.
STEP 7. Add a small amount of your prepared pink batter to the mixing bowl and mix really well until you have a pale pink. Don’t make the shade too subtle as I did – compare it to your white layer. Put in your second cake tin.
STEP 8. Add more of the tinted batter to build up the colour for your third layer and pour same amount into third your tin.
STEP 9. Now tint your final layer and put into fourth tin.
STEP 10. Bake for 23-25 minutes until cakes are springy to the touch and a skewer inserted in center comes out clean.
STEP 11. Cool in the tins for 10 minutes. Run a knife around the tin edge and carefully invert onto a wire rack lined with greaseproof paper. Leave to cool completely before frosting.
How to make the best vanilla buttercream (mock Swiss meringue buttercream)
STEP 1. Put the egg whites, icing sugar, vanilla paste and a little salt in the bowl of your stand mixer. Use the paddle attachment to beat together until thoroughly combined.
STEP 2. Gradually add room temperature unsalted butter, one chunk at a time, beating on medium-low until all the butter is incorporated. Use a spatula to scrape the bottom and sides of the bowl as well as the paddle.
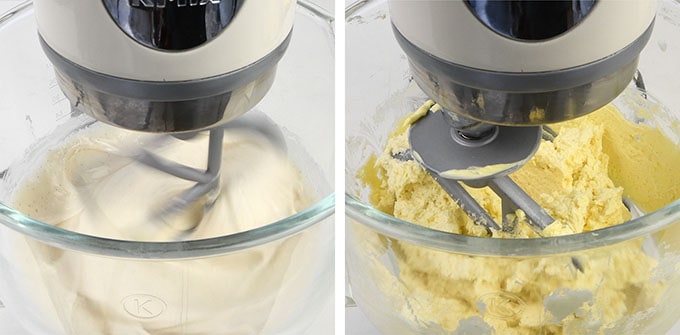
STEP 3. Increase the speed slightly (not all the way to maximum, around 5 or 6 on dial) and beat for about 5-10 minutes until the buttercream is fluffy, silky and holds peaks.
STEP 4. Transfer 2/3 of the buttercream to a piping bag fitted with a plain round tip to assemble the cake.

STEP 5: Divide remaining buttercream between two medium bowls and one small bowl. Tint the buttercream in the large bowls two shades of pink and the small bowl green to decorate the top of the cake. Use a small offset spatula to mix in the colouring paste.
HOW TO ASSEMBLE A PINK OMBRE CAKE
STEP 1. Use a little buttercream to stick a cake board onto a turn table. Add a dot of the frosting on the cake board and secure your bottom layer on it (I stacked them darkest layer to lightest).
STEP 2. Pipe an even layer of butter cream over the bottom layer, smooth with an offset spatula and sandwich with the second layer.
STEP 3. Repeat the process with the third layer and top with the fourth. Make sure the stacked cake is flat on top and all the layers are even. If the cake is a tilting slightly (most of my cakes do!) you can nudge the layers slightly to make sure cake is level.
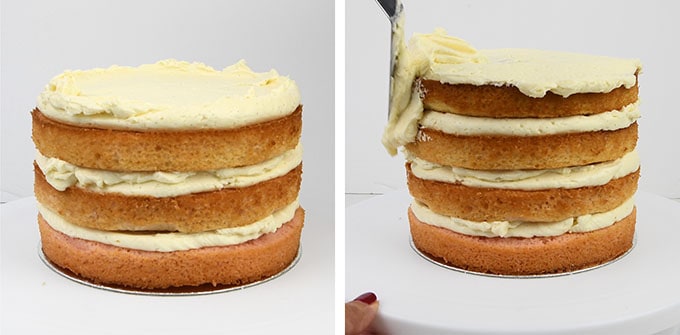
STEP 4. Pipe more frosting over the top layer and use the offset spatula to smooth the buttercream so that it comes over the sides.
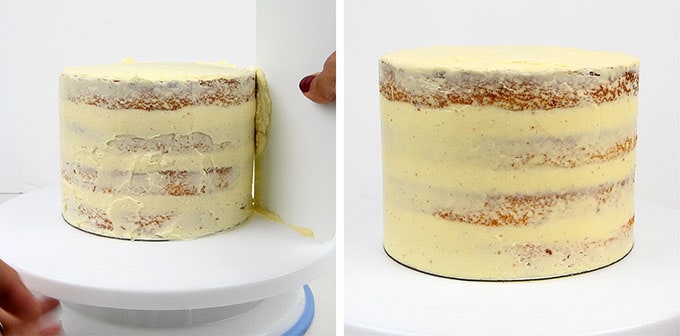
STEP 5. Add more buttercream to the sides of the cake and smooth it to cover the cake completely. Use a pastry scraper (icing smoother) to smooth the frosting. This is your crumb coating and you can stop here for a semi-naked cake effect where a hint of the sponge shows through. OPTIONAL Chill the crumb-coated cake for 15 minutes then add another layer of buttercream to completely cover the cake.
STEP 6. Transfer the tinted buttercream into three piping bags fitted with a Wilton Open Star Piping Tip #1M to create the roses and a Wilton Open Star Piping Tip #32 for smaller rosettes and Wilton Leaf Tip, 352 for the green leaves. Create the decorations on top of the cake and carefully transfer to a cake plate or stand. Serve immediately or keep chilled until needed.
OMBRE CAKE TIPS, TRICKS and FAQs
- How to store the cake: put in a cake carrier and store at room temperature out of direct sunlight (only IF the weather is cool). Store in the fridge for up to 3 days but bring back to room temperature before serving.
- Cake I bake the cake in advance? the cake layers can be made up to two days in advance and stored at room temperature. Place them on a piece for greaseproof paper, cover with another layer of greaseproof paper and cover with a clean towel. The layers are quite sticky so it would be best not to stack them.
- How to store the buttercream: store the buttercream in the fridge for two weeks or freezer for up to 6 weeks. Bring back to room temperature and beat it again so that it is creamy and ready to use.
- Layer cake essentials: I have used four 15cm (6in) cake tins but you could also use three 18cm (7in) cake tins. A cake turntable is useful when frosting the cake but not essential. If you are creating the buttercream decorations then you will need piping bags and tips. Take a look at my affiliate Amazon list to see the products I used.
- I want to make a blue ombre cake! You can tint this cake any colour you like to make a gender reveal cake or to suit a party theme. This cake is perfect for any celebrations: birthdays, baby showers, weddings, christenings etc.
- Can I use this recipe to make a rainbow cake? This recipe is perfect for a rainbow cake! Double the cake recipe to bake 6 or 7 layers and use gel food colouring for the layers (Wilton and Americolor have colouring kits suitable for rainbow cakes). You can probably get away with just the one batch of the buttercream.
- I don’t have a stand mixer… You can make the cake in a food processor fitted with a metal blade. Pulse the dry ingredients with the butter to achieve the sandy consistency. Gradually add the wet ingredients and mix until batter is smooth. You will need a stand or hand mixer for the buttercream however.
- So many egg whites! Both the cake and the frosting contain egg whites. I recommend using pasteurised egg whites from a carton for this recipe. Much easier to use, safe and you won’t be left with a dozen egg yolks.
Have you made my pink ombre cake?
Post a photo on my Facebook page, share it on Instagram, or save it to Pinterest with the tag #supergoldenbakes. I can’t wait to see your take on it!
Pink Ombre Cake with Mock Swiss Buttercream Frosting
Ingredients
- 340 g (1 3/4 cups) sugar granulated or caster sugar
- 255 g ( 2 1/4 cups) plain flour
- 4 tsp baking powder
- 1/2 tsp salt
- 170 g (1 1/2 sticks) unsalted butter cold and cubed
- 240 ml (1 cup) whole milk ideally room temperature
- 180 ml (3/4 cup) pasteurised liquid egg whites or from 6 eggs
- 2 tsp almond extract
- 1 tsp vanilla extract
- pink paste food colouring
For the buttercream
- 180 ml (3/4 cup) pasteurised liquid egg whites or from 6 eggs
- 500 g (6 cups) icing sugar
- 500 g (3 cups) unsalted butter room temperature
- 1 tbsp vanilla extract
- 1/4 tsp salt
Instructions
- Preheat the oven to 180C. Spray 4 x15cm/6in cake tins (or 3x20cm/8in tins) with cake release and line with baking parchment.
- Put the (empty) bowl of your stand mixer on the scales and make a note of the weight.
- Put the flour, sugar, baking powder and salt in the bowl of your stand mixer and briefly beat together with the paddle attachment on low speed to combine.
- Add the cubed butter and beat on low speed until the mixture resembles coarse sand.
- In a measuring jug, mix together the milk, egg whites and extracts.
- Add the liquid ingredients into the batter, in three stages, mixing well on low speed after each addition. Increase the speed and mix for a couple of minutes until batter is smooth.
- Weigh your (full) mixing bowl again and subtract the weight of the empty bowl. Divide the weight of the batter into 3 or 4 depending on how many cake tins you are using.
- Fill one prepared cake tin with untinted batter. This is your white layer.
- Put a ladleful of the batter in a small bowl and use pink paste food colouring to create a fairly strong pink shade.
- Add a small amount of your prepared pink batter to the mixing bowl and mix really well until you have a pale pink. Don’t make the shade too subtle – compare it to your white layer. Add this to the second tin.
- Add more of the tinted batter to build up the colour for your third layer and pour same amount into third your tin.
- Now tint your final layer and put into fourth tin.
- Bake for 20-25 minutes or until the cakes are well risen, firm on top and coming away from the sides of the tin. A skewer inserted in the centre should come out clean.
- Cool in the tins for 10 minutes and then carefully turn out on a wire rack lined with baking paper (the cake layers are quite sticky). Cool completely before frosting.
Make the buttercream
- Put the egg whites, icing sugar, vanilla paste and salt in the bowl of your stand mixer. Use the paddle attachment to beat together until thoroughly combined, about a a minute. Scrape the bottom and sides of the bowl if needed.
- Gradually add room temperature unsalted butter, one chunk at a time, beating on medium-low until all the butter is incorporated. Use a spatula to scrape the bottom and sides of the bowl as well as the paddle.
- Increase the speed slightly (not all the way to maximum, around 5 or 6 on dial) and beat for about 5-10 minutes until the buttercream is fluffy, smooth and silky.
- Transfer 2/3 of the buttercream to a piping bag fitted with a round tip to assemble the cake.
- Divide the remaining buttercream in two medium bowls and one small bowl and tint two shades of pink (for buttercream roses) and a green (for leaves).
Assemble the cake
- Use a little buttercream to stick a cake board onto a turntable. Add a dot of the frosting on the cake board and secure your bottom layer on it (I stacked them from darkest layer to lightest).
- Pipe an even layer of buttercream over the bottom layer, smooth with an offset spatula and sandwich with the second layer.
- Repeat the process with the third layer and top with the fourth. Make sure the stacked cake is flat on top and all the layers are even. If not you can nudge the layers slightly to make sure cake is level.
- Pipe more frosting over the top layer and use the offset spatula to smooth the buttercream so that it comes over the sides.
- Add more buttercream to the sides of the cake and smooth it to cover the cake completely. Use a pastry scraper (icing smoother to smooth the frosting. This is your crumb coating and you can stop here for a semi-naked cake effect.
OPTIONAL: Chill for 15 minutes then add another layer of buttercream to completely cover the cake. - Transfer the tinted buttercream into three piping bags fitted with a Wilton Open Star Piping Tip #1M to create the roses and a Wilton Open Star Piping Tip #32 for smaller rosettes and Wilton Leaf Tip, 352 for the green leaves. Create the decorations on top of the cake.
- Carefully transfer to a cake platter or stand. Serve immediately or keep chilled until needed. Bring back to room temperature before serving.
Leave a Reply